1. Introduction
Managing database code changes across environments can quickly become complex. When SQL scripts are deployed manually, there is always a risk of missing a change, running scripts out of order, or overwriting updates made by other developers.
These challenges can be addressed using a database change management tool that brings structure and automation to the deployment process. schemachange is one such tool designed specifically for Snowflake.
In this article, we’ll explore how to set up and use SchemaChange on your local machine to deploy SQL changes across Snowflake environments. In Part 2, we’ll explore how to automate this process using GitHub Actions.
2. What is Snowflake schemachange?
schemachange is an open-source python-based Database Change Management Tool built specifically for Snowflake. It helps automate and manage database changes in a version controlled, repeatable, and auditable manner ensuring that your database structure stays consistent across all environments integrating easily into your CI/CD pipelines.
3. How to Implement Snowflake schemachange?
Follow below steps to install and configure Snowflake schemachange locally on your machine to automate and deploy SQL code components across all environments.
3.1. Install Python
schemachange is a Python-based utility. Start by installing Python 3.8 or later on your system. The latest version of the python can be downloaded and installed from the Downloads section of official Python website. This allows us to run the schemachange command-line interface (CLI).
To verify if Python is installed on your machine, open the Command Prompt (Start → cmd) and run the following command.
python --version3.2. Install Schemachange
Once Python is set up, execute the following command in the terminal to install schemachange using pip.
pip install schemachangeTo verify that schemachange is installed successfully, run the following command. It lists the various commands and options supported using the schemachange.
schemachange --h3.3. Folder Structure for SQL Scripts Deployment
Schemachange expects the SQL scripts to be organized in a folder structure like the following.
(root-folder)
├─ V0
│  ├─ V0_1__first_script.sql
│  ├─ V0_2__second_script.sql
│
├─ V1
│  ├─ V1_1__third_script.sql
│  ├─ V1_2__fourth_script.sql
│ ├─ V1_3__fifth_script.sqlThe root-folder can be any directory where you choose to store your SQL scripts. You can create as many subfolders (e.g., V0, V1, etc.) as needed, each containing multiple SQL files.
Schemachange is flexible in how you version and name your scripts, but for this example, we’ll use the following naming convention:
- Prefix: The letter V indicates a versioned change.
- Version: A unique version number, with parts separated by underscores. (e.g., 1_1, 1_2, etc.)
- Separator: Two underscores __ separating the version and description.
- Description: A brief description of the change, with words separated by underscores or spaces (cannot include two consecutive underscores).
- Suffix: The file extension .sql.
Schemachange executes the scripts in ascending order of version numbers, ensuring each change is applied sequentially.
3.4. Create connections.toml file
The connections.toml file stores Snowflake connection details like account, user, role, and warehouse. This configuration allows schemachange to securely connect to your Snowflake environment.
The following is an example connection.toml file used for the demonstration which connects to DEV environment.
[dev]
account = "ecuueyj-eqc77006"
user = "SFUSER28"
password = "********"
warehouse = "COMPUTE_WH"
database = "demo_db_dev"
schema = "public"
role = "sysadmin"Each section (e.g., [dev]) represents a specific environment. You can define additional sections like [uat] or [prod] for other environments.
Note that we would be using demo_db_dev, demo_db_uat and demo_db_prod databases for the schemachange demonstration.
3.5. Setup schemachange YAML Configuration File
By default, schemachange expects a YAML configuration file named schemachange-config.yml to be located in the current working directory.
For this demonstration, we’ll create a folder named schemachange and organize all related components including SQL scripts, the connections.toml file, and the YAML configuration file inside it as shown below.
# Folder structure in schemachange demo
schemachange
├── connection
│   └── connections.toml
├── db_scripts
│   ├── V0
│   │   ├── V0_1__create_table.sql
│   │   └── V0_2__alter_table.sql
│   └── V1
│       └── V1_1__insert_records.sql
└── schemachange-config.ymlThe following is the YAML configuration file used for this demonstration based on the folder structure defined above.
config-version: 1

# The root folder for the database change scripts
root-folder: 'C:\schemachange\db_scripts'

# The modules folder for jinja macros and templates to be used across multiple scripts.
modules-folder: null

# Override the default connections.toml file path at snowflake.connector.constants.CONNECTIONS_FILE (OS specific)
connections-file-path: 'C:\schemachange\connection\connections.toml'

# Override the default connections.toml connection name. Other connection-related values will override these connection values.
connection-name: '{{ env_var('ENV') }}'

# Used to override the default name of the change history table (the default is METADATA.SCHEMACHANGE.CHANGE_HISTORY)
change-history-table: 'demo_db_{{ env_var('ENV') }}.SCHEMACHANGE.CHANGE_HISTORY'

# Define values for the variables to replaced in change scripts. vars supplied via the command line will be merged into YAML-supplied vars
vars:
  database: 'DEMO_DB_{{ env_var('ENV') }}'

# Create the change history schema and table, if they do not exist (the default is False)
create-change-history-table: true

# Enable autocommit feature for DML commands (the default is False)
autocommit: false

# Display verbose debugging details during execution (the default is False)
verbose: true

# Run schemachange in dry run mode (the default is False)
dry-run: false

# A string to include in the QUERY_TAG that is attached to every SQL statement executed
query-tag: 'QUERY_TAG'
The following are key configuration details that should be adjusted as per your working directory and database details.
- root-folder:
As shown in the folder structure, all our SQL scripts are stored in the'C:\schemachange\db_scripts'directory. - connections-file-path:
The connection details are stored in'C:\schemachange\connection\connections.toml'file - connection-name:
Specifies the connection to use from the connections.toml file.- Its value is dynamically set using an environmental variable
ENVreferenced using{{ env_var('ENV') }}syntax. - The value to the ENV variable is set during the execution from the command line.
- Its value is dynamically set using an environmental variable
- change-history-table:
schemachange records details of all the executed SQL scripts in a change history table.- By default, this table is
METADATA.SCHEMACHANGE.CHANGE_HISTORYtable.The change history table name can be overridden in the config YAML file using change-history-table configuration.
- In this demo, we parameterized the
databasename of change history table using{{ env_var('ENV') }}so that it adapts to different environments (dev, uat, prod).
- By default, this table is
- vars:
The variables defined here can be referenced within SQL scripts.- In this demo, we have defined a variable named
databasewhich dynamically resolves based on the environment variableENV.
- Create additional variables as per your need.
- In this demo, we have defined a variable named
- create-change-history-table:
Set this to true automatically create the change history table if it doesn’t already exist.
The rest of the configurations can be adjusted as per your requirement.
3.6. Setup SQL Scripts for Deployment
The following SQL scripts are setup for the demonstration as defined in the folder structure in the previous section.
V0_1__create_table.sql
- The script creates a test table.
create or replace table {{ database }}.public.test(id number);V0_2__alter_table.sql
- The script adds a new column in the test table.
alter table {{ database }}.public.test add column name varchar;V1_1__insert_records.sql
- The script adds sample records into test table.
insert into {{ database }}.public.test values(1, 'abc');
insert into {{ database }}.public.test values(2, 'xyz');The {{ database }} variable is dynamically replaced at runtime based on your YAML configuration.
3.7. Execute schemachange
Using the schemachange CLI command, the SQL scripts from your local directory can be deployed into target Snowflake environment.
The schemachange can be executed from the command line using schemachange deploy command. It also supports various options in conjunction which can be listed using schemachange --h command.
Follow the steps below to execute schemachange based on our current configuration.
STEP-1: Navigate to schemachange directory
cd C:\schemachangeSTEP-2: Set the Environmental Variable
The ENV variable defines which connection to use from the connections.toml file and dynamically assigns the value for the database variable defined in the YAML configuration.
Set it to dev to deploy changes to the development environment.
set ENV=devSTEP-3: Deploy the changes using schemachange
The SQL scripts can be deployed using the schemachange deploy command. The --config-folder . option specifies that the current working directory contains the schemachange configuration files.
schemachange deploy --config-folder .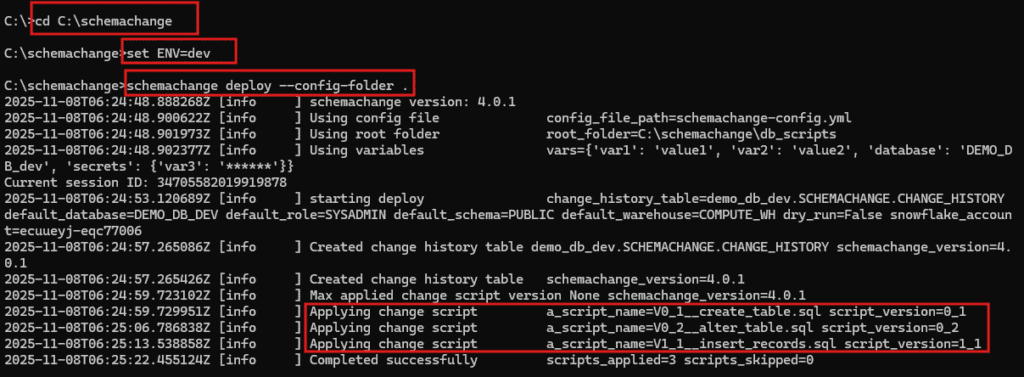
STEP-4: Verify CHANGE_HISTORY Table
All successfully executed scripts are logged in the CHANGE_HISTORY table for tracking and audit purposes.
The following SQL query returns list of all successfully executed scripts using schemachange.
SELECT * FROM DEMO_DB_DEV.SCHEMACHANGE.CHANGE_HISTORY;
3.8. Deploying Changes to UAT and PROD
After successfully deploying the SQL scripts to the DEV environment, you can promote the same changes to higher environments, UAT and PROD.
Ensure that the connection details for both environments are properly configured in the connections.toml file.
If you are using Key pair authentication to connect to Snowflake, include the private key file path and password as shown in the example below:
[prod]
account = "ecuueyj-eqc77006"
user = "SFUSER28"
private_key_file = "C:\\schemachange\\connection\\rsa_key.pem"
private_key_file_pwd = "*******"
warehouse = "COMPUTE_WH"
database = "demo_db_prod"
schema = "public"
role = "sysadmin"To deploy changes to the UAT environment, run:
cd C:\schemachange
set ENV=uat
schemachange deploy --config-folder .To deploy changes to the PROD environment, run:
cd C:\schemachange
set ENV=prod
schemachange deploy --config-folder .schemachange will automatically connect to the respective environment, execute only the pending scripts, and record the deployment details in the environment’s change history table.
4. Conclusion
In this article, we walked through how to set up and use Snowflake schemachange locally to automate the deployment of SQL scripts across different environments. We started from installing Python and schemachange, setting up configuration files like connections.toml and schemachange-config.yml, organizing SQL scripts, and finally executing the deployments to DEV, UAT, and PROD environments.
In the next article, we’ll take this a step further demonstrating how to fully automate the schemachange deployment process using GitHub Actions, integrating it into a CI/CD workflow for continuous and hands-free Snowflake database change management.
Subscribe to our Newsletter !!
Related Articles:
- Overview of Snowflake Time Travel
- Snowflake Zero Copy Cloning
- Snowflake Information Schema
- Snowflake Resource Monitors
- Snowflake Virtual Warehouses
- Snowflake SnowSQL: Command Line Tool to access Snowflake
- HOW TO: Remove Duplicates in Snowflake?
- HOW TO: Get DDL of database objects in Snowflake?
- HOW TO: Find and Kill long running queries in Snowflake?
- HOW TO: Send Email Notification in Snowflake?
- Snowflake Alerts: Schedule Conditional SQL Statements
- Snowflake Tasks: Execute SQL Statements on Schedule
- Change Data Capture using Snowflake Streams
- Change Data Capture using Snowflake Dynamic Tables
- Common Table Expressions (CTEs) in Snowflake
- Introduction to Snowflake Notebooks