Consider a scenario where instead of dropping a backup table you have accidentally dropped the actual table (or) instead of updating a set of records, you accidentally updated all the records present in the table (because you didn’t use the Where clause in your update statement).
What would be your next action after realizing your mistake?
You must be thinking to go back in time to a period where you didn’t execute your incorrect statement so that you can undo your mistake.
Snowflake provides this exact feature where you could get back to the data present at a particular period of time. This feature in Snowflake is called Time Travel.
Let us understand more about Snowflake Time Travel in this article with examples.
1. What is Snowflake Time Travel?
Snowflake Time Travel enables accessing historical data that has been changed or deleted at any point within a defined period. It is a powerful CDP (Continuous Data Protection) feature which ensures the maintenance and availability of your historical data.
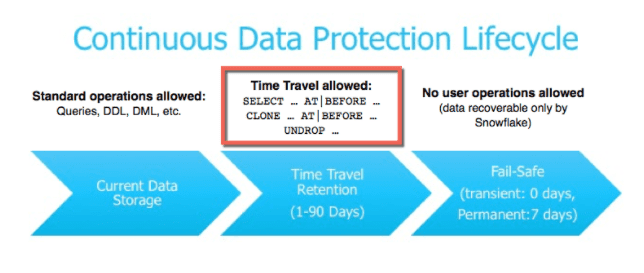
Below actions can be performed using Snowflake Time Travel within a defined period of time:
- Restore tables, schemas, and databases that have been dropped.
- Query data in the past that has since been updated or deleted.
- Create clones of entire tables, schemas, and databases at or before specific points in the past.
Once the defined period of time has elapsed, the data is moved into Snowflake Fail-Safe and these actions can no longer be performed.
2. Restoring Dropped Objects
A dropped object can be restored within the Snowflake Time Travel retention period using the “UNDROP” command.
Consider we have a table ‘Employee’ and it has been dropped accidentally instead of a backup table.
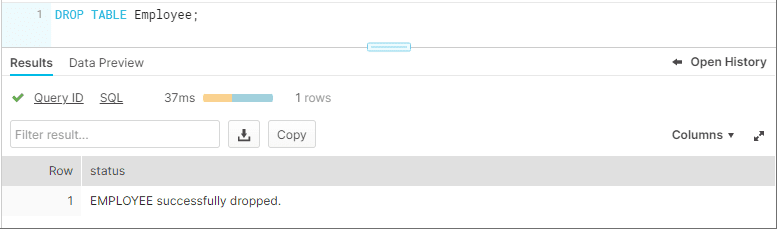
It can be easily restored using the Snowflake UNDROP command as shown below.
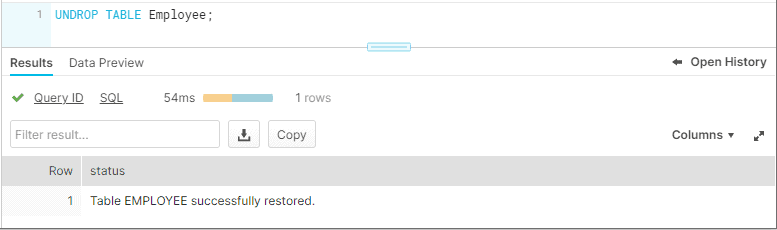
Databases and Schemas can also be restored using the UNDROP command.
UNDROP DATABASE mydatabase;

UNDROP SCHEMA myschema;

UNDROP TABLE mytable;
Calling UNDROP restores the object to its most recent state before the DROP command was issued.
3. Querying Historical Objects
When unwanted DML operations are performed on a table, the Snowflake Time Travel feature enables querying earlier versions of the data using the AT | BEFORE clause.
The AT | BEFORE clause is specified in the FROM clause immediately after the table name and it determines the point in the past from which historical data is requested for the object.
Let us understand with an example. Consider the table Employee. The table has a field IS_ACTIVE which indicates whether an employee is currently working in the Organization.
SELECT * FROM employee;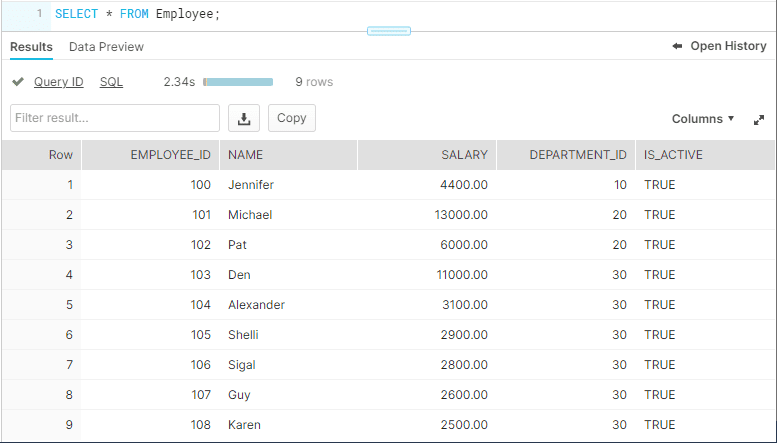
The employee ‘Michael’ has left the organization and the field IS_ACTIVE needs to be updated as FALSE. But instead you have updated IS_ACTIVE as FALSE for all the records present in the table.
UPDATE employee SET IS_ACTIVE=0;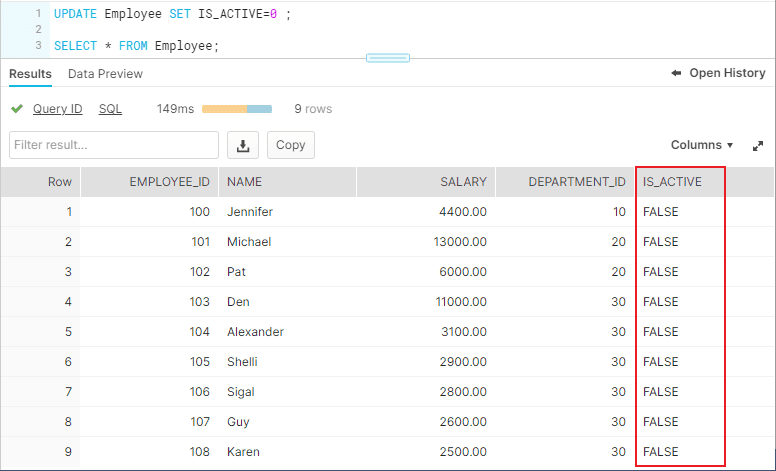
There are three different ways you could query the historical data using AT | BEFORE Clause.
3.1. OFFSET
“OFFSET” is the time difference in seconds from the present time.
The following query selects historical data from a table as of 5 minutes ago.
SELECT * FROM employee at(offset => -60*5);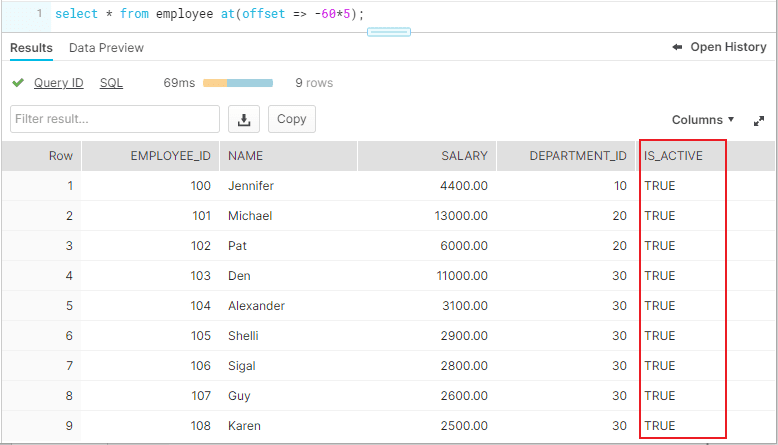
3.2. TIMESTAMP
Use “TIMESTAMP” to get the data at or before a particular date and time.
The following query selects historical data from a table as of the date and time represented by the specified timestamp.
SELECT * FROM employee at(timestamp => 'Sun, 06 Mar 2022 13:45:00 +0530'::timestamp_tz);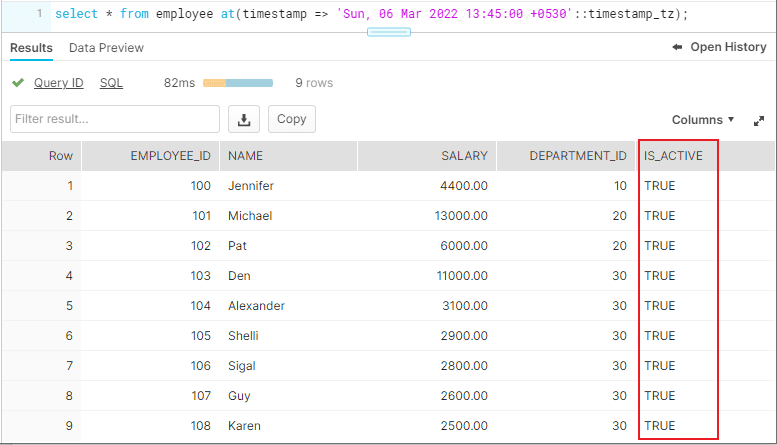
3.3. STATEMENT
Identifier for statement, e.g. query ID
The following query selects historical data from a table up to, but not including any changes made by the specified statement.
SELECT * FROM employee before(statement => '01a2b7f1-0000-214f-0000-0002ef66a941');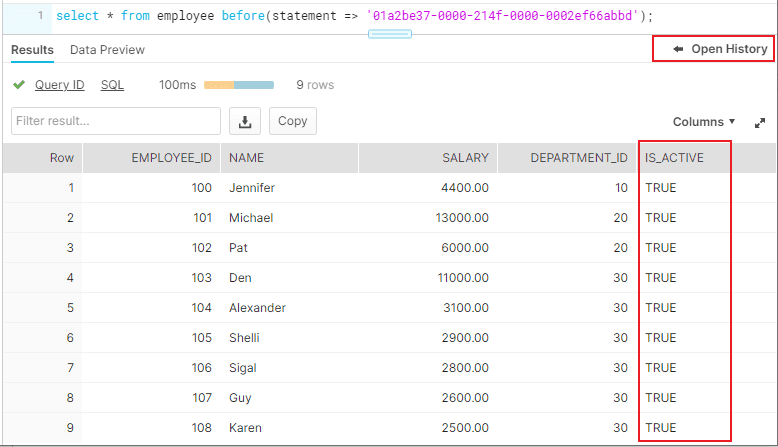
The Query ID used in the statement belongs to Update statement we executed earlier. The query ID can be obtained from “Open History”.
4. Cloning Historical Objects
We have seen how to query the historical data. In addition, the AT | BEFORE clause can be used with the CLONE keyword in the CREATE command to create a logical duplicate of the object at a specified point in the object’s history.
The following queries show how to clone a table using AT | BEFORE clause in three different ways using OFFSET, TIMESTAMP and STATEMENT.
CREATE TABLE restored_Employee_2 CLONE employee
    at(offset => -60*5);

CREATE TABLE restored_Employee CLONE employee
  at(timestamp => 'Sun, 06 Mar 2022 13:45:00 +0530'::timestamp_tz);

CREATE TABLE restored_Employee_3 CLONE employee
    before(statement => '01a2b7f1-0000-214f-0000-0002ef66a941);
To restore the data in the table to a historical state, create a clone using AT | BEFORE clause, drop the actual table and rename the cloned table to the actual table name.
5. Data Retention Period
A key component of Snowflake Time Travel is the data retention period.
When data in a table is modified, deleted or the object containing data is dropped, Snowflake preserves the state of the data before the update. The data retention period specifies the number of days for which this historical data is preserved.
Time Travel operations can be performed on the data during this data retention period of the object. When the retention period ends for an object, the historical data is moved into Snowflake Fail-safe.
| Object Type | Time-Travel Retention period (Days) | Fail-Safe period in days |
| Temporary | 0 or 1 (default is 1) | 0 |
| Transient | 0 or 1 (default is 1) | 0 |
| Permanent( Standard Edition) | 0 or 1 (default is 1) | 7 |
| Permanent( Enterprise Edition and higher) | 0 to 90 (default is configurable) | 7 |
6. How to find the Time Travel Data Retention period of Snowflake Objects?
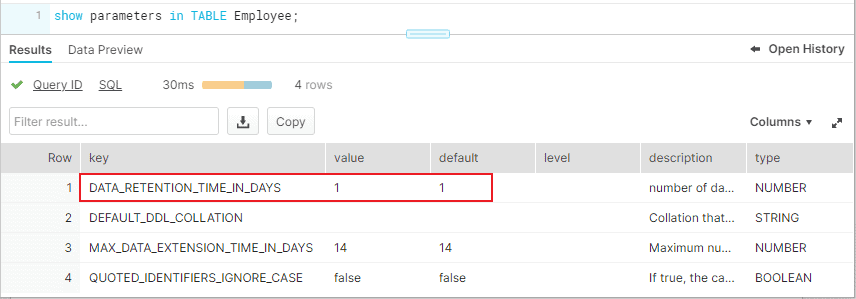
SHOW PARAMETERS command can be used to find the Time Travel retention period of Snowflake objects.
Below commands can be used to find the data retention period of data bases, schemas and tables.
SHOW PARAMETERS IN DATABASE db_name;

SHOW PARAMETERS IN SCHEMA schema_name;

SHOW PARAMETERS IN TABLE table_name;
The DATA_RETENTION_TIME_IN_DAYS parameters specifies the number of days to retain the old version of deleted/updated data.
The below image shows that the table Employee has the DATA_RETENTION_TIME_IN_DAYS value set as 1.
7. How to set custom Time-Travel Data Retention period for Snowflake Objects?
Time travel is automatically enabled with the standard, 1-day retention period. However, you may wish to upgrade to Snowflake Enterprise Edition or higher to enable configuring longer data retention periods of up to 90 days for databases, schemas, and tables.
You can configure the data retention period of a table while creating the table as shown below.
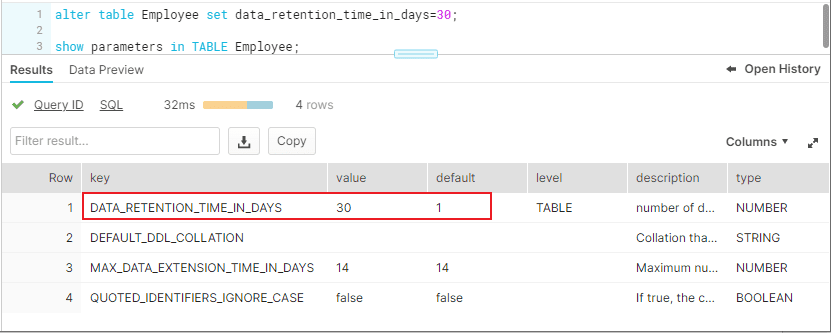
CREATE TABLE mytable(col1 NUMBER, col2 DATE) data_retention_time_in_days=90;To modify the data retention period of an existing table, use below syntax
ALTER TABLE mytable SET data_retention_time_in_days=30;The below image shows that the data retention period of table is altered to 30 days.
A retention period of 0 days for an object effectively disables Time Travel for the object.
8. Data Retention Period Rules and Inheritance
Changing the retention period for your account or individual objects changes the value for all lower-level objects that do not have a retention period explicitly set. For example:
- If you change the retention period at the account level, all databases, schemas, and tables that do not have an explicit retention period automatically inherit the new retention period.
- If you change the retention period at the schema level, all tables in the schema that do not have an explicit retention period inherit the new retention period.
Currently, when a database is dropped, the data retention period for child schemas or tables, if explicitly set to be different from the retention of the database, is not honored. The child schemas or tables are retained for the same period of time as the database.
- To honor the data retention period for these child objects (schemas or tables), drop them explicitly before you drop the database or schema.
Related Articles: