1. Introduction
Snowflake supports multiple ways of authentication apart from basic authentication method (i.e. using username and password). For enhanced security while connecting to Snowflake from other applications, Snowflake supports Key Pair authentication which uses a combination of public-private key pair.
The public and private keys required for authentication must be a minimum 2048-bit RSA key pair generated using OpenSSL. In the Key Pair authentication method the public key is assigned to the user and the user must use the private key while connecting from the Snowflake client.
How it works?
Every public key matches to only one private key. Together, they are used to encrypt and decrypt messages. Data encrypted with the private key can be decrypted only with the public key and vice versa.
When keys are used for authentication, the user being authenticated uses the private key to generate a digital signature. The client decrypts the signature using the public key and compares the hash with its own computed hash. If the values match, user authentication is successful.
2. How to generate Public and Private Keys using OpenSSL in Windows?
There are several ways of generating the public-private key pairs.
OpenSSL is an open-source command line tool that is commonly used to generate public-private key pairs. Snowflake supports keys generated through OpenSSL only.
The Keys generated using PuTTYgen or OpenSSH in Windows are not supported by Snowflake. Generate Keys by Installing OpenSSL on your Windows machine or use the exported keys from Linux machine generated using OpenSSL.
2.1. Download and Install OpenSSL on Windows
Follow below steps to install OpenSSL on Windows machine
- Navigate to OpenSSL for Windows installer page.
- Download the Windows64 Installation package.
- Once the download is complete, double-click the downloaded file to start installation.
- Accept license agreement and click Next in each step to proceed.
- Click on Install.
- Click on Finish to exit the wizard once installation is complete.
2.2. Set Environmental Variables for OpenSSL
Follow below steps to set Environmental Variables for OpenSSL.
- From the Start menu, search for “environmental variables” and click on the Edit the system environment variables result.
- In the System Properties window, under the Advanced tab, click Environment Variables.
- Under User variables, click on New to create a new variable.
- Variable Name: OPENSSL_CONF
- Variable Value: C:\Program Files\OpenSSL-Win64\bin\openssl.cfg
- Enter a new value for Path variable as mentioned below.
- C:\Program Files\OpenSSL-Win64\bin
- Click OK to save the changes.
2.3. Test the OpenSSL Installation
Run the following command from a new command prompt window to test the installation of OpenSSL.
openssl versionIf the installation is successful and the variables set up is done correctly, the command outputs the OpenSSL version as shown below.

2.4. Generate Private Key
To generate a private key, open a command prompt window and navigate to path where keys needs to be stored. You can generate either an encrypted version of the private key or an unencrypted version of the private key.
To generate an unencrypted version, use the following command:
openssl genrsa 2048 | openssl pkcs8 -topk8 -inform PEM -out rsa_key.pem –nocryptTo generate an encrypted version, use the following command (which omits “-nocrypt”):
openssl genrsa 2048 | openssl pkcs8 -topk8 -v2 des3 -inform PEM -out rsa_key.pemYou will have to enter a passphrase as Encryption Password using this method which would be required during authentication.
These commands generate a private key in PEM format as shown below.
-----BEGIN PRIVATE KEY-----
MIIEvAIBADANBgkqhkiG9w0BAQEFAASCBKYwggSiAgEAAoIBAQC0ElLYu+UZjgft
6th1HDppkJg1pbEzCiUw6+czuiDgzfnbvEG8Ah/y1Ir2f27AmCUVvfFIXiEfGFIY
...
d+7T5RSG+bQyylGPpfpdig==
-----END PRIVATE KEY-----
2.5. Generate Public Key
The Public key is generated by referencing the Private Key.
The following command generates the public key using the private key contained in rsa_key.pem
openssl rsa -in rsa_key.pem -pubout -out rsa_key.pubThis commands generate a public key in PEM format as shown below.
-----BEGIN PUBLIC KEY-----
MIIBIjANBgkqhkiG9w0BAQEFAAOCAQ8AMIIBCgKCAQEAtBJS2LvlGY4H7erYdRw6
aZCYNaWxMwolMOvnM7og4M3527xBvAIf8tSK9n9uwJglFb3xSF4hHxhSGH7sy1n2
...
qIQIDAQAB
-----END PUBLIC KEY-----
3. Configuring Key Pair Authentication in Snowflake
Follow below steps to configure Key Pair Authentication for all supported Snowflake clients.
3.1. Generate and store the Public and Private keys securely
Generate the public and private keys using OpenSSL as explained in the previous section. If the keys are generated in a different location, move them to your local directory where the snowflake client runs.
The Key files should be protected from unauthorized access and it is user’s responsibility to secure the keys.
3.2. Assign the Public Key to a Snowflake User
The public key should be assigned to the user using ALTER USER statement as shown below.
ALTER USER SFUSER08 SET RSA_PUBLIC_KEY = 'MIIBIjANB…';Only users with SECURITYADMIN role and above can alter the user.
3.3. Verify the assigned Public Key of a User
Verify if the public key is successfully assigned to the user using DESCEIBE USER statement as shown below.
DESCRIBE USER SFUSER08;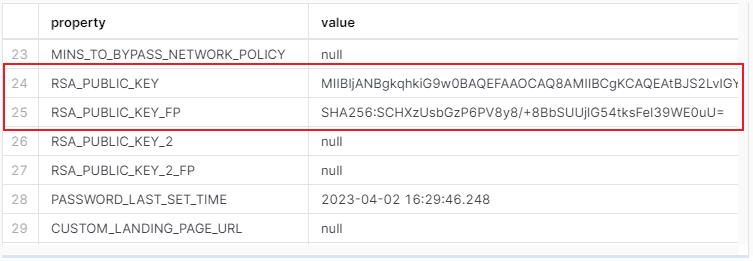
The above output of the DESCRIBE USER shows the assigned public key and the public key finger print generated.
With this step the configuration of the Key Pair Authentication is completed.
4. Connect Snowflake using Key-Pair Authentication
Below are the supported Snowflake Clients with Key Pair Authentication.
- SnowSQL (CLI Client)
- Snowflake Connector for Python
- Snowflake Connector for Spark
- Snowflake Connector for Kafka
- Go driver
- JDBC Driver
- ODBC Driver
- Node.js Driver
- .NET Driver
- PHP PDO Driver for Snowflake
Let us use SnowSQL to verify whether the generated private key can be used to connect to Snowflake.
In order to connect SnowSQL through key pair authentication, the private key must be available on a local directory of the machine where SnowSQL is installed.
To know more about how to download and install SnowSQL, refer our previous article.
Run the below command to connect to SnowSQL using Private key.
snowsql -a <account_identifier> -u <user> --private-key-path <path>/rsa_key.pemThe <account_identifier> can be extracted from the URL to login to Snowflake account.
<account_identifier>.snowflakecomputing.comThe below image shows that we were able to successfully connect to Snowflake SnowSQL using the private key generated.

5. Configuring Key Pair Rotation in Snowflake
Snowflake supports assigning multiple keys to users for rotation of key pairs for authentication.
Currently, RSA_PUBLIC_KEY and RSA_PUBLIC_KEY_2 parameters can be used to associate up to 2 public keys with a single user using ALTER USER.
To assign a second public key to a user
1. Generate a new public-private key pair.
2. Assign the public key to the user using RSA_PUBLIC_KEY_2 parameter as shown below.
ALTER USER SFUSER08 SET RSA_PUBLIC_KEY2 = 'MIIBIjANB…';3. Use the new private key to connect to Snowflake. Snowflake verifies the correct active public key for authentication based on the private key submitted with your connection information.
To remove a public key assigned to a user, use the following ALTER USER command.
ALTER USER SFUSER08 UNSET RSA_PUBLIC_KEY;Subscribe to our Newsletter !!
Related Articles:

Learn how to find and kill long running queries in Snowflake using the QUERY_HISTORY table functions available under Information Schema.

Snowflake Data Cloud Connector allows connecting to Snowflake from IICS using which you can securely read/write data into Snowflake.

Row-Level Security is a security mechanism that limits the records returned from a database table based on the permissions provided to the currently logged-in user.