1. What is Row-Level Security?
Row-Level Security is a security mechanism that limits the records returned from a database table based on the permissions provided to the currently logged-in user. This indicates that the records from the tables are shown in accordance with the user’s identity and the records to which the user has access.
Typically, this is done such that certain users can access only their data and are not permitted to view the data of other users.
2. Procedure to implement Row-Level Security using Views in Snowflake
Consider a scenario where there is a database table which holds information of employees of an Organization present across the world. The requirement is to provide access to the data in this table to the data analysts from different countries but they should be allowed to view the data from their respective country only.
How can this be achieved in Snowflake?
One solution is to create different views on the same table with filter condition on the country and provide access to these views to users belonging to respective countries. But in this process we end up building many database objects in which the process is repetitive and maintenance of these objects is also a challenge.
Another way of achieving this, which we will discussing in detail in this article, is to make use of the current role of the users to control the rows that they can access from the table.
This process needs a Mapping Table which stores the roles of the users and the country they belong to. The view is created on source table such that it is joined with mapping table based on country, and the user assigned with a role will be able to see the only that country’s data that is assigned to the country in mapping table. This is achieved by using additional condition on role field of mapping table with current_role() function in the view.
3. Steps to implement Row-Level Security using Secure Views in Snowflake
Follow below steps to implement Row-Level Security using Secure Views in Snowflake
- Create a table to apply Row-Level Security
- Create a Role Mapping table
- Create a Secure View on source table using role mapping table
- Create Custom Roles and their Role Hierarchy
- Grant access on Secure View to custom roles
- Grant access on virtual warehouse to custom roles
- Assign Custom Roles to Users
- Query and verify Row-Level Security on data using custom roles
3.1. Create a table to apply Row-Level Security
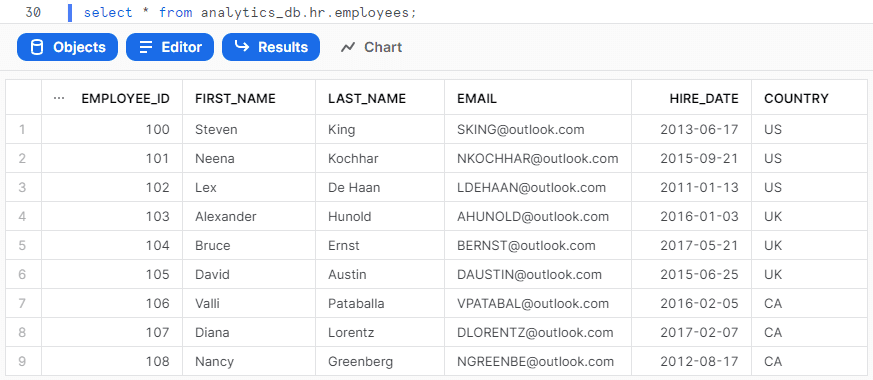
Let us consider a sample employees table as an example for the demonstration of row-level security using secure views.
The below SQL statements creates a table named employees with required sample data in hr schema of analytics_db database.
use role SYSADMIN;

create or replace database analytics_db;

create or replace schema analytics_db.hr;

create or replace table analytics_db.hr.employees(
    employee_id number,
    first_name varchar(50),
    last_name varchar(50),
    email varchar(50),
    hire_date date,
    country varchar(50)
);

INSERT INTO analytics_db.hr.employees(employee_id,first_name,last_name,email,hire_date,country) VALUES
(100,'Steven','King','SKING@outlook.com','2013-06-17','US'),
(101,'Neena','Kochhar','NKOCHHAR@outlook.com','2015-09-21','US'),
(102,'Lex','De Haan','LDEHAAN@outlook.com','2011-01-13','US'),
(103,'Alexander','Hunold','AHUNOLD@outlook.com','2016-01-03','UK'),
(104,'Bruce','Ernst','BERNST@outlook.com','2017-05-21','UK'),
(105,'David','Austin','DAUSTIN@outlook.com','2015-06-25','UK'),
(106,'Valli','Pataballa','VPATABAL@outlook.com','2016-02-05','CA'),
(107,'Diana','Lorentz','DLORENTZ@outlook.com','2017-02-07','CA'),
(108,'Nancy','Greenberg','NGREENBE@outlook.com','2012-08-17','CA')
;
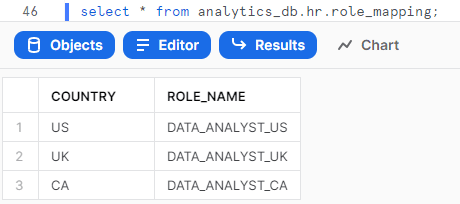
3.2. Create a Role Mapping table
The below SQL statements creates mapping table named role_mapping which stores the country and corresponding role to be assigned for the users of that country as shown below.
use role SYSADMIN;

create or replace table analytics_db.hr.role_mapping(
    country varchar(50),
    role_name varchar(50)
);

INSERT INTO analytics_db.hr.role_mapping(country, role_name) VALUES
('US','DATA_ANALYST_US'),
('UK','DATA_ANALYST_UK'),
('CA','DATA_ANALYST_CA')
;
3.3. Create a Secure View on source table using role mapping table
The below SQL statement creates a Secure View named vw_employees on employees table joining with role mapping table using country and role name fields as shown below.
use role SYSADMIN;
create or replace secure view analytics_db.hr.vw_employees as
select a.* from employees a join role_mapping b
on a.country = b.country
and current_role() = b.role_name
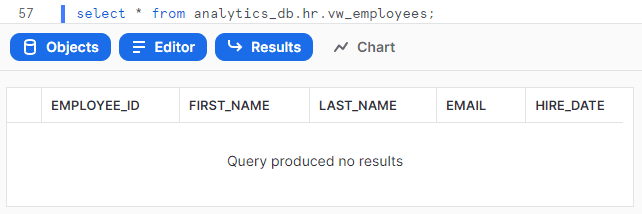
;The below image shows that no rows are returned when view is queried with SYSADMIN role as no entry is made with the SYSADMIN role in role mapping table.
3.4. Create Custom Roles and their Role Hierarchy
The below SQL statements creates custom roles mentioned in the role mapping table to assign to the users in later stage.
use role SECURITYADMIN;

create or replace role DATA_ANALYST_US;
create or replace role DATA_ANALYST_UK;
create or replace role DATA_ANALYST_CA;
When the roles are created, they exist in isolation not allowing the other roles (even the roles which create and grant privileges to them) to access the objects created by them. So, it is required to set up a role hierarchy for the custom roles we created.
The below SQL statements assigns the custom roles to the role SYSADMIN so that the SYSADMIN can inherit all the privileges assigned to custom role.
use role SECURITYADMIN;

grant role DATA_ANALYST_US to role SYSADMIN;
grant role DATA_ANALYST_UK to role SYSADMIN;
grant role DATA_ANALYST_CA to role SYSADMIN;
3.5. Grant access on Secure View to custom roles
The below SQL statements grants usage privileges on database analytics_db and schema hr with only select privilege on all views present inside them to the custom roles created.
use role SYSADMIN;

grant usage on database analytics_db to role DATA_ANALYST_US;
grant usage on schema analytics_db.hr to role DATA_ANALYST_US;
grant select on all views in schema analytics_db.hr to role DATA_ANALYST_US;

grant usage on database analytics_db to role DATA_ANALYST_UK;
grant usage on schema analytics_db.hr to role DATA_ANALYST_UK;
grant select on all views in schema analytics_db.hr to role DATA_ANALYST_UK;

grant usage on database analytics_db to role DATA_ANALYST_CA;
grant usage on schema analytics_db.hr to role DATA_ANALYST_CA;
grant select on all views in schema analytics_db.hr to role DATA_ANALYST_CA;
3.6. Grant access on virtual warehouse to custom roles
The below SQL statements provides usage privileges on warehouse compute_wh to the custom roles created for them query on secure view.
use role ACCOUNTADMIN;

grant usage on warehouse compute_wh to role DATA_ANALYST_US;
grant usage on warehouse compute_wh to role DATA_ANALYST_UK;
grant usage on warehouse compute_wh to role DATA_ANALYST_CA;
3.7. Assign Custom Roles to Users
Let us consider there are three users TONY, STEVE and BRUCE belonging to US, UK and CA respectively.
The below SQL statements assigns the custom roles to the users belonging to their respective countries.
use role SECURITYADMIN;

grant role DATA_ANALYST_US to user TONY;
grant role DATA_ANALYST_UK to user STEVE;
grant role DATA_ANALYST_CA to user BRUCE;
3.8. Query and verify Row-Level Security on data using custom roles
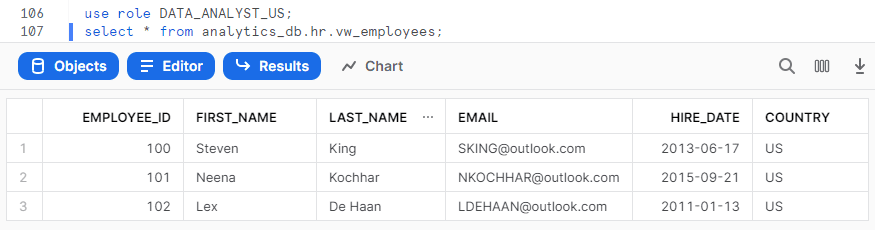
Let us verify the data returned for each user when queried on the same view.
The below image shows that for user with role DATA_ANALYST_US when queried on the view vw_employees, the data returned is only from country US.
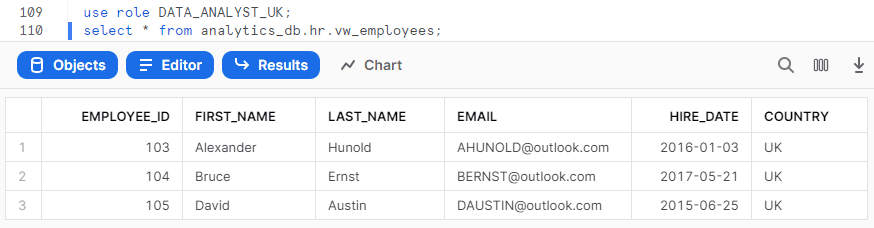
The below image shows that for user with role DATA_ANALYST_UK when queried on the view vw_employees, the data returned is only from country UK.
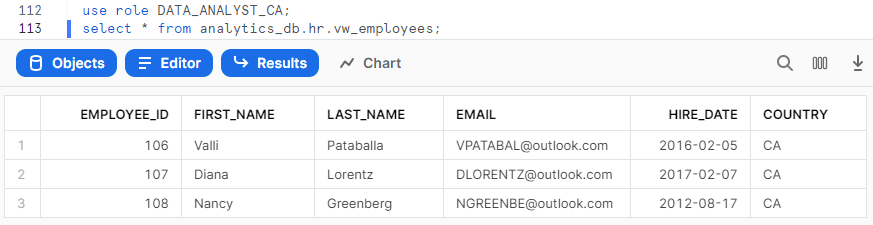
The below image shows that for user with role DATA_ANALYST_CA when queried on the view vw_employees, the data returned is only from country CA.
4. Conclusion
This method of Row-Level Security reduces the need of creating and managing multiple database objects. When a new country is introduced in your source table, all you need to do is to make an entry in the role mapping table and create a new custom role and assign it to the users. There is no change required in the view definition itself.
The reason behind using Secure Views is that the users cannot be able to see the underlying view definition. This method is useful when you want to provide read-only access on a table through views. But if you want to apply row-level security on the table itself, it can be done through Row Access Policies.
Subscribe to our Newsletter !!
Related Articles:
Snowflake Resource Monitors assist in cost management and prevent unforeseen credit usage caused by operating warehouses.

Learn different ways to remove duplicate records from a Snowflake table using SWAP WITH and INSERT OVERWRITE commands.

Snowflake Dynamic Data Masking is a security feature that allows you to mask sensitive data in database tables, views, and query results in real-time.