
1. Introduction
In the Cloud computing era with pay-as-you go resources it is necessary to have a billing alerts set to get notified when there are unexpected spend increases. This is an extremely useful tool to keep a close watch on your resource usage and stay on-budget.
Snowflake provides one such feature to track your resource usage and control your budget using Resource Monitors.
2. Snowflake Resource Monitors
Resource Monitors in Snowflake assist in cost management and prevent unforeseen credit usage caused by operating warehouses. They issue alarm alerts and helps in stopping user-managed warehouses when certain limits are reached or approaching.
Resource monitors can only be created by Account Administrators (i.e. users with the ACCOUNTADMIN role).
However, Account Administrators can choose to enable users with other roles to view and modify resource monitors using SQL.
3. Creating Resource Monitors from WebUI
To create Resource monitors in Snowflake, follow below steps.
1. Login to Snowflake and switch the role to Account Admin.
2. Navigate to Account > Resource Monitors > Create Resource Monitor.
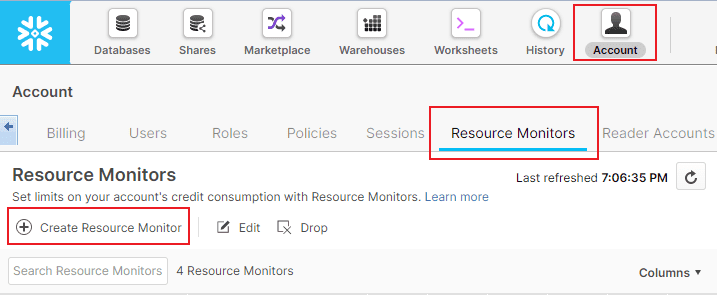
3. The following properties needs to be configured to set up a Resource Monitor.
3.1. Credit Quota
Credit Quota is the number of credits that are allowed to be consumed in a given interval of time during which the Resource Monitor takes action. Credit quota accounts for credits consumed by both user-managed virtual warehouses and virtual warehouses used by cloud services.
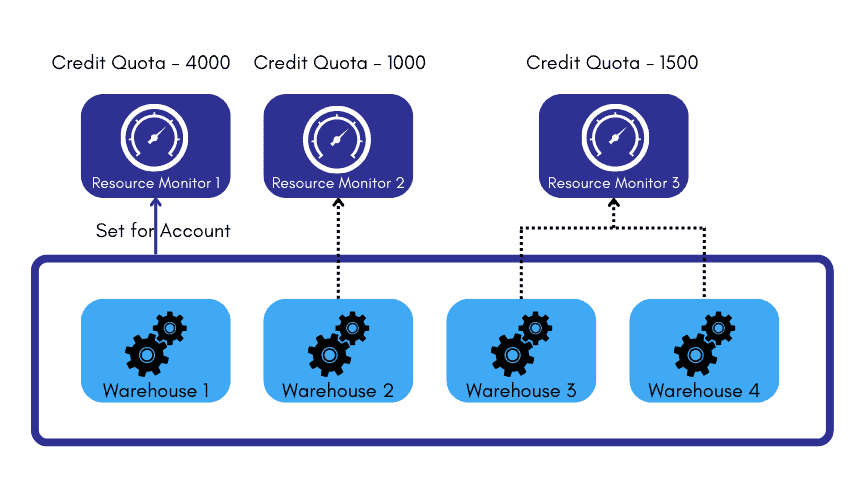
3.2. Monitor Level
The Resource Monitors in Snowflake can monitor the credit usage at two different levels.
- ACCOUNT: At the Account level i.e. all the warehouses in the account.
- WAREHOUSE: At the individual Warehouse or a group of warehouses level.
If you have selected the Monitor level as Warehouse, you need to individually select the Warehouses to monitor.
The following image illustrates a scenario in which one resource monitor is set at the Account level and individual warehouses are assigned to two other resource monitors.
- The credit quota for the entire account is set to 4000 credits for the interval (month, week, etc.), as defined by Resource Monitor 1. If this quota is reached within the interval, the actions defined for the resource monitor (Suspend, Suspend Immediately, etc.) are enforced for all the warehouses.
- Warehouse 2 can consume a maximum of 1000 credits within the interval.
- Warehouse 3 and 4 can consume a maximum combined total of 1500 credits within the interval.
3.3. Schedule
By default, the Snowflake set the scheduling of resource monitor to begin monitoring immediately and reset back the credit usage to 0 at the beginning of the calendar month.
However, you can customize the scheduling of the resource monitor to your liking using additional properties as shown below
Time Zone:
You have two options to set the time zone of the schedule – Local and UTC.
Starts:
You can choose to start the resource monitor either immediately or Later. If you choose Later, you should enter the date and time for the resource monitor to start.
Ends:
You can choose to run the resource monitor continuously using the Never option or stop the resource monitor at a particular date and timestamp using the On option.
Resets:
You can choose the frequency interval at which the credit usage resets. The supported values are
- Daily
- Weekly
- Monthly
- Yearly
- Never (Used credits never reset. Assigned warehouses continue using credits until the credit quota is reached)
3.4. Actions
You can define certain defined actions when the credit quota is reaches a certain limit. Following are the actions that resource monitors support.
- One Suspend and Notify action.
- One Suspend Immediately and Notify action.
- Up to five Notify actions.
Suspend: Suspends all assigned warehouses after all statements being executed by the warehouse(s) have completed.
Suspend Immediately: Suspends all assigned warehouses immediately, which cancels any statements being executed by the warehouses at the time.
Notify: Send an alert notification to all users with notifications enabled.
A Resource Monitor must have at least one action defined. If no actions have been defined, nothing happens when the used credits reach the threshold.
4. Click Create to create the Resource Monitor.
The below image shows the Resource Monitor RM_DEMO with Credit Quota set to 100 monitoring at the Warehouse level with two warehouses configured with default schedule.
- Suspend and Notify action is set to trigger at 90% of credit usage.
- Suspend Immediately and Notify action is set to trigger at 95% of credit usage.
- Notify action is set to trigger at 70% and 80% of credit usage.

4. Creating Resource Monitors using SQL
Resource Monitors can also be created using CREATE RESOURCE MONITOR command.
The below image shows an example of resource monitor with default schedule.
CREATE RESOURCE MONITOR "RM_DEMO" WITH CREDIT_QUOTA = 100
 TRIGGERS
 ON 90 PERCENT DO SUSPEND
 ON 95 PERCENT DO SUSPEND_IMMEDIATE
 ON 70 PERCENT DO NOTIFY
 ON 80 PERCENT DO NOTIFY;
The below image shows an example of resource monitor with custom schedule.
CREATE RESOURCE MONITOR "RM_DEMO" WITH CREDIT_QUOTA = 100,
frequency = 'MONTHLY', start_timestamp = '2022-10-01 00:00 IST', end_timestamp = null
 TRIGGERS
 ON 90 PERCENT DO SUSPEND
 ON 95 PERCENT DO SUSPEND_IMMEDIATE
 ON 70 PERCENT DO NOTIFY
 ON 80 PERCENT DO NOTIFY;
5. Assigning Warehouses to the Resource Monitor
Once the resource monitor is created, warehouses can be assigned to it as shown below.
ALTER WAREHOUSE "COMPUTE_WH" SET RESOURCE_MONITOR = "RM_DEMO";
ALTER WAREHOUSE "DEMO_WH" SET RESOURCE_MONITOR = "RM_DEMO";
A Resource monitor can be set at the Account level as shown below.
ALTER ACCOUNT SET RESOURCE_MONITOR = RM_DEMO;6. Resource Monitor Notification Alerts for Administrators
Notifications can be received by account administrators through the web interface and/or email. By default, notifications are not enabled. It must be enabled from classic web interface.
Follow below steps to enable notifications.
1. Login to Snowflake and switch the role to Account Admin.
2. In the drop-down menu at the top right corner, navigate to Preferences > Notifications.
3. Select the Notification Preference as All.
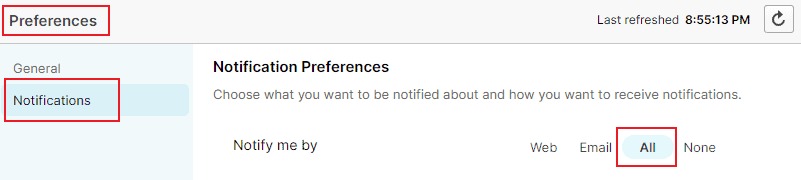
This allows all the users with Account Admin Role to receive the email alerts.
7. Resource Monitor Notification Alerts for Non-Administrators
Email Notifications for Non-Admin users cannot be enabled directly from Web interface. It can only enabled through SQL statement as shown below.
CREATE RESOURCE MONITOR "RM_USER_ALERT" WITH CREDIT_QUOTA = 100
 NOTIFY_USERS = ('SFUSER04')
 TRIGGERS
 ON 90 PERCENT DO SUSPEND
 ON 95 PERCENT DO SUSPEND_IMMEDIATE
 ON 70 PERCENT DO NOTIFY
 ON 80 PERCENT DO NOTIFY;
The users must have their email id verified for them to receive the email alerts.
To view the list of users who were given access to email alerts of resource monitors, use below SQL command.
SHOW RESOURCE MONITORS;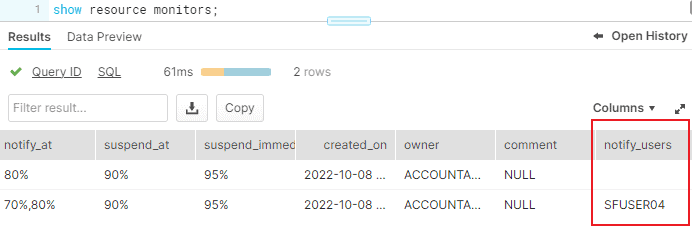
The users with Account Admin access by default have access to email alerts and they are not displayed under notify_users.
8. Assigning Warehouses to multiple Resource Monitors
When you try to assign a Warehouse which already been assigned to a resource monitor to a new resource monitor, the warehouse gets assigned to the new resource monitor and gets unassigned from previous resource monitor and credit usage resets to zero.
A resource monitor can be set to monitor multiple warehouses but a warehouse can be assigned only to a single resource monitor.
The older resource monitor if not assigned to any other warehouse remains dormant and do not monitor anything.
9. Summary
A Resource Monitor can be used to monitor credit usage by user-managed virtual warehouses and virtual warehouses used by cloud services. However it can only suspend user-managed warehouses based on credit usage thresholds.
- Suspend and Suspend Immediate actions only apply to user-managed warehouses. Virtual warehouses that provide cloud services cannot be suspended.
- By default, notifications are not enabled. It must be enabled from classic Web UI for Administrators.
- Reassigning a warehouse to a new resource monitor get it unassigned from older resource monitor.
Subscribe to our Newsletter !!
Related Articles:
Learn about Snowflake Micro-partitioning method and how the storage can be organized using Data Clustering in Snowflake.

A Virtual warehouse is a cluster of compute resources which provides required resources such as CPU, memory, and temporary storage in Snowflake.
Learn various system define roles in Snowflake, their purpose and how you can create custom roles and Role Hierarchy.