In our earlier article where we discussed about Snowflake’s Architecture, we have talked about the compute layer which is the ‘Muscle’ of the system where queries are executed. Before any query is executed, compute machines needs to be provisioned in Snowflake and they are called Virtual Warehouses. Creating your Virtual Warehouses will be one of the first steps you take while configuring your Snowflake system.
1. What is a Snowflake Virtual Warehouse?
A Virtual Warehouse is a cluster of compute resources in Snowflake. A warehouse provides the required resources, such as CPU, memory, and temporary storage, to perform various operations in Snowflake like executing SQL statements, performing data loading and unloading operations.
The Virtual Warehouses can be started and stopped at any time. They can also be resized at any time, even while running, to accommodate the need for more or less compute resources, based on the type of operations being performed by the warehouse.
One of Snowflake’s greatest benefits is that, in order to create a Virtual Warehouse, you simply give a name and specify the size of the compute power (larger the size, more the compute power), and Snowflake handles all the provisioning and configuration of underlying compute resources (ex. It is EC2 instance in case of AWS, Azure virtual machines in case of Azure).
2. Steps to create a Snowflake Virtual Warehouse
You can create a Snowflake virtual warehouse through the web interface or using SQL.
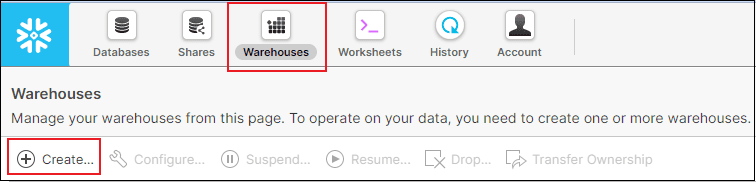
To create a Snowflake virtual warehouse from classis web interface
- Navigate to Warehouses and click Create.
- Enter a Name and select the Size of the Warehouse.
- Select the number of Minimum and Maximum clusters to create a Multi-cluster warehouse. Default values are 1 and 2 respectively.
- Select the Scaling policy. Default is Standard.
- Select the number of idle minutes after which the warehouse should automatically suspend using Auto Suspend. Default is 10 minutes.
- The Auto Resume feature by default checked-in. Unselect if you don’t want the warehouse to resume automatically when a query is submitted.
- Optionally fill in the comments section and click Finish.
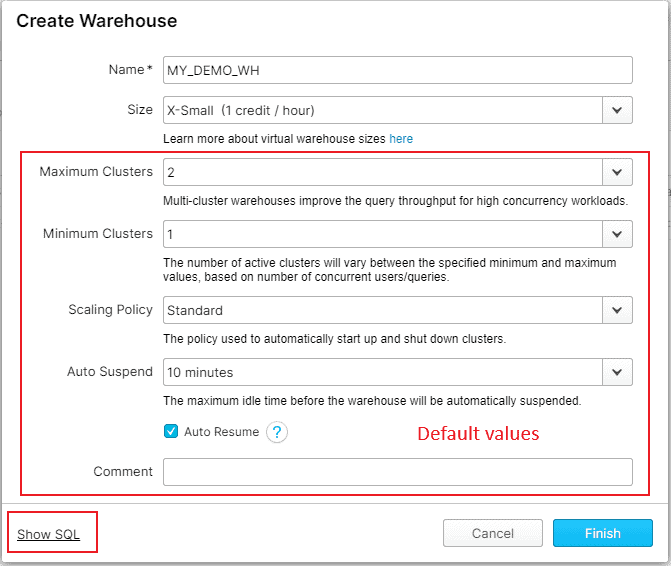
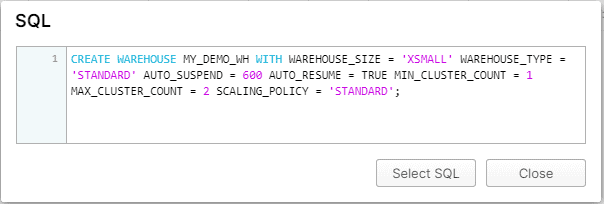
Click on Show SQL option to view the SQL statement to create the virtual warehouse.
You may only enter Name and choose Size of the Warehouse, leaving the remaining settings at their default values for an optimal utilization if you are not sure about the rest of the options.
Let’s go through the remaining options one by one in the following sections of the post so that you have a complete understanding of provisioning a virtual warehouse.
3. Virtual Warehouse Size and Credit Usage/Billing
The Virtual Warehouse Size specifies the amount of compute resources available per cluster in a warehouse. They are available in a range of T-shirt sizes, from extra small to 6XL, with each size representing an increase in the amount of hardware resources available for you to use.
Needlessly to say, with increase in size of the warehouse, the credit usage also increases and so does the billing cost. For every next size you choose, the credit usage doubles.
The below table shows the credits consumed per hour and second for different warehouse sizes.
| Warehouse Size | X-Small | Small | Medium | Large | X-Large | 2X-Large | 3X-Large | 4X-Large | 5X-Large | 6X-Large |
| Credits/Hour | 1 | 2 | 4 | 8 | 16 | 32 | 64 | 128 | 256 | 512 |
| Credits / Second | 0.0003 | 0.0006 | 0.0011 | 0.0022 | 0.0044 | 0.0089 | 0.0178 | 0.0356 | 0.0711 | 0.1422 |
Note that Snowflake utilizes per-second billing( charges for first 60 seconds minimum each time the warehouse starts) so warehouses are billed only for the credits they actually consume.
4. Multi-cluster Warehouses
Multi-cluster warehouses enable you to automatically scale out compute resources to manage your concurrent users/queries needs as they change, such as during peak and off hours. Multi-cluster warehouses are an Enterprise Edition feature.
Consider a scenario where you have provisioned a Small warehouse for your queries and observe that during certain peak hours of a day there are many concurrent queries being submitted and they are queued because of lack of compute resources.
What would you think is best in such scenarios – resizing the warehouse to next size or spinning up a second Small warehouse to handle concurrent queries?
Resizing a warehouse generally improves query performance, particularly for larger, more complex queries. But larger is not necessarily faster. For smaller, basic queries that are already executing quickly, you may not see any significant improvement after resizing.
Note that warehouse resizing is not intended for handling concurrency issues. Instead use Multi-cluster Warehouse where you could spin-up additional warehouses to handle the workload.
Observe the difference in number of credits consumed by a single cluster Medium warehouse vs spinning up am additional cluster of small warehouse for our example scenario where there is an increased work load only during the third hour.
Medium Warehouse
Small Warehouse
| Cluster 1 | |
| 1st hour | 4 |
| 2nd hour | 4 |
| 3rd hour | 4 |
| Total Credits | 12 |
| Cluster 1 | Cluster 2 | Total Credits | |
| 1st hour | 2 | 0 | 2 |
| 2nd hour | 2 | 0 | 2 |
| 3rd hour | 2 | 2 | 4 |
| Total Credits | 6 | 2 | 8 |
Note that Multi-cluster warehouses are not as beneficial for improving the performance of slow-running queries or data loading. For these types of operations, Scaling up by resizing a warehouse provides more benefits.
5. Maximized vs Auto-Scale Modes
You can choose to run a Multi-cluster warehouse in either of the following modes.
- Maximized
- Auto-scale
5.1. Maximized Mode
This mode is enabled by specifying the same value for both maximum and minimum number of clusters (note that the specified value must be larger than 1). In this mode, when the warehouse is started, Snowflake starts all the clusters so that maximum resources are available while the warehouse is running.
This mode is effective particularly if you have large numbers of concurrent user sessions/queries and the numbers do not fluctuate significantly.
5.2. Auto-Scale Mode
This mode is enabled by specifying different values for maximum and minimum number of clusters. In this mode, Snowflake starts and stops clusters as needed to dynamically manage the load on the warehouse:
- As the number of concurrent user sessions/queries for the warehouse increases, the queries start to queue due to insufficient resources. Snowflake then automatically starts additional clusters, up to the maximum number defined for the warehouse.
- Similarly, as the load on the warehouse decreases, Snowflake automatically shuts down clusters to reduce the number of running clusters and, correspondingly, the number of credits used by the warehouse.
6. Scaling Policy: Standard vs Economy
Scaling Policy helps control the credits consumed by a multi-cluster warehouse running in Auto-scale mode (i.e. the minimum and maximum number of clusters are set to different value). It helps in determining when to start or shut down a cluster.
The scaling policy for a multi-cluster warehouse doesn’t apply if it is running in Maximized mode as all clusters run concurrently. It applies only for Auto-scale mode.
Snowflake supports the following scaling policies.
- Standard
- Economy
6.1. Standard
- It prevents/minimizes queuing by favoring starting additional clusters over conserving credits.
- After the first cluster has begun, the following clusters wait 20 seconds before beginning.
6.2. Economy
- It conserves credits by favoring keeping running clusters fully-loaded rather than starting additional clusters.
- A new cluster is started only if the system estimates there’s enough query load to keep the cluster busy for at least 6 minutes.
7. Auto Suspend and Auto Resume Warehouses
A warehouse can be set to automatically Suspend or Resume, based on activity
7.1. Auto Suspend
- Auto Suspend is enabled by default while provisioning a warehouse.
- Snowflake automatically suspends the warehouse if it is inactive for the specified period of time.
- Auto Suspend ensures that you do not leave a warehouse running (and consuming credits) when there are no incoming queries.
7.2. Auto Resume
- Auto Resume is enabled by default while provisioning a warehouse.
- Snowflake automatically resumes the warehouse when any statement that requires a warehouse is submitted and the warehouse is the current warehouse for the session.
- Auto Resume ensures that the warehouse starts up again as soon as it is needed.
If the Auto Suspend and Auto Resume are disabled, you need to manually suspend a warehouse when it is not in use and resume the warehouse when you want to execute the queries.
You can resume, suspend warehouses from web interface as shown below. You can also edit, drop, transfer ownership from web interface.
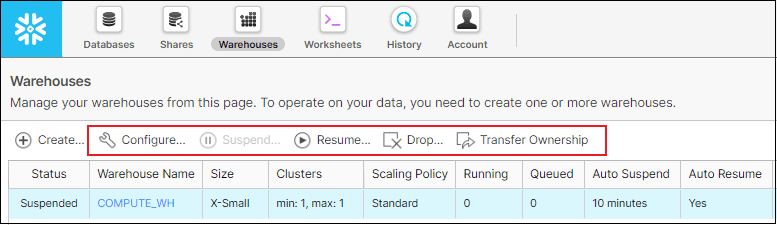
The same can be done using SQL as shown below.
alter warehouse my_wh resume;

alter warehouse my_wh suspend;
8. Conclusion
To find the combinations that best suit your unique query demands and workload, experiment with various query types and warehouse sizes. You can build multiple warehouses with different sizes and use them according to the query performance needs. As Snowflake utilizes per-second billing, you can run larger warehouses (Large, X-Large, 2X-Large, etc.) and simply suspend them when not in use.
Resizing a running warehouse does not impact queries that are already being processed by the warehouse i.e. the queries which are currently running cannot take advantage of additional resources. The additional compute resources are only used for queued and new queries.
It is recommended to enable Auto-suspend and Auto-resume. If you choose to disable auto-suspend, please carefully consider the costs associated with running a warehouse continually, even when the warehouse is not processing queries.
Test your understanding
Subscribe to our Newsletter !!
A step by step guide on automating continuous data loading into Snowflake through Snowpipe on Microsoft Azure.

There are three different types of views in Snowflake – Non-Materialized, Materialized and Secure Views.
Secure Data Sharing in Snowflake enables account-to-account sharing of selected database objects in your account with other.