1. Introduction
Over the years, there is a steady increase in demand for getting real-time or near real-time data for data analytics. In such scenarios, it becomes important how soon can the data be made available in Snowflake as soon as it is available.
There are several ways in which data available on external stages can be loaded into Snowflake like using popular ETL tools likes Informatica Cloud, Matillion etc. But Snowflake also provides its own functionality to load the data from external stages into its tables.
Let us discuss more about it in the following article.
2. What is Snowpipe?
Snowpipe is Snowflake’s continuous data ingestion service which enables loading data from files as soon as they are available in a stage. It is basically a COPY INTO command continuously looking for fresh files to process them in micro-batches as soon as they arrive at the staging area.
Snowpipe eliminates the requirement to build out near-real-time pipelines to process data from external locations.
Few key points to know about Snowpipe
- Snowpipe uses a combination of filename and a file checksum to ensure only “new” data is processed.
- Snowpipe uses serverless architecture and uses Snowflake-supplied compute resources and you are billed accordingly.
- Snowpipe loads data in response to new file notification events. These notification events are usually configured in cloud platforms.
- We can also trigger a Snowpipe manually from Snowflake or through custom programs calling the REST APIs.
3. Snowpipe on Azure
In this article, let us see an end-to-end demo on how to set up a Snowflake Snowpipe on an Azure external stage.
The following diagram shows the Snowpipe auto-ingest process flow on Azure Blob Storage.

1. Data files are loaded in a stage.
2. A blob storage event message informs Snowpipe via Event Grid that files are ready to load. Snowpipe copies the files into a queue.
3. A Snowflake-provided virtual warehouse loads data from the queued files into the target table based on parameters defined in the specified pipe.
4. Setting up Azure Storage Event Notifications
We need to initially set up a notification process in Azure to identify the event of new files arrival into Azure blob storage to let Snowflake know about it. To achieve this, we need to set up following services.
4.1. Storage Account
An Azure storage account is mandatory to access the Azure Storage data objects including blobs file shares, queues, tables, and disks. Create a Storage account by passing your Azure Subscription and Resource Group details in which you want it to be placed.
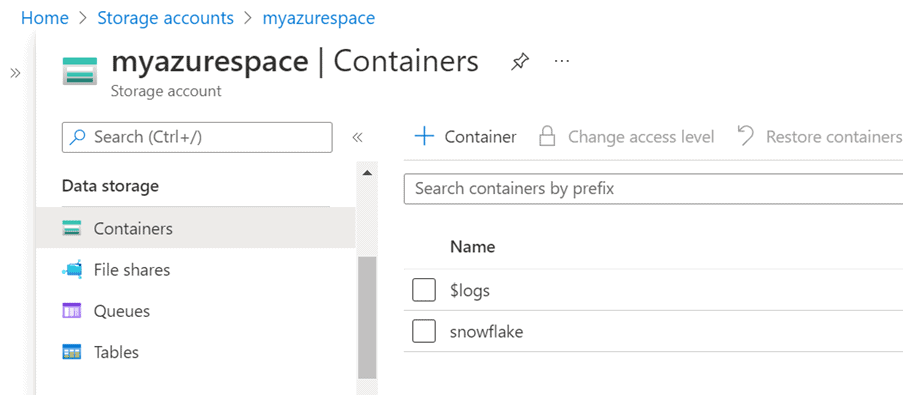
4.2. Container
A Container organizes a set of blobs, similar to a directory in a file system.
Create a container inside your storage account created in earlier step by navigating to StorageAccount >> Data Storage >> Containers.
All the files you want to process through Snowpipe should be placed inside the containers.
The below image shows a container named snowflake created inside a storage account named myazurespace.
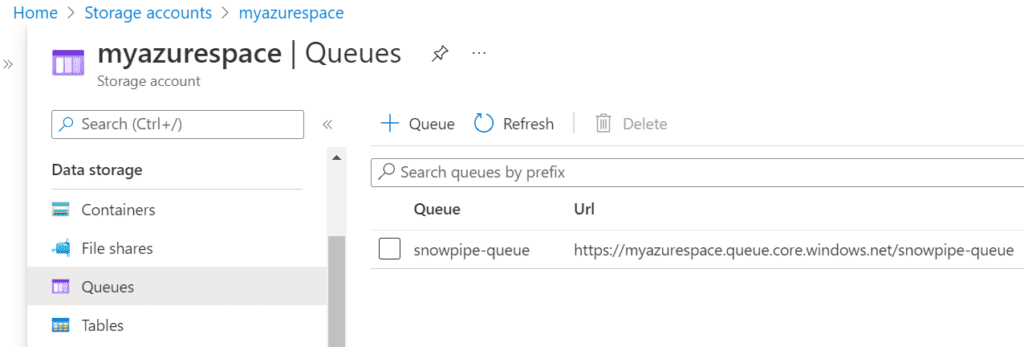
4.3. Storage Queue
Azure Queue storage is a service for storing large numbers of messages that can be accessed from anywhere in the world via authenticated calls using HTTP or HTTPS.
Create a storage queue inside your storage account by navigating to StorageAccount >> Data Storage >> Queues.
Make note of the URL of the queue created which will be later used while creating notification integration in Snowflake.
The storage queue holds all the event messages of arrival of the new files into the container.
The below image shows a queue named snowpipe-queue created inside a storage account named myazurespace.
4.4. Event Subscription
An Event Subscription tells Event Grid which events on a topic you’re interested in receiving. When creating the subscription, you provide an endpoint for handling the event.
1. Create an Event Subscription inside your storage account by navigating to StorageAccount >> Events >> Event Subscription.
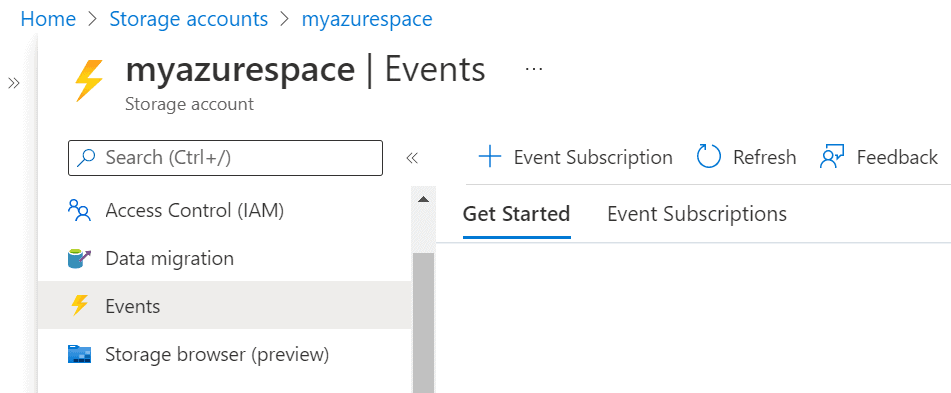
2. Specify a name for Event Subscription.
3. Select the Event Type as Blob Created.
4. Select the Endpoint Type as Storage Queues and select the queue created in earlier step.
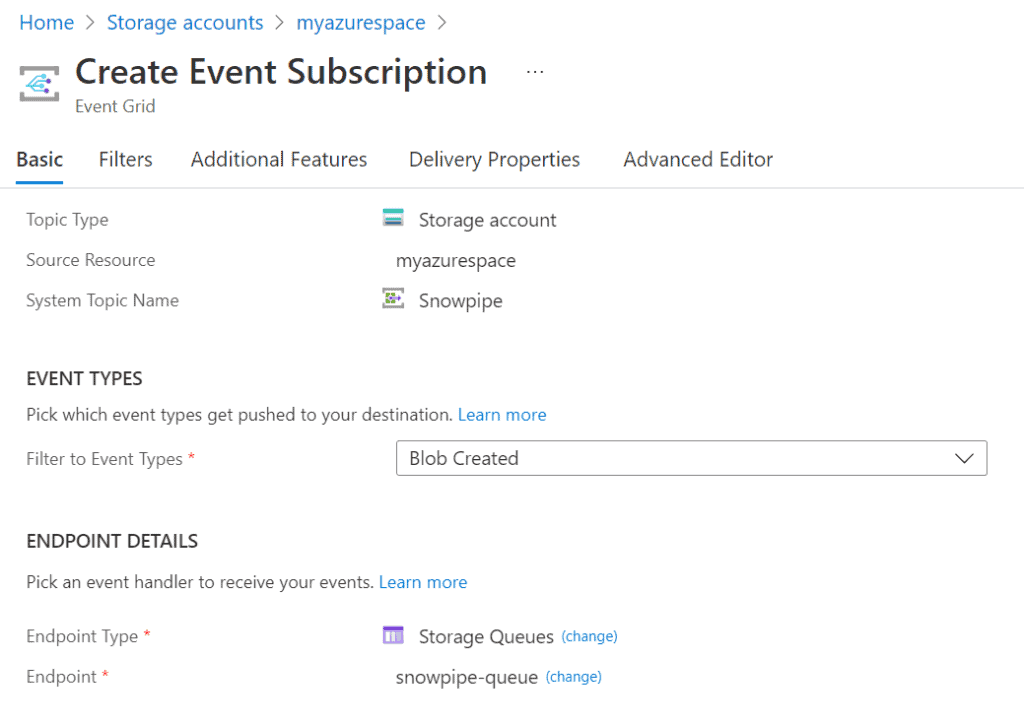
The Event Subscription created identifies when ever a Blob is created in the storage account and send the event message to the Storage Queue.
5. Creating Notification Integration in Snowflake
A Notification Integration is a Snowflake object that provides an interface between Snowflake and a third-party cloud message queuing service such as Azure Event Grid.
The below SQL creates Notification Integration in Snowflake.
CREATE NOTIFICATION INTEGRATION AZURE_NOTIFICATION_INT
ENABLED = TRUE
TYPE = QUEUE
NOTIFICATION_PROVIDER = AZURE_STORAGE_QUEUE
AZURE_STORAGE_QUEUE_PRIMARY_URI = 'https://myazurespace.queue.core.windows.net/snowpipe-queue'
AZURE_TENANT_ID = '2c1588a7-00b6-45e2-b0dd-eb6ed3a403c9';
AZURE_STORAGE_QUEUE_PRIMARY_URI is the URL of the queue we created in step 3.3
AZURE TENANT_ID can be obtained by navigating to Home >> Azure Active Directory >> Properties
6. Granting Snowflake, the access to the Storage Queue in Azure
We have created a notification integration in Snowflake passing the details of Microsoft Azure Queue for it to connect. Similarly, we need to provide the consent from Microsoft Azure for the Snowflake to access the Storage Queue.
Follow below steps to grant Snowflake access to the Azure Storage Queue.
1. Execute the DESCRIBE INTEGRATION command to retrieve the consent URL
DESC NOTIFICATION INTEGRATION "AZURE_NOTIFICATION_INT";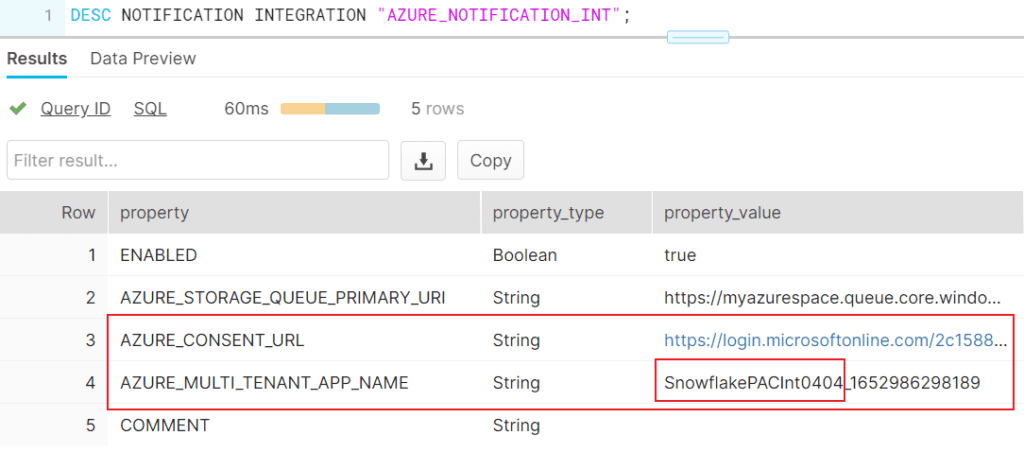
2. Copy the AZURE_CONSENT_URL value and navigate to the URL from a web browser. The page displays a Microsoft permissions request page.
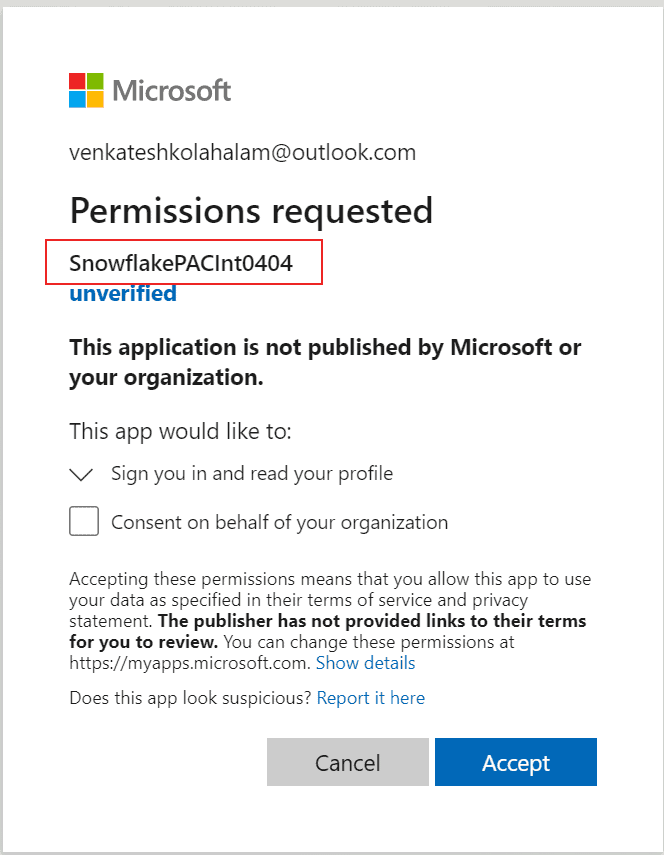
3. Click the Accept button. This action allows the Azure service principal created for your Snowflake account. In simple terms, this action creates a service account for your Snowflake application in Azure.
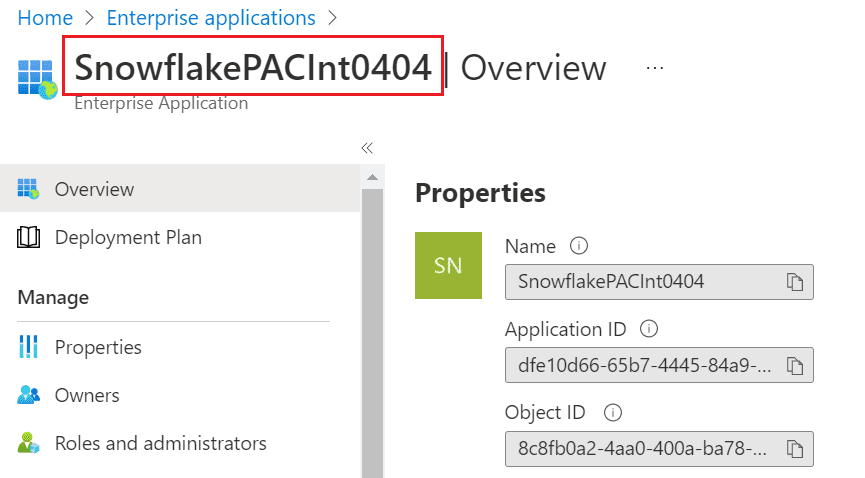
4. Log into the Microsoft Azure portal.
5. Navigate to Azure Active Directory >> Enterprise applications. Verify the Snowflake application identifier.
6. Navigate to StorageAccount >> Data Storage >> Queues >> storage_queue_name, where storage_queue_name is the name of the storage queue you created in step 3.3
7. Click Access Control (IAM) >> Add role assignment.
8. Provide below details
- Role: Storage Queue Data Contributor
- Assign access to: User, group, or service principal
- Members: Search with the name of the Snowflake Service Principal which we verified in Enterprise Applications.
Review and Assign the Storage Queue Data Contributor role to the Snowflake Service Principal.
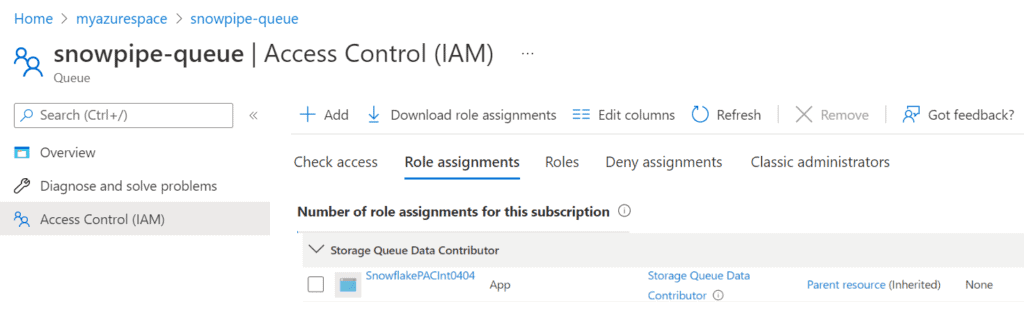
This Allows access to Snowflake for read, write, and delete Azure Storage queues and queue messages.
7. Creating Snowflake Stage
In order to access the files from external locations like Microsoft Azure, we need to build external stages in Snowflake referencing the Azure container where our files will be placed.
There are two different ways through which the external stages can be created in Snowflake.
1. The easiest way is by providing the URL of the Azure container and SAS token to authenticate.
CREATE OR REPLACE STAGE "AZURE_STAGE"
URL = 'azure://myazurespace.blob.core.windows.net/snowflake'
CREDENTIALS = (AZURE_SAS_TOKEN = 'S%2BUm9qqDRXFDzwawAqvmni04TPaKQ7n1YEJy7Um9%Jk%3D');
The URL can be obtained by navigating to
StorageAccount >> Data Base Storage >> Container >> container_name >> Properties.
The AZURE_SAS_TOKEN can be obtained by navigating to
StorageAccount >> Data Base Storage >> Container >> container_name >> Generate SAS
(OR)
StorageAccount >> Security + networking >> Shared access signature
2. The second method is by creating a Storage Integration. The process is similar to the process of creating notification integration which we discussed in section 5. You need to create a Service Principle for your Snowflake account in Azure and provide Storage Blob Data Contributor role access to the Service Principle from storage account Access Control (IAM).
Once the entire set up is done, create external stage in Snowflake using below statement.
CREATE OR REPLACE STAGE "AZURE_STAGE"
STORAGE_INTEGRATION = MY_AZURE_INT
URL = 'azure://myazurespace.blob.core.windows.net/snowflake';
This is the recommended method as it avoids supplying credentials while creating stages.
8. Creating Snowflake Snowpipe
Before we create a Snowpipe, let us create a table into which the data from stage is to be loaded.
CREATE OR REPLACE TABLE Employee_Details(
  EMPLOYEE_ID number,
  NAME varchar(50) ,
  SALARY number ,
  DEPARTMENT_ID number ,
  JOINING_DATE date
);
Now that the Stage from where the data files will be read and the table where the data will be loaded are setup, let us build the pipe that moves data from the stage into the table. This is going to be an object called a PIPE, and it is wrapped around a COPY command. We will enable the AUTO_INGEST feature and specify the file format of our source data which is CSV.
CREATE OR REPLACE PIPE MY_SNOWPIPE
AUTO_INGEST = TRUE
INTEGRATION = AZURE_NOTIFICATION_INT
AS
COPY INTO EMPLOYEE_DETAILS FROM @AZURE_STAGE
FILE_FORMAT = (FORMAT_NAME = MY_CSV_FORMAT);
AUTO_INGEST = TRUE enables automatic data loading when the file arrives in the stage location.
My Azure Container already contains a file before creating the pipe. So, to process the file which is already existing in the stage location use ALTER PIPE command.
ALTER PIPE MY_SNOWPIPE REFRESH;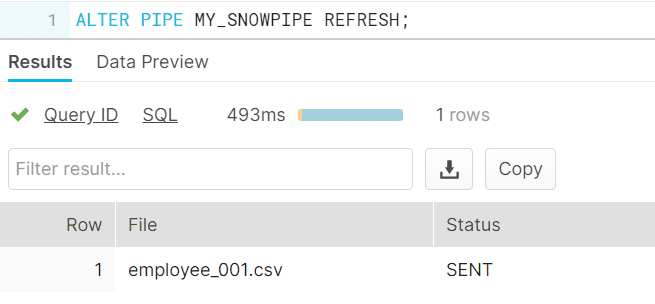
Going forward as and when new files arrive at the Stage location, the data get loaded into the table in Snowflake automatically.
9. Monitoring Pipe Status and data loads
Now that the pipe is created, here is a command to see the status of the pipe you created. This will show you some metadata about what the pipe is doing.
SELECT system$pipe_status('MY_SNOWPIPE');
10. Summary
There are several steps involved in the process that we have discussed here. Let us summarize everything we discussed so far here.
Snowpipes are basically a COPY INTO statement looking for the files on an external stage to process them as soon as they arrive. For the Snowpipe to automatically pick the files,
- We have set up a notification service which captures event messages when a new file arrives in the container using Azure Event Subscriptions and route them to a Storage Queue end point.
- We have created a notification integration in Snowflake which lets Snowflake access event messages from Microsoft Azure.
- Then to provide consent from Microsoft Azure to let Snowflake access event messages a Service Principle for Snowflake account is created.
- A Storage Queue Data Contributor role is assigned to service principle which lets Snowflake access Azure Storage queues and queue messages.
Hope this is informative!! Watch out this space for updates on more cool features of Snowflake.
Subscribe to our Newsletter !!
Related Articles:
A complete guide to types of Snowflake Stages and how to load data into and unload data from Snowflake tables using stages.
Learn how to create external stages on AWS S3, Microsoft Azure and Google Cloud platforms in Snowflake.
A quick guide explaining what are Snowflake External tables and how to create them using various methods.


Pls add the similar steps in case of AWS
Sure!! Will Publish soon.