1. Introduction
A Snowflake Iceberg table is a type of table in Snowflake that employs the open-source Apache Iceberg table format for organizing and storing data within the Snowflake data warehouse environment.
Iceberg table format stores the actual data outside of Snowflake in a public cloud object storage location such as Amazon S3, Google Cloud Storage, or Azure Storage. They are ideal for existing data lakes that you cannot, or choose not to, store in Snowflake.
2. Types of Snowflake Iceberg tables
The following are the Iceberg table types that Snowflake offers:
2.1. Snowflake Managed Iceberg Tables
A Snowflake Managed Iceberg Table is a table where Snowflake manages both the table data and metadata stored within an external location. These tables utilize Snowflake as the catalog and offer complete Snowflake platform support with read and write access.
Snowflake handles all life-cycle maintenance of managed iceberg tables and access table data and metadata using an External Volume.
Refer to our previous article to learn how to create Snowflake Managed Iceberg tables.
2.2. Externally Managed Iceberg Tables
An Externally Managed Iceberg Table is a table where an external system such as AWS Glue manages both the table data and metadata. These tables provide limited Snowflake platform support with read-only access.
In External Iceberg tables, Snowflake uses a Catalog Integration to retrieve information about your Iceberg metadata and schema and uses External Volume to access table data and metadata are stored in external cloud storage.
In this article, let us explore how to create Externally Managed Iceberg tables managed by AWS Glue.
3. Pre-requisites to creating a Snowflake Iceberg table using AWS Glue as Catalog
To create an Iceberg table that uses an external Iceberg catalog, you must configure a catalog integration and an external volume.
3.1. Setting up Iceberg Table in AWS Glue Data Catalog for Demonstration
The following example creates an Iceberg table named employees in glue_db database in the AWS Glue Data Catalog. The table data and metadata are managed by Glue in AWS S3 in the S3 bucket te-aws-s3-bucket001 in the glue directory.
CREATE TABLE glue_db.employees (
  year bigint,
  employee_id bigint,
  first_name string,
  last_name string)
PARTITIONED BY (`year`)
LOCATION 's3://te-aws-s3-bucket001/glue'
TBLPROPERTIES (
  'table_type'='iceberg',
  'write_compression'='snappy',
  'format'='parquet'
);
The below SQL statement inserts 10 records into the employees table from an already existing table.
INSERT INTO EMPLOYEES SELECT year,employee_id,first_name,last_name FROM employee WHERE year=2018 LIMIT 10;The Glue Data Catalog and the S3 bucket are in the US East (N. Virginia) us-east-1 AWS region.
3.2. Configure a Catalog Integration that connects to the AWS Glue Catalog
A Catalog Integration is a named, account-level object within Snowflake that stores configuration details necessary for connecting to and retrieving table metadata from external catalog systems, such as AWS Glue, when you don’t use Snowflake as the Iceberg catalog.
Follow the below steps to create a Catalog Integration in Snowflake that connects to the AWS Glue Catalog
- Create an IAM policy that grants access to the AWS Glue Data Catalog
- Create an IAM role to attach the Policy
- Create a Catalog Integration in Snowflake
- Retrieve the AWS IAM User and External ID of your Snowflake Account
- Grant the IAM user Permissions to Access the AWS Glue Data Catalog
- Configure an External Volume pointing to the Glue-managed Iceberg S3 path
3.2.1. Create an IAM policy that grants access to the AWS Glue Data Catalog
As a first step, a custom policy should be created in IAM which configures access permissions for Snowflake to access the AWS Glue Data Catalog.
Follow the below steps to create a custom policy in IAM.
1. Log into the AWS Management Console.
2. Go to IAM > Policies > Create policy.
3. Select the JSON tab and enter the policy contents in the editor as shown below and click Next.
{
   "Version": "2012-10-17",
   "Statement": [
      {
         "Sid": "AllowGlueCatalogTableAccess",
         "Effect": "Allow",
         "Action": [
            "glue:GetTable",
            "glue:GetTables"
         ],
         "Resource": [
            "arn:aws:glue:*:<accountid>:table/*/*",
            "arn:aws:glue:*:<accountid>:catalog",
            "arn:aws:glue:*:<accountid>:database/<database-name>"
         ]
      }
   ]
}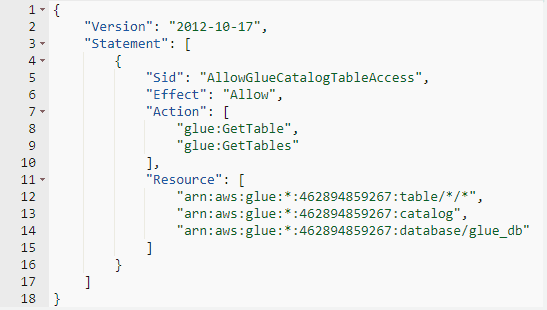
4. Enter the Policy name (e.g. glueCatalogInt_Policy) and an optional description. Click Create policy.
3.2.2. Create an IAM role to attach the Policy
An IAM Role must be created with all the necessary permissions to access the AWS Glue Data Catalog by assigning an IAM Policy. The Role gets assigned to the Snowflake entity allowing it to access the Iceberg table files in AWS Glue Data Catalog.
Follow the below steps to create an AWS IAM Role that provides access to the files in the catalog.
1. Go to IAM > Roles > Create role.
2. Select Trusted entity type as AWS account.
3. Select Another AWS account and specify your own AWS account ID temporarily. We will come back to modify this value to grant access to Snowflake.
4. Select the Require external ID option. Enter an External ID value of your choice, for example, 0000.
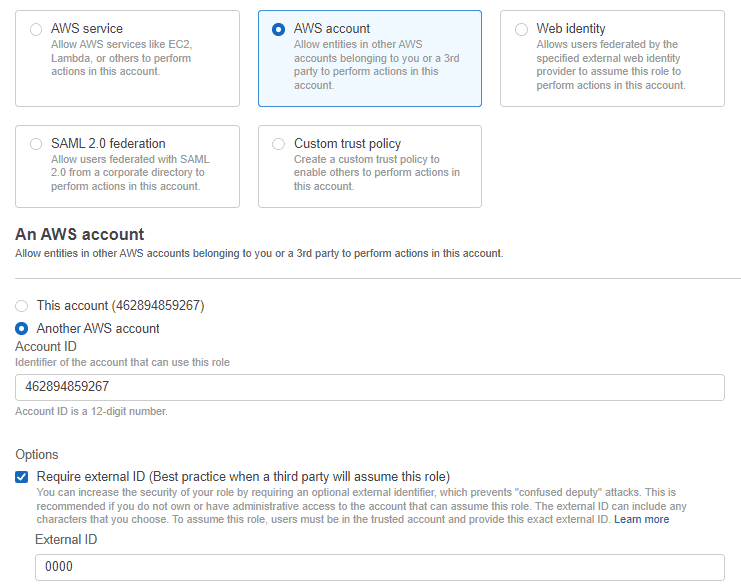
5. Click the Next button.
6. Select the policy created in the earlier step and click Next.
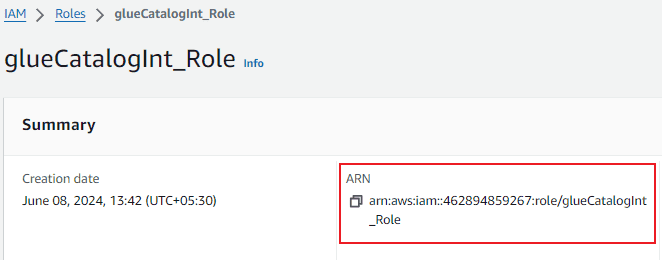
7. Enter a Role name (e.g. glueCatalogInt_Role) and an optional description. Click Create Role.
8. Once the role is created, note the Role ARN from the role summary page. The Role ARN should be passed as a reference while creating the Catalog Integration.
3.2.3. Create a Catalog Integration in Snowflake
Create a Catalog Integration in Snowflake using the “CREATE CATALOG INTEGRATION” command.
The below SQL creates a Catalog Integration that uses an AWS Glue Data Catalog source in Snowflake.
CREATE OR REPLACE CATALOG INTEGRATION glueCatalogInt
  CATALOG_SOURCE=GLUE
  TABLE_FORMAT=ICEBERG
  GLUE_AWS_ROLE_ARN='arn:aws:iam::462894859267:role/glueCatalogInt_Role'
  GLUE_CATALOG_ID='462894859267'
  GLUE_REGION='us-east-1'
  CATALOG_NAMESPACE = 'glue_db'
  ENABLED=TRUE;
The following are the required parameters in the CREATE CATALOG INTEGRATION command.
- CATALOG_SOURCE: Specifies the type of catalog source. Specifying GLUE creates an integration between Snowflake and AWS Glue.
- TABLE_FORMAT: Specifies the table format supplied by the catalog.
- GLUE_AWS_ROLE_ARN: Specifies the ARN of the AWS Identity and Access Management (IAM) role to assume.
- GLUE_CATALOG_ID: Specifies the ID of your AWS account.
- GLUE_REGION: Specifies the AWS Region of your AWS Glue Data Catalog.
- CATALOG_NAMESPACE: Specifies your AWS Glue Data Catalog database name where the Iceberg tables exist.
- ENABLED: Specifies whether the catalog integration is available to use for Iceberg tables.
- TRUE allows users to create new Iceberg tables that reference this integration.
- FALSE prevents users from creating new Iceberg tables that reference this integration.
3.2.4. Retrieve the AWS IAM User and External ID of your Snowflake Account
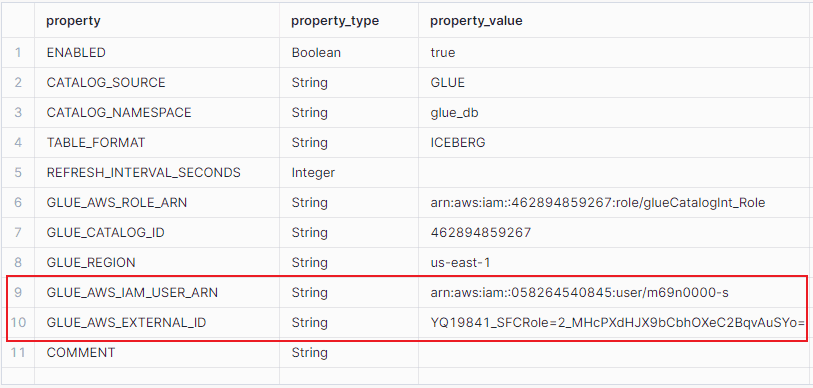
Retrieve the ARN of the IAM user and External ID information of your Snowflake account using the “DESC CATALOG INTEGRATION” command.
DESCRIBE CATALOG INTEGRATION glueCatalogInt;Where glueCatalogInt is the catalog integration created in the earlier step.
Record the following values from the output of the above command.
- STORAGE_AWS_IAM_USER_ARN: AWS IAM user created for your Snowflake account.
- STORAGE_AWS_EXTERNAL_ID: The external ID that is needed to establish a trust relationship.
3.2.5. Grant the IAM user Permissions to Access the AWS Glue Data Catalog
The IAM user created for your Snowflake account should be provided access to the AWS Glue Data Catalog. To achieve this, the details of your Snowflake account should be configured in the role that is created to provide access to the AWS Glue Data Catalog.
Follow the below steps to grant the Snowflake IAM User permissions to access the AWS Glue Data Catalog.
1. Go to IAM > Roles > select the Role created in STEP-2.
2. Click on the Trust relationships tab > Edit trust policy.
3. Replace the AWS Principle and ExternalID values in the Policy document with values from DESC CATALOG INTEGRATION recorded in the previous step.
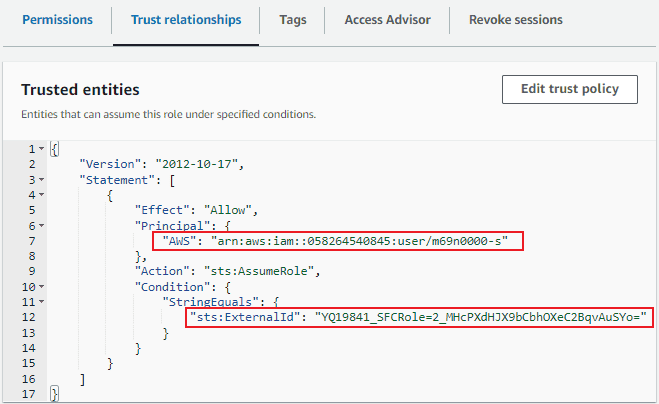
4. Click the Update policy button to save your changes.
3.3. Configure an External Volume pointing to the Glue-Managed Iceberg S3 path
An External Volume is an account-level Snowflake object that stores a generated Identity and Access Management (IAM) entity for your external cloud storage for Iceberg tables. This feature allows users to avoid supplying credentials when connecting to storage for accessing table data, Iceberg metadata, and manifest files that store the table schema, partitions, and other metadata.
In our previous article, we have discussed in detail on various steps involved in creating an External Volume in Snowflake.
- Create an IAM policy that grants access to the Glue managed Iceberg S3 location
- Create an IAM role to attach the policy
- Create an External Volume in Snowflake
- Retrieve the AWS IAM User for your Snowflake Account
- Grant the IAM user Permissions to Access Bucket Objects
The main difference between creating an external volume for a Snowflake Managed Iceberg table versus a Glue Managed Iceberg table is as follows:
- For a Snowflake Managed Iceberg table, the external volume must be created on an AWS S3 path that is in the same region as your Snowflake account. If the S3 path is in a different region, the creation of the Iceberg table is not supported.
- For a Glue Managed Iceberg table, the external volume should be created on an AWS S3 path managed by Glue, which can be in a different region than your Snowflake account.
The SQL query below creates an External Volume in Snowflake.
CREATE OR REPLACE EXTERNAL VOLUME glueCatalog_extvol
   STORAGE_LOCATIONS =
      (
         (
            NAME = 'glueCatalog_extvol'
            STORAGE_PROVIDER = 'S3'
            STORAGE_BASE_URL = 's3://te-aws-s3-bucket001/glue/'
            STORAGE_AWS_ROLE_ARN = 'arn:aws:iam::462894859267:role/gluecatalog_extvol_role'
         )
      );
4. Create an Iceberg table with AWS Glue as a Catalog
Create an Iceberg table that uses Glue as a Catalog specifying the name of a catalog integration that has been configured for AWS Glue and an external volume pointing to the Glue-managed Iceberg S3 location. Additionally, you need to specify the catalog table name which is the table name in the AWS Glue Data Catalog.
The following SQL creates an Iceberg table that uses the AWS Glue Data Catalog.
CREATE OR REPLACE ICEBERG TABLE EMPLOYEES
EXTERNAL_VOLUME='glueCatalog_extvol'
CATALOG='glueCatalogInt'
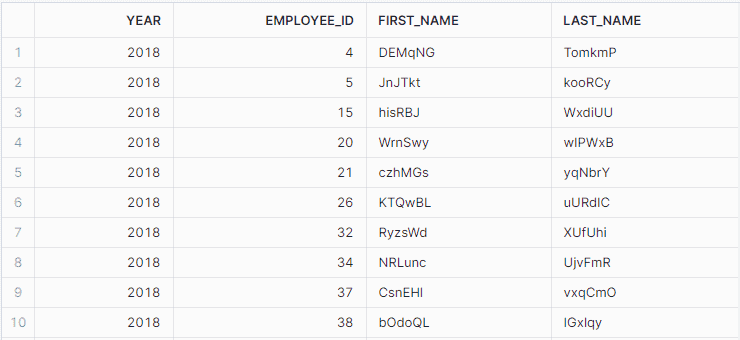
CATALOG_TABLE_NAME='EMPLOYEES';The below image shows the data present in the Iceberg table EMPLOYEES created in Snowflake.
5. Refreshing data of Externally Managed Snowflake Iceberg table
When using an external Iceberg catalog, you can refresh the table metadata and data with the ‘ALTER ICEBERG TABLE … REFRESH’ command. This command synchronizes the metadata with the latest changes to the table.
The following SQL refreshes the Glue Managed Iceberg table EMPLOYEES in Snowflake.
ALTER ICEBERG TABLE EMPLOYEES REFRESH;6. Conclusion
Externally Managed Iceberg tables are a valuable feature in Snowflake that allows users to access and query data stored in external locations without needing to load the data into Snowflake’s internal storage.
This capability is particularly useful for organizations that already have large datasets in cloud storage and want to leverage Snowflake’s powerful querying and analytics capabilities without duplicating data.
Externally Managed Iceberg tables eliminate the need for complex data migration processes and allow for consistent data management across different platforms.
Subscribe to our Newsletter !!
Related Articles:
Snowflake File format simplifies the process of accessing the staged data and streamlines data loading/unloading in database tables.
Snowflake supports loading JSON data in database tables and allows querying data along with flattening it into a columnar structure.
A Snowflake Iceberg table Snowflake employs the Apache Iceberg format for organizing and storing data within the Snowflake data warehouse environment.