Snowflake Data Cloud Connector
Snowflake is a single, integrated analytic data platform built for cloud delivered as Data warehouse as a service. Informatica supports connecting to Snowflake using Snowflake Data Cloud Connector using which you can securely read data from and write data into Snowflake tables and views.
In this article let us discuss how to configure the Snowflake Data Cloud Connector in Informatica and what are the pre-requisites for connecting to Snowflake from Informatica.
Step-1: Create dedicated user account for Informatica in Snowflake
In order to connect to Snowflake from Informatica, there should be a dedicated user created for Informatica in Snowflake.
The below SQL statement creates a user named INFAUSER in Snowflake.
-- Create User for Informatica
----------------------------------------------------------------------------
use role USERADMIN;

create user INFAUSER password = 'INFA@12345'
    COMMENT = 'User to connect from Informatica application'
    MUST_CHANGE_PASSWORD = FALSE;
Step-2: Create Custom Role with all necessary privileges
Roles are the entities to which privileges on Snowflake objects can be granted and revoked. A role could be assigned to multiple users which grants privileges to all the users to all the objects to which role has privileges to.
Create a Custom Role with all the necessary privileges to access the required database tables, views and other snowflake objects from Informatica.
Skip this step and proceed to next
if a Custom Role with all necessary privileges already exists.
Step-2(a): Create Custom Role for assigning to Informatica user
The below SQL statement creates a Custom Role named SALES_DATA_ENGINEER in Snowflake.
-- Create Custom Role for Informatica user
----------------------------------------------------------------------------
use role SECURITYADMIN;

create role SALES_DATA_ENGINEER;
Step-2(b): Create Role Hierarchy for Custom Role created for Informatica
When creating custom roles, Snowflake recommends creating hierarchy of custom roles with the topmost role assigned to the SYSADMIN role.
The below SQL statement assign the custom role SALES_DATA_ENGINEER to the role SYSADMIN so that the SYSADMIN can inherit all the privileges assigned to custom role.
-- Create Role Hierarchy for Custom Role created for Informatica
-------------------------------------------------------------------------------------
use role SECURITYADMIN;

grant role SALES_DATA_ENGINEER to role SYSADMIN;
Step-2(c): Grant required privileges to the Custom Role
The custom roles when created do not have any privileges to access any database objects nor create any of them. They must be explicitly provided access.
The below SQL statements grants usage privileges on database sales_db and all schemas present inside it with full privileges on tables present inside them to the custom role created.
-- Grant database privileges to custom role
----------------------------------------------------------------------------
use role SYSADMIN;

grant usage on database sales_db to role SALES_DATA_ENGINEER;
grant usage on all schemas in database sales_db to role SALES_DATA_ENGINEER;
grant all privileges on all tables in database sales_db to role SALES_DATA_ENGINEER;
The below SQL statement provides usage privileges on warehouse sales_wh to the custom role created.
-- Grant warehouse privileges to custom role
----------------------------------------------------------------------------
use role SYSADMIN;

grant usage on warehouse sales_wh to role SALES_DATA_ENGINEER;
Step-3: Assign Custom Role to Informatica user
Users in Snowflake should be assigned with roles. Then only they were allowed to perform actions in their Organization with the privileges inherited from role.
The below SQL statement assigns the custom role SALES_DATA_ENGINEER created in earlier step to the user INFAUSER in Snowflake.
-- Assign custom role to Informatica user
------------------------------------------------------------
use role SECURITYADMIN;

grant role SALES_DATA_ENGINEER to user INFAUSER;
Step-4: Configure Snowflake Data Cloud connector in Informatica
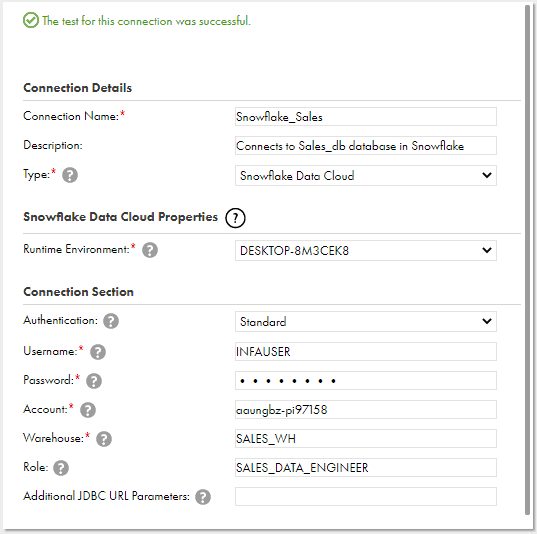
Follow below steps to create Snowflake Data Cloud connection in Informatica Cloud.
1. Go to Administrator > Connections > New Connection.
2. Enter the Connection Name, Description and select the connection type as Snowflake Data Cloud.
3. Select the Runtime Environment where you want to run the tasks.
4. Select the Authentication method as Standard.
5. Enter the Username and Password details of the Informatica user created in Snowflake.
6. Enter the Snowflake Account name. It can be extracted from the the login URL of your Snowflake account.
For example, 123abc is the account name in the https://<123abc>.snowflakecomputing.com
7. Enter the Warehouse name assigned to the Informatica user.
8. Enter the Role name which is assigned to the Informatica user.
Closing Points
The Snowflake Data Cloud Connector is an Add-On Connector and the license needs to be procured by your Informatica Administrator before you start building a connection. You get free trail for first 30 days in case you want to try out initially.
Before you create a connection, make sure necessary privileges are assigned for Informatica user. The Snowflake user must have necessary system defined roles assigned to him in order to create and assign privileges to Informatica user.
The following table lists the permissions that Informatica user require in the Snowflake account:
| Privileges | Object Type |
| Database | Usage |
| Schema | Usage, Create Table, Create View, Create Procedure, Create Sequence |
| Table | All |
| Sequence | All |
| Stored Procedure | All |
Subscribe to our Newsletter !!
Related Articles:
FTP/SFTP Connection in Informatica Cloud enables you to access source and target files present in a remote sever.

File Processor Connector in IICS lets you securely transfer files from one location to another regardless of size and location.

Microsoft Excel Connector is an Add-On Connector that let you read data from multiple worksheets of an Excel source file.


Hi, Thanks a lot for your much efforts in explaining how to connect Snowflake to Informatica.
I have one query, How you set up the run time environment.
Appreciate your help in helping a newbies like me into Cloud world.
you are a blessings for us, Keep writing good stuff..!
Thanks for the feedback Bishnu. Glad the articles are of great help to you!!
Refer our articles on Secure Agent for more information on setting up Runtime environment using secure Agents.