1. Introduction
Taskflows in Informatica Cloud define the execution sequence of the tasks. To create a taskflow, you must first create the tasks and then add them to a taskflow.
A taskflow is analogous to a Workflow in Informatica Powercenter.
There are two different types of taskflows that are supported in Informatica Cloud.
Taskflow
A taskflow controls the execution sequence of Data Integration tasks like mapping configuration task or a synchronization task based on the output of the previous task. It allows you to run tasks in parallel, use advance decision making criteria, time tasks, perform other advanced orchestrations and recovery options.
Linear Taskflow
A Linear taskflow is a simplified version of the taskflow. A Linear taskflow groups multiple Data Integration tasks and run them serially in the specified order.
If a task defined in linear taskflow gets failed, you need to restart the entire taskflow. However, a taskflow allows you to either restart from failed task or skip it and continue when a task fails.
2. Taskflow Steps
Use taskflow steps to add and orchestrate data integration tasks. You can add different types of steps to a taskflow. To add a step to a taskflow, drag a step from the palette on the left into canvas.
Taskflow steps are analogous to mapping transformations. Each step has its own properties and functionalities.
You can add the following steps to a taskflow:
2.1 Assignment
Assignment step is used to set a value for a field. A field is a data holder that carries data around a taskflow. You can use input fields and temporary fields to set a value for a field.
Input fields provide input when you run the taskflow. The taskflow uses temporary fields internally to handle data.
Assignment step is analogous to Expression transformation.
2.2 Data Task
Data Task step is used to add a mapping task, synchronization task, or PowerCenter task to a taskflow. You can configure how the taskflow handles errors and warnings, perform actions based on a schedule, and override runtime parameters.
2.3 Notification Task
Notification Task step is used to send a notification to specified recipients.
You can configure the Notification Task step to send an email notification. For example, you can send an email notification to inform recipients about the number of success rows and error rows that were encountered in a Data Task step of a taskflow.
2.4 Command Task
Command Task step is used to run shell scripts or batch commands from a file on the Secure Agent machine. For example, you can use a command task to move a file, copy a file, zip or unzip a file, or run clean scripts or SQL scripts as part of a taskflow.
You can use the Command Task outputs to orchestrate subsequent tasks in the taskflow.
2.5 File Watch Task
File Watch Task step is used to listen to files in a defined location and monitor file events. In the File Watch Task step, you can select an existing file listener with the connector source type. You can use file events to orchestrate taskflow execution. For example, you can wait for a file to arrive at a particular location and then consume the file in a subsequent step.
2.6 Ingestion Task
Ingestion Task step is used to leverage a file ingestion task for taskflow orchestration. In the Ingestion Task step, you can select an existing file ingestion task.
You might want to perform data integration operations after moving files to an intermediate location and before transferring the files to the target. In this scenario, you can use the Ingestion Task step in conjunction with the Data Task step.
2.7 Subtaskflow
Subtaskflow step is used to embed and reuse an existing taskflow in the current taskflow. You can configure input fields to provide input when you run the taskflow. You can also enable fault handling to determine the reason for a taskflow failure.
2.8 Decision
Decision step is used when you want a taskflow to take different paths based on the value of a specific field.
Decision step is analogous to Router transformation.
2.9 Parallel Paths
Parallel Paths step is used when you want a taskflow to run multiple items at the same time. For example, you can run three mapping tasks simultaneously. The taskflow runs all items in the Parallel Paths step and then moves to the next step.
2.10 Jump
Jump step is used when you want to jump from one part of the taskflow to another. You can use decision task and Jump step in conjunction to loop through a set of tasks in taskflow.
2.11 Wait
Wait step is used when you want to pause taskflow execution for a specific duration. This is similar to Unix Sleep command which waits for a defined period before executing the next steps.
2.12 Throw
Throw step is used to catch a fault, return the fault details, and prevent the execution of the subsequent steps in a taskflow. The Throw step is an interrupting step, which means that if a fault occurs, the Throw step stops the execution of the taskflow and sets the taskflow status to fail.
2.13 End
End step is used to define the HTTP status code that must be used when a taskflow completes. This is a default step that is added at the end of the taskflow.
3. How to create a Taskflow in Informatica Cloud?
Follow below steps to create a taskflow
- In Data Integration, click New > Taskflows > Taskflow > Create.
- Set general properties providing the name of the Taskflow. Set start properties, input fields, and temporary fields for the taskflow if any.
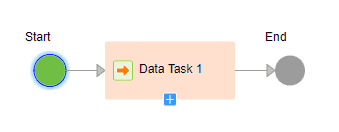
- Add steps to the taskflow. For example, you can use the Data Task step to add a Mapping Task. You can use the Subtaskflow step to embed and reuse an existing taskflow.
- Validate and save the taskflow.
- Click on three dots on top right corner of the page and select Publish from the menu.
4. Taskflow templates
Instead of creating a taskflow from scratch, you can use the templates provided by Informatica. To use a taskflow template, in Data Integration, click New > Taskflows > Taskflow Template name > Create
Below are the pre-created templates in Informatica
4.1 Parallel Tasks
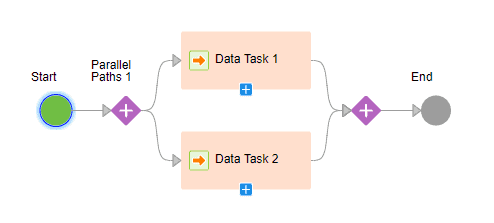
Select the Parallel Tasks template if your major requirement is to run two or more data integration tasks in parallel. You start with a taskflow that contains a Start step, a Parallel Paths step, and an End step.
You can add other steps at any point on the canvas.
4.2 Parallel Tasks with Decision
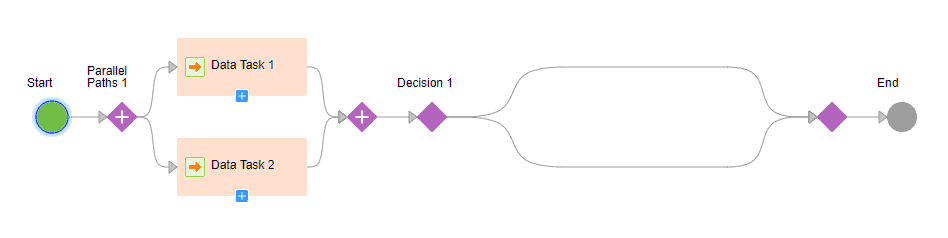
Select the Parallel Tasks with Decision template if your major requirement is to run two or more data integration tasks in parallel and then make a decision based on the outcome of any task. You start with a taskflow that contains a Start step, a Parallel Paths step, a Decision step, and an End step.
4.3 Sequential Tasks
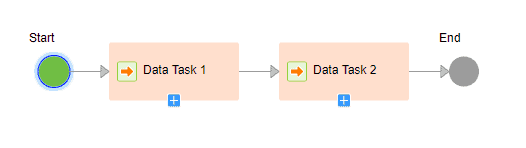
Select the Sequential Tasks template if your major requirement is to run two data integration tasks, one after the other. You start with a taskflow that contains a Start step, two Data Task steps, and an End step.
4.4 Sequential Tasks with Decision
Select the Sequential Tasks with Decision template if your major requirement is to run two Data Integration consecutive tasks and then make a decision based on the output of either task. You start with a taskflow that contains a Start step, two Data Task steps, a Decision step, and an End step.
When you modify a taskflow template, you only modify that instance. The template remains unchanged.

4.5 Single Task
Select the Single Task template if your major requirement is to run one data integration task on a daily or weekly schedule, for example. You start with a taskflow that contains a Start step, a Data Task step, and an End step.
5. Taskflow Properties
To set taskflow properties, create a taskflow, click the Start step and access the Properties section. Optionally, click the empty area of the canvas to access the Properties section.
5.1 General Properties
You can specify the following general properties for a taskflow
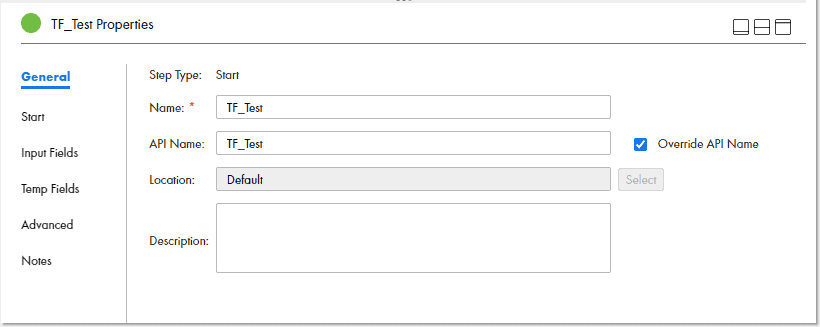
5.1.1 Name
Required. A descriptive name to identify the taskflow.
5.1.2 Override API Name
Optional. Overrides the API name that is auto generated when you publish the taskflow with a name that you specify. When you select this option, the API Name field becomes available for you to edit.
5.1.3 API Name
Required if you select the Override API Name option. A unique API name to override the auto-generated API name for the taskflow. The API name that you specify in this field is used in the generated service URLs.
To change the API name of a published taskflow, you must first unpublish the taskflow. Then, change the API name and republish the taskflow.
5.1.4 Location
The project and folder in which you want to save the taskflow. Click Select to navigate to a folder.
5.1.5 Notes
A description of the taskflow
5.2 Start Properties
You can specify the following properties for a taskflow under Start tab.
5.2.1 Binding
The Binding property defines how a taskflow is invoked and run. You can select one of the following values:
5.2.1.1 REST/SOAP
If you select the REST/SOAP binding type, you can run the taskflow by using a REST or SOAP endpoint. You can use the Allowed Groups and the Allowed Users fields to define the user groups and users who can run a published taskflow as an API.
If you do not configure any of the Allowed Groups and the Allowed Users fields, Data Integration does not generate the taskflow service URL. You can run and schedule the taskflow. However, you cannot run the taskflow as an API.
5.2.1.1.1 Allowed Groups
Defines the groups that have access to the taskflow service URL at run time. Use the Allowed Groups option when you want a group of users to have access to a taskflow service URL.
5.2.1.1.2 Allowed Users
Defines the users that have access to the taskflow service URL at run time.Use the Allowed Users field when you want a specific user to have access to the taskflow service URL.
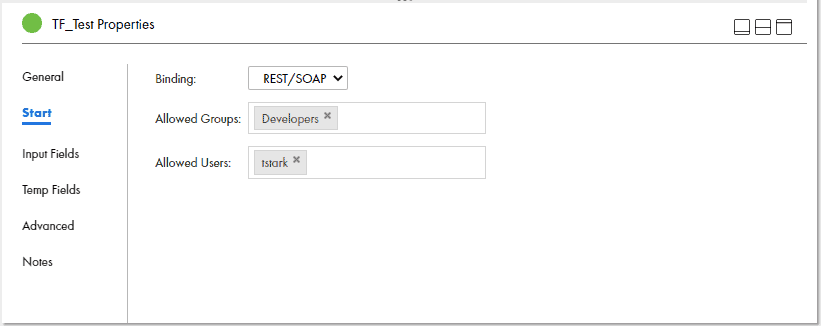
The above image shows that users in the ‘Developers’ group and the user ‘tstark’ will have access to the taskflow service URL.
You can specify more than one user in the Allowed Users field.
5.2.1.2 Event
If you select the Event binding type, the taskflow is invoked when the specified event occurs. For example, a taskflow can be invoked upon an event such as arrival of a file in a file system. The Event Source Name field is available when you select the file listener that you created for the event.
The following image shows the binding set to Event and the Event Source Name field:

After you publish a taskflow, you cannot edit the binding details. You must Unpublish the taskflow to edit the binding details.
5.3 Input fields
Use the Input Fields section to add fields that a taskflow uses at the beginning of a step. You can define the input fields that you want to pass when you run a taskflow. You can create input fields of a simple type or a custom type.
Simple type: Create a simple type field to use common data types such as Checkbox, Date, Date Time, Time, Number, Integer, or Text.
Custom type: Create a custom type field to use an object that is added to the taskflow.
5.4 Temporary fields
A taskflow uses temporary fields internally.
- Temporary fields do not appear in the input or output of a taskflow.
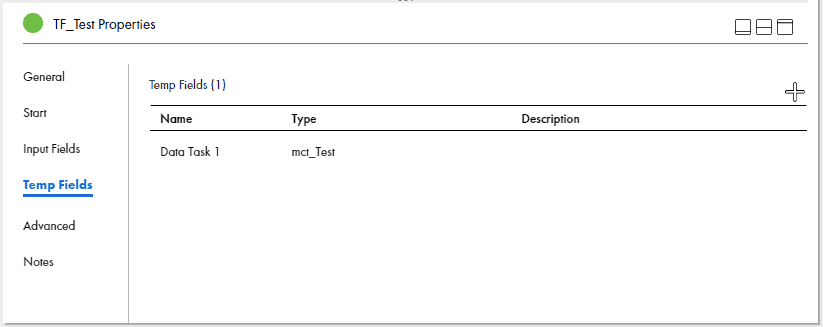
- Some temporary fields appear without you specifically adding them. When you add a task to a taskflow, a corresponding temporary field appears.
- If you included a Data Task step in a taskflow, the Data Task fields appear on the Temp Fields tab of the Start step. The Data Task fields represent the input parameters of the task.
The following image shows the mapping task ‘mct_Test’ used in the Data task step as a temporary field in Start.
5.5 Advanced Properties
You can configure a taskflow to suspend on a fault that occurs at the taskflow level. You can also configure the taskflow to send an email notification to specified recipients when it is suspended on a fault.
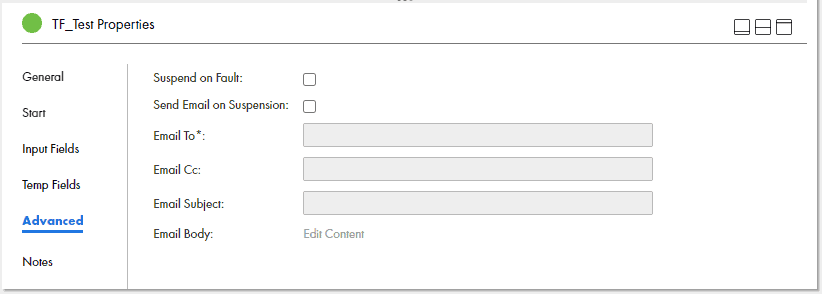
You can define the following advanced properties for a taskflow:
- Suspend on Fault: Suspends the taskflow on a fault that occurs at the taskflow level.
- Send Email on Suspension: Sends an email notification when the taskflow is suspended on a fault.
When you select the Send Email on Suspension option, the rest of the email fields become available. - Email To: Defines the primary recipients for the email notification. Enter multiple email addresses using comma (,) or a semicolon (;) as separator.
- Email Cc: Defines the recipients who need to be sent a copy of the email notification.
- Email Subject: Specifies a short and descriptive subject that introduces the email.
- Email Body: Defines the content that you want to send in the email. Click Edit Content to open a rich text editor and use formatting options such as bold, italics, underlines, lists, indentations, and fonts. You can also insert tables and links
5.6 Notes
Use the Notes field to add information that you or other users might need. The notes that you enter here appear on the Data Integration page. You do not see these notes when you run the taskflow.
6. How to run a Taskflow in Informatica Cloud?
There are several ways in which you can invoke and run a taskflow.
6.1 From the taskflow designer
To run a taskflow from the taskflow designer, open the taskflow and click Run present in the upper-right part of the page.
6.2 As an API
To run a taskflow as an API, you must first publish the taskflow as a service, and then run it. When you publish a taskflow, Data Integration generates the service URL and the SOAP service URL. You can use these endpoint URLs to run the taskflow as an API.
6.3 Using the RunAJob utility
RunAJob utility is a command line tool used to trigger IICS Data Integration tasks.
- The RunAJob utility internally calls IICS REST API service to trigger tasks.
- The RunAJob utility bundles all the required functionalities of REST API there by making it easy to the end user to perform tasks by just passing only the required details to the tool such as task name and type.
- Your organization must have a license to use the RunAJob utility.
6.4 Initiated by a file listener
You can invoke a taskflow through a connector file listener. Within the taskflow, define the binding type as Event and select the connector file listener as the event source. When you publish the taskflow, the taskflow subscribes to the connector file listener that is defined in it. When a file event occurs, the connector file listener invokes the taskflow.
6.5 According to a schedule
To run a taskflow on a schedule, create a schedule in Administrator and associate the taskflow with the schedule.
Related Articles:


Its really informative.Thanks for sharing
Thank you!!👍
Good information.really useful.
Thank you!! Glad it is useful👍
I have 2 components viz. File Ingestion task & Data Replication task.
In linear taskflow its not possible to add File Ingestion task, and
In Advance taskflow, its not possible to add Data Replication task.
Please advise how can I run both in single taskflow.
Did u try event based triggering approach? When one job completes, the other one gets triggered by the file event created by the first job.
ITS SO USEFULL