1. Introduction
A taskflow controls the execution sequence of Data Integration tasks based on the output of the previous task. It allows you to run tasks in parallel, use advance decision making criteria, time tasks, perform other advanced orchestrations and recovery options.
To learn more about Informatica Cloud taskflows and their properties, please refer our article – Overview of Taskflows in Informatica Cloud .There are several ways in which a taskflow could be triggered. One of the way is to trigger the taskflow as an API.
An API is basically a software intermediary that delivers request from a user to a system and sends the system’s response back to a user.
Informatica provides the option to publish a taskflow as an API. A user with access to that API is able to trigger the taskflow from external applications and get the status of the triggered jobs as a response.
In this article let us discuss how to trigger a taskflow as an API. Before that let us understand the requirements for a taskflow to be published as an API.
2. Requirements to run a taskflow as an API
To run a taskflow as an API, following conditions must be met
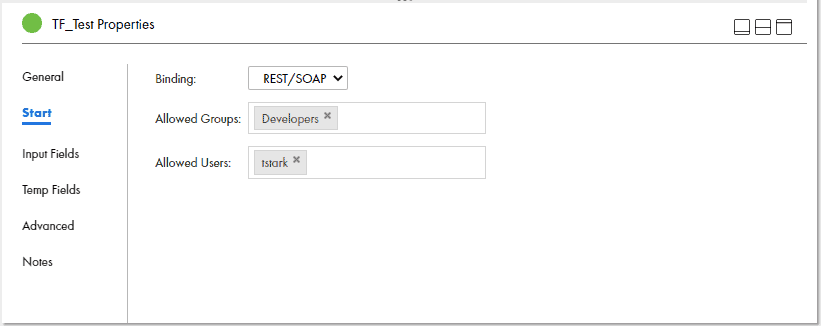
- The Allowed Groups or the Allowed Users must be configured under the Start properties of taskflow.
- The taskflow must be published as a service.
When you publish a taskflow, Data Integration generates the Service URL and the SOAP Service URL. You can use these endpoint URLs to run the taskflow as an API.
If you do not configure any of the Allowed Groups and the Allowed Users fields, Data Integration does not generate the taskflow service URL. You can run and schedule the taskflow. However, you cannot run the taskflow as an API.
The below image shows that users in the ‘Developers’ group and the user ‘tstark’ will have access to the taskflow service URL. You can specify more than one user in the Allowed Users field.
3. Publishing taskflow as an API
Follow below to steps to publish taskflow as an API
- In Data Integration, select Explore and navigate to the taskflow you wanted to publish.
- Make sure any of the Allowed Groups or the Allowed Users fields in the Start properties are configured and saved.
- From the Actions menu on the top right corner of the page, select publish. Data Integration publishes the taskflow as a service.

- From the Actions menu, select Properties Detail. The Properties Detail dialog box appears displaying the Service URL and the SOAP Service URL as shown in the following image:
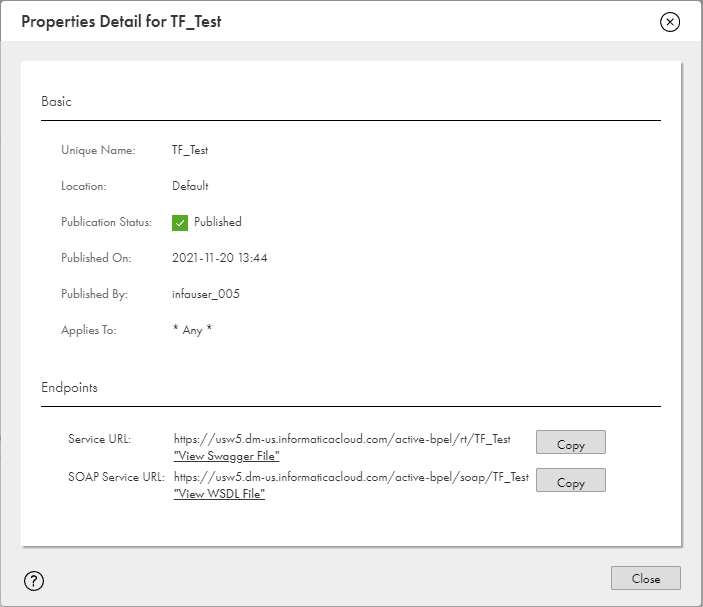
The service URL uses the following format:
<Informatica Intelligent Cloud Services URL>/active-bpel/rt/<API_name>The SOAP service URL uses the following format:
<Informatica Intelligent Cloud Services URL>/active-bpel/soap/<API_name>You can also view the associated Swagger file and WSDL file.
4. Running taskflow as an API
To run the taskflow, perform one of the following steps based on the type of client that you want to use:
- If you use a REST client, use the service URL and the API definition available in the Swagger file to send a request through the REST client.
- If you use a SOAP client, use the SOAP service URL and the API definition available in the WSDL file to send a request through the SOAP client.
You can run the task flow as an API using Service URL through a browser or a third-party tool like Postman.
4.1 Running taskflow as an API from browser
To run taskflow as an API from browser, follow below steps
- Open the taskflow and click Actions > Properties Detail > Copy Service URL.
- Open a browser and paste the Service URL.
- The service returns the taskflow run ID as the response. You can monitor the taskflow execution by using the run ID.
The below image shows triggering taskflow as an API browser and the Run ID of the job returned as the response to the request.

The below image shows the status of the taskflow triggered from browser in IICS monitor.

4.2 Running taskflow as an API from REST Client Postman
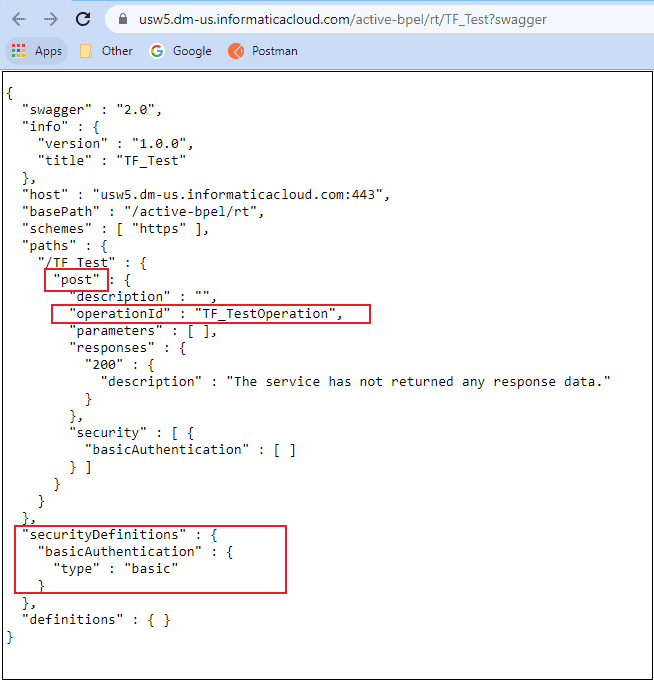
You can use REST clients such as Postman to run the taskflow as an API. You must use the service URL and the API definition available in the Swagger file to send a request through a REST client. The Swagger file contains the operation name, authentication method, and the input for the taskflow.
To view Swagger file, click on “View Swagger File” in the Properties Detail page of a taskflow.
To run taskflow as an API from REST Client Postman, follow below steps
- Open Postman.
- Select the HTTP Method such as GET or POST (specified in swagger file) and specify the generated REST service URL.
- Select the Authentication Type in the Authorization tab. The authentication type details can be collected from swagger file as discussed above.
- Enter the user account details in the Authorization tab.
- Click Send.
- The taskflow run ID will be returned as the response. You can monitor the taskflow execution status by using the run ID.
The below image shows request details specified in Postman.

The below image shows the taskflow run ID as the response in Postman.

The below image shows the status of the taskflow triggered from Postman in IICS monitor.

5. Monitoring the status of a taskflow
To monitor the taskflow with the run ID, perform one of the following steps:
1. Use the run ID to monitor the taskflow run in the My Jobs page. The instance name uses the following format
<taskflow name>-<run ID>2. Use the status resource to query the status of the taskflow based on the run ID. Use following URL to query the status of the taskflow.
<Informatica Intelligent Cloud Services URL>/active-bpel/services/tf/status/<run ID>The below image shows status of the taskflow along with the status details of the mapping task triggered through taskflow using status API.

6. Conclusion
- If you edit a published taskflow, you must publish the taskflow again for the changes to get reflected in the taskflow API.
- By using the Override API Name in General Taskflow properties, you can modify the taskflow (API) name in Service URL.
- If the taskflow requires input values to be passed, you can pass inputs using the service URL through a browser or a third-party tool.
- When you have multiple input values to pass and have a complex body, using a REST client such as Postman makes it easy.


Great example and explanation in setting up to run a taskflow as an API thru Informatica. Thank You for sharing and look forward to venture more information on this topic.
Thank you!! Appreciate your feedback !!
nice explanation, please keep up the good work
Thanks Divakar!! 👍