1. Introduction
Snowflake provides multiple ways to process data from staged files into database tables. In our previous articles, we have discussed how to process files automatically when files arrive in the external stage using Snowpipe by configuring Event Notifications.
In this article let us discuss about Snowpipe REST API which lets users define a list of files to ingest into Snowflake and fetch reports of the load history by making REST API calls.
2. Snowpipe Rest API Endpoints
The Snowpipe API provides two REST endpoints to work with staged files.
- insertFiles
- insertReport
insertFiles Endpoint
This endpoint helps in passing the list of files to be ingested into a table in Snowflake. A successful response from this endpoint means that Snowflake has recorded the list of files to add to the table. A maximum of 5000 files can be submitted for ingestion in a single API request.
insertReport Endpoint
This endpoint helps in retrieving the list of files submitted for loading using insertFiles endpoint and their load status. The endpoint retains the 10,000 most recent events.
3. Steps to access Snowpipe Rest API Endpoints using Postman
Follow below steps to access Snowpipe REST Endpoints using Postman.
- Step-1: Configure Key-Pair Authentication
- Step-2: Generate JWT Token
- Step-3: Create a table to load the data from staged files
- Step-4: Create a Stage and place the files
- Step-5: Create a Snowpipe
- Step-6: Ingest staged files by invoking Snowpipe using a REST API call
- Step-7: Get the load history of the files submitted using a REST API call
Step-1: Configure Key-Pair Authentication
Every API request we make must also include the authentication information. The Snowpipe REST endpoints require Key Pair authentication with JSON Web Token (JWT).
Configure Key-Pair Authentication by performing below actions.
- Generate Public-Private Key pair using OpenSSL.
- Assign the generated public key to your Snowflake user.
- The generated private key should be stored in a file and available locally on machine where JWT is generated.
Refer our previous article for more details on Configuring Key Pair authentication.
Step-2: Generate JWT Token
Once Key Pair Authentication for your Snowflake account is set, JWT token should be generated.
This JWT or JSON Web Token is a time limited token which has been signed with your key and Snowflake will know that you authorized this token to be used to authenticate as you for the API.
Below is the command to generate JWT token using SnowSQL.
snowsql --generate-jwt -a <account_identifier> -u <username> --private-key-path <path>/rsa_key.pemIn the above command,
- <account_identifier> : It is the unique name assigned to your account. It can be extracted from the URL to login to Snowflake account as shown below.
<account_identifier>.snowflakecomputing.com - <username> : It is the user name with which you connect to the specified account.
- <path>: It is the location where the generated private key file is placed.
The below image shows generating JWT using SnowSQL command line tool.

Step-3: Create a table to load the data from staged files
Before we create a Snowpipe, let us create a table in Snowflake into which the data from staged files is to be loaded.
The below SQL statement creates a table named Employee.
CREATE OR REPLACE TABLE EMPLOYEES(
  EMPLOYEE_ID NUMBER,
  FIRST_NAME VARCHAR(50),
  LAST_NAME VARCHAR(50),
  EMAIL VARCHAR(50),
  PHONE_NUMBER NUMBER
);
Step-4: Create a Stage and place the files
Snowpipe supports loading from the following stage types.
- Named Internal Stages
- External Stages
- Table stages
The below SQL statement creates an internal stage in Snowflake.
CREATE OR REPLACE STAGE MY_INTERNAL_STAGE;In order to access the files from external locations like Amazon S3, Google Cloud Storage, or Microsoft Azure, we need to build external stages in Snowflake referencing the external location where our files will be placed.
Refer below articles for creating externals stages in Snowflake
Step-5: Create a Snowpipe
Now that the Stage from where the data files will be read and the table where the data will be loaded are setup, let us build the pipe that copies data from the stage into the table.
The below SQL statement creates a Snowpipe named MY_REST_SNOWPIPE which loads data from MY_S3_STAGE into EMPLOYEES table.
CREATE OR REPLACE PIPE MY_REST_SNOWPIPE
AS
COPY INTO EMPLOYEES
FROM @MY_S3_STAGE
FILE_FORMAT = (TYPE = 'CSV' skip_header = 1);
AUTO_INGEST=TRUE is not used while creating the Snowpipe as the invoking of the Snowpipe happens by calling REST endpoints.
Step-6: Ingest staged files by invoking Snowpipe using a REST API call
To submit the list of files staged to load into a table using Snowpipe REST API, POST a request using insertFiles endpoint.
The Snowpipe REST API request for submitting a list of files to ingest into a table is as follows.
HTTP Method: POST

EndPoint URL:
https://<account>.snowflakecomputing.com/v1/data/pipes/<pipeName>/insertFiles?requestId=<requestId>

Headers:
Content-Type: application/json
Accept: application/json
Authorization: Bearer <jwt_token>

Body:
{
  "files":[
    {
      "path":"path/file1.csv",
      "size":100
    },
    {
      "path":"path/file2.csv",
      "size":100
    }
  ]
}
In the Endpoint URL of the above request:
- account: The Account Identifier of your Snowflake account which can be obtained from your login URL.
- pipeName: Fully qualified Snowpipe Name. ex: my_db.my_schema.my_pipe.
- requestId: A random string used to track requests. The same can be passed to inserReport endpoint to find the load status of files processed in a particular request.
Below is the EndPoint URL of the sample request made for the demonstration.
https://eubchbl-al20253.snowflakecomputing.com/v1/data/pipes/DEMO_DB.PUBLIC.MY_REST_SNOWPIPE/insertFiles?requestId=S0MeRaNd0MvA1ue01In the Headers section of the above request:
- <jwt_token> is the token generated in step-2.
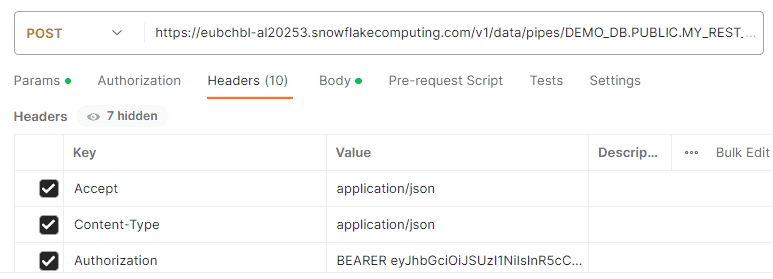
The below image shows the HTTP Method, EndPoint URL, Headers configured in the API request to submit a list of files for ingestion in Postman.
In the Body section of the above request.
- The list of files with path along with file sizes (optional but recommended for better performance) are submitted.
Below is the contents of body submitted for demonstration.
{
"files":[
{
"path":"Inbox/s3_emp_1.csv"
},
{
"path":"Inbox/s3_emp_2.csv"
}
]
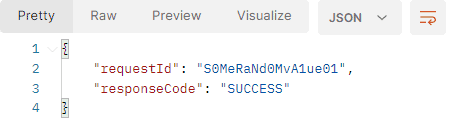
}Submit the request once all the required details are filled in. The successful response of the request will be as shown below.
Step-7: Get the load history of the files submitted using a REST API call
The load history of files submitted for ingestion can be extracted either using the insertReport endpoint. The same can also be verified directly in Snowflake using COPY_HISTORY table function.
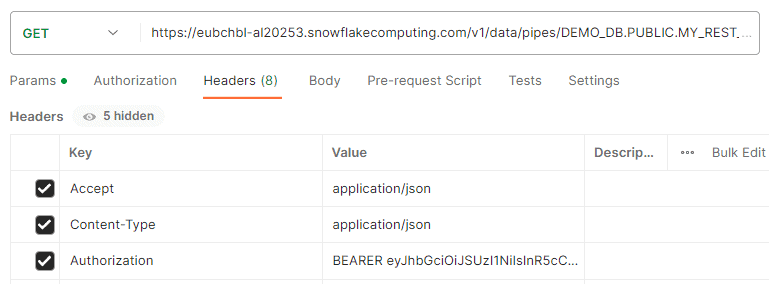
The load history of files submitted for ingestion can be extracted by a REST API request as shown below.
HTTP Method: GET

EndPoint URL:
https://<account>.snowflakecomputing.com/v1/data/pipes/<pipeName>/insertReport?requestId=<requestId>&beginMark=<beginMark>

Headers:
Content-Type: application/json
Accept: application/json
Authorization: Bearer <jwt_token>
In the Endpoint URL of the above request:
- account: The Account Identifier of your Snowflake account which can be obtained from your login URL.
- pipeName: Fully qualified Snowpipe Name. ex: my_db.my_schema.my_pipe.
- requestId: A random string used to track requests submitted in the REST request to ingest files.
- beginMark: Marker, returned by a previous call to insertReport, that can be used to reduce the number of repeated events seen when repeatedly calling insertReport.
Below is the response of the request used for demonstration which shows the load status of the files processed.
{
    "pipe": "DEMO_DB.PUBLIC.MY_REST_SNOWPIPE",
    "completeResult": true,
    "nextBeginMark": "1_1",
    "files": [
        {
            "path": "Inbox/s3_emp_2.csv",
            "stageLocation": "s3://te-aws-s3-bucket001/",
            "fileSize": 18777931,
            "timeReceived": "2023-05-21T15:19:04.353Z",
            "lastInsertTime": "2023-05-21T15:19:35.356Z",
            "rowsInserted": 199923,
            "rowsParsed": 199923,
            "errorsSeen": 0,
            "errorLimit": 1,
            "complete": true,
            "status": "LOADED"
        },
        {
            "path": "Inbox/s3_emp_1.csv",
            "stageLocation": "s3://te-aws-s3-bucket001/",
            "fileSize": 18777914,
            "timeReceived": "2023-05-21T15:19:04.353Z",
            "lastInsertTime": "2023-05-21T15:19:35.356Z",
            "rowsInserted": 200195,
            "rowsParsed": 200195,
            "errorsSeen": 0,
            "errorLimit": 1,
            "complete": true,
            "status": "LOADED"
        }
    ],
    "statistics": {
        "activeFilesCount": 0
    }
}
The load status can also be verified from Snowflake using the COPY_HISTORY table function as shown below.
SELECT * FROM TABLE(INFORMATION_SCHEMA.COPY_HISTORY(TABLE_NAME=>'EMPLOYEES', START_TIME=> DATEADD(MINUTES, -10, CURRENT_TIMESTAMP())));
4. Snowpipe REST API Response Codes
Below are the expected response codes of the Snowpipe REST API requests.
| Response Code | Description |
| 200 | Success. Files added to the queue of files to ingest. |
| 400 | Failure. Invalid request due to an invalid format, or limit exceeded. |
| 404 | Failure. pipeName not recognized. This error code can also be returned if the role used when calling the endpoint does not have sufficient privileges. |
| 429 | Failure. Request rate limit exceeded. |
| 500 | Failure. Internal error occurred. |
5. Closing Points
In this article we have used Postman REST Client to use Snowpipe REST API. However in your application, you can choose to use either Java or Python SDKs which are provided by Snowflake. The difference is the Snowflake provided SDKs automatically handle the creation and management of JWT tokens required for authentication.
For more details, refer Snowflake Documentation.
Subscribe to our Newsletter !!
Related Articles:
A step by step guide on automating continuous data loading into Snowflake through Snowpipe on Microsoft Azure.

A step by step guide on automating continuous data loading into Snowflake through Snowpipe on AWS S3.

Learn how to load files from external storage using the Snowpipe and monitor the load status of the files in Snowflake.