
1. Introduction
Over the years, there is a steady increase in demand for getting real-time or near real-time data for data analytics. In such scenarios, it becomes important how soon the data can be made available in Snowflake as soon as it is available.
There are several ways in which data available on external stages can be loaded into Snowflake like using popular ETL tools likes Informatica Cloud, Matillion etc. But Snowflake also provides its own functionality to load the data from external stages into its tables.
Let us discuss more about this in the following article.
2. What is Snowflake Snowpipe?
Snowpipe is Snowflake’s continuous data ingestion service which enables loading data from files as soon as they are available in a stage. It is basically a “COPY INTO” command continuously looking for fresh files to process them in micro-batches as soon as they arrive at the staging area.
Snowpipe eliminates the requirement to build out near-real-time pipelines to process data from external locations.
Few key points to note about Snowflake Snowpipe.
- Snowpipe uses a combination of filename and a file checksum to ensure only “new” data is processed.
- Snowpipe uses serverless architecture and uses Snowflake-supplied compute resources and you are billed accordingly.
- Snowpipe loads data in response to new file notification events. These notification events are usually configured in cloud platforms.
- We can also trigger a Snowpipe manually from Snowflake or through custom programs calling the REST APIs.
3. Snowflake Snowpipe on AWS
In this article, let us see an end-to-end demo on how to set up a Snowflake Snowpipe on an AWS S3 external stage.
The following diagram shows the Snowpipe auto-ingest process flow on AWS S3.
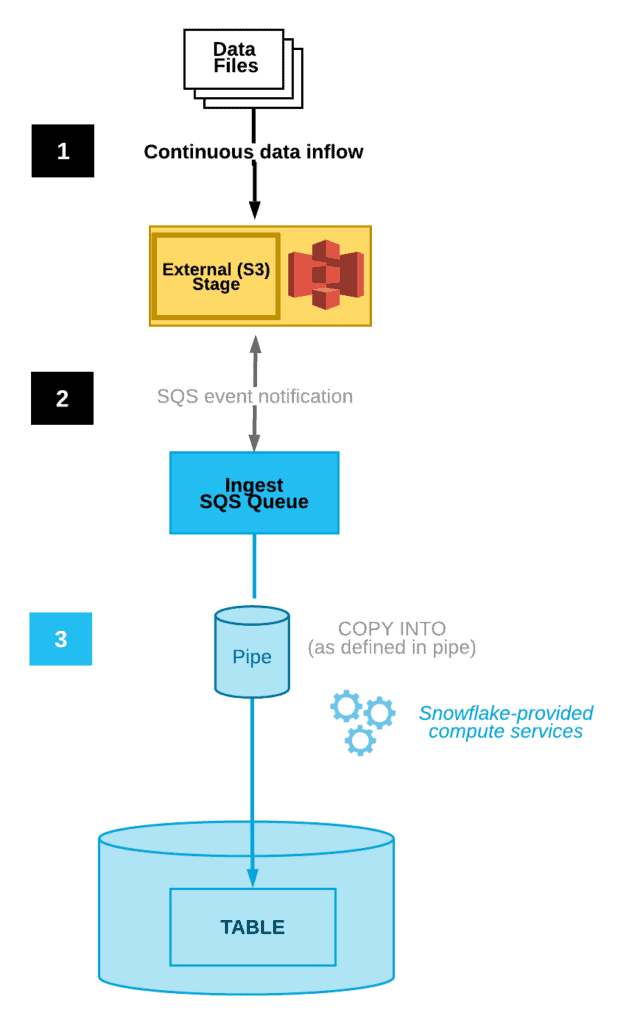
- Data files are loaded in a stage.
- An S3 event notification informs Snowpipe via an SQS queue that files are ready to load. Snowpipe copies the files into a queue.
- A Snowflake-provided virtual warehouse loads data from the queued files into the target table based on parameters defined in the specified pipe.
4. Steps to implement Snowpipe on AWS
The below steps should be followed to implement Snowpipe on AWS.
- Create an AWS IAM Policy which configures access permissions for Snowflake to access your S3 bucket.
- Create an External Stage on an AWS S3 bucket.
- Create Snowflake Snowpipe to ingest files from the AWS external stage.
- Setup AWS S3 Event Notification to automate Snowpipe.
Let us discuss these steps in detail.
4.1. Create an IAM Policy configuring Access Permissions on the S3 Bucket
In order to create an External Stage on AWS S3 bucket, as a first step a Policy should be created which configures access permissions for Snowflake to access your S3 bucket.
Follow below steps to create a custom policy in IAM.
1. Log into the AWS Management Console.
2. Go to IAM > Policies > Create policy.
3. Select JSON tab and enter the policy contents in the editor as shown below and click Next.
{
"Version": "2012-10-17",
"Statement": [
{
"Effect": "Allow",
"Action": [
"s3:GetObject",
"s3:GetObjectVersion"
],
"Resource": "arn:aws:s3:::<bucket>/<prefix>/*"
},
{
"Effect": "Allow",
"Action": [
"s3:ListBucket",
"s3:GetBucketLocation"
],
"Resource": "arn:aws:s3:::<bucket>",
"Condition": {
"StringLike": {
"s3:prefix": [
"<prefix>/*"
]
}
}
}
]
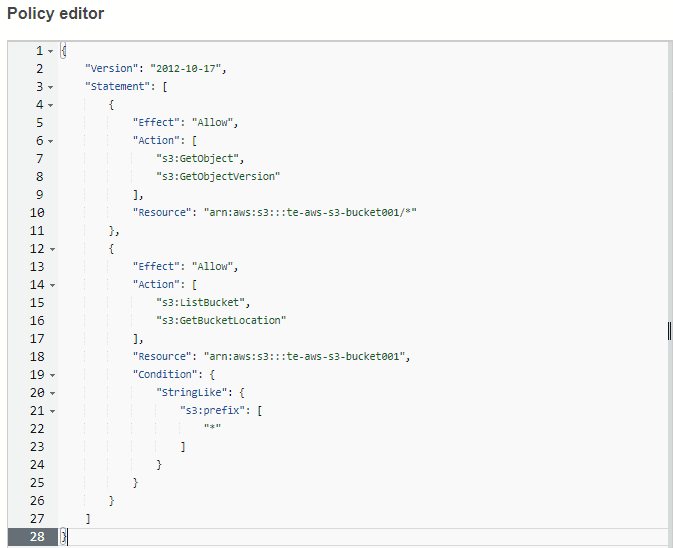
}The above policy provides the following minimum required permissions by Snowflake to access the S3 bucket. Add additional permissions if required as per your requirement.
- s3:GetBucketLocation
- s3:GetObject
- s3:GetObjectVersion
- s3:ListBucket
The below image shows the policy providing all the above listed permissions on S3 bucket named te-aws-s3-bucket001.
4. Enter the Policy name (e.g. Snowpipe_Policy) and an optional description. Click Create policy.
4.2. Create an External Stage on AWS S3 bucket
In order to access the files from external locations like AWS S3, we need to build external stages in Snowflake referencing the AWS S3 bucket where our files will be placed.
An External Stage in Snowflake can be created in two different ways.
- Using Storage Integration
- Using Access Keys of IAM User
It is recommended practice to create an external stage using Storage Integration.
4.2.1. Using Cloud Storage Integration
A Storage Integration is a Snowflake object that stores a generated Identity and Access Management (IAM) entity for your external cloud storage. Cloud provider administrators grant permissions on the storage locations to the generated Snowflake entity. This allows users to avoid supplying credentials when creating stages or when loading or unloading data.
Follow below steps to create an external stage using Storage Integration.
1. Create IAM Role in AWS
An IAM Role must be created with all the necessary permissions to access the S3 bucket by assigning an IAM Policy. The Role gets assigned to the Snowflake entity allowing it to access the files in the S3 bucket.
Follow below steps to create an AWS IAM Role to grant privileges on the S3 bucket containing your data files.
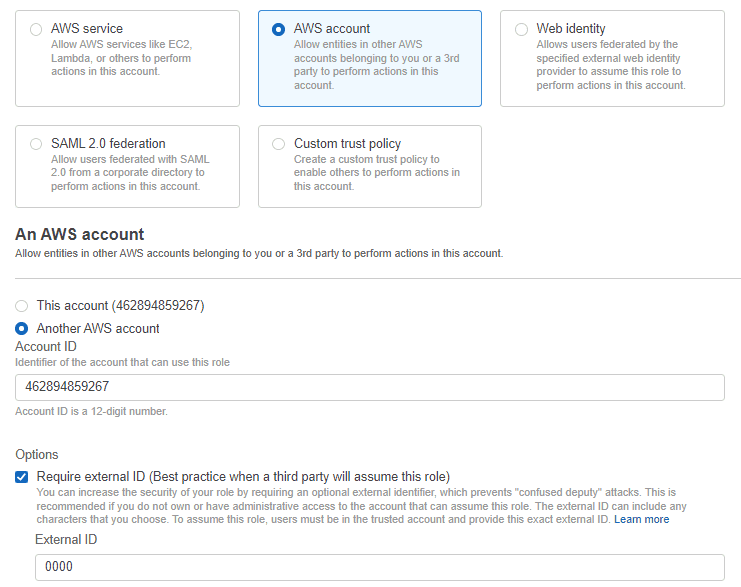
1. Go to IAM > Roles > Create role.
2. Select Trusted entity type as AWS account.
3. Select Another AWS account and specify your own AWS account ID temporarily. We will come back to modify this value to grant access to Snowflake.
4. Select the Require external ID option. Enter a dummy External ID value 0000. We will also comeback to modify this value to grant access to Snowflake.
5. Click the Next button.
6. Select the policy created in step 4.1 and click Next.
7. Enter the Role name (e.g. Snowpipe_Role) and an optional description. Click Create Role.
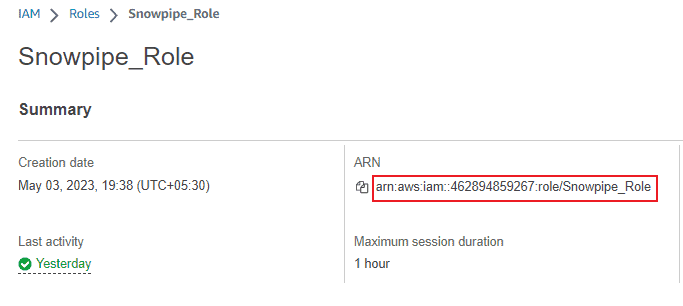
Once role is created, note the Role ARN from the role summary page. The Role ARN should be passed as a reference while creating the Storage Integration.
2. Create a Cloud Storage Integration in Snowflake
A Storage Integration in Snowflake can be created by users with ACCOUNTADMIN role or a role with global CREATE INTEGRATION privilege.
The below SQL creates Storage Integration in Snowflake.
USE ROLE ACCOUNTADMIN;

CREATE STORAGE INTEGRATION AWS_STORAGE_INT
  TYPE = EXTERNAL_STAGE
  STORAGE_PROVIDER = 'S3'
  ENABLED = TRUE
  STORAGE_AWS_ROLE_ARN = 'arn:aws:iam::462894859267:role/Snowpipe_Role'
  STORAGE_ALLOWED_LOCATIONS = ('s3://te-aws-s3-bucket001')
;
In the above SQL statement:
- The ARN of the role created in previous step is passed as value to the STORAGE_AWS_ROLE_ARN.
- You can pass multiple paths as input to STORAGE_ALLOWED_LOCATIONS like (
's3://te-aws-s3-bucket001/<path1>', 's3://te-aws-s3-bucket001/<path2>'). - Optionally you can also pass the specific paths to block access using STORAGE_BLOCKED_LOCATIONS.
3. Retrieve the AWS IAM User for your Snowflake Account
The storage integration creates IAM user for your Snowflake account. The ARN of the IAM user created for your Snowflake account can be extracted using the “DESC INTEGRATION” command.
DESC INTEGRATION AWS_STORAGE_INT;Where AWS_STORAGE_INT is the storage integration created in earlier step.
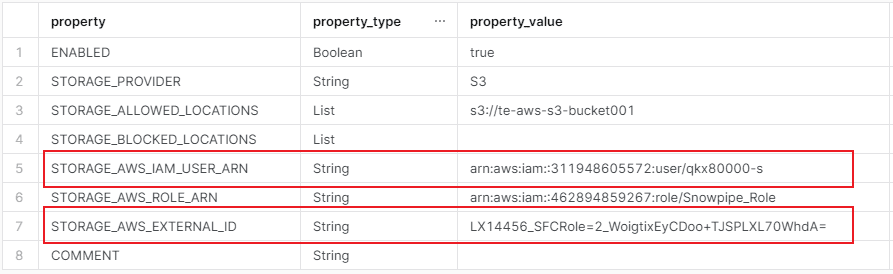
From the output of above command, record below values.
- STORAGE_AWS_IAM_USER_ARN: The AWS Account that is needed to be configured as Trusted entity.
- STORAGE_AWS_EXTERNAL_ID: The external ID that is needed to establish a trust relationship.
4. Grant the IAM User Permissions to Access Bucket Objects
The IAM user created for your Snowflake account should be provided access to the storage account. To achieve this, the details of your Snowflake account should be configured in the role which provides access to the S3 bucket folders.
Follow below steps to grant the Snowflake IAM User permissions to access bucket objects.
1. Go to IAM > Roles > select the Role created in step-1.
2. Click on the Trust relationships tab > Edit trust policy.
3. Replace the AWS Principle and ExternalID values in the Policy document with values from DESC INTEGRATION recorded in step-3.
{
  "Version": "2012-10-17",
  "Statement": [
    {
      "Sid": "",
      "Effect": "Allow",
      "Principal": {
        "AWS": "<STORAGE_AWS_IAM_USER_ARN>"
      },
      "Action": "sts:AssumeRole",
      "Condition": {
        "StringEquals": {
          "sts:ExternalId": "<STORAGE_AWS_EXTERNAL_ID>"
        }
      }
    }
  ]
}
4. Click the Update policy button. The changes are saved.
5. Create an External Stage using Storage Integration
The below SQL statement creates External Stage on AWS S3 location using Cloud Storage Integration.
CREATE STAGE MY_S3_STAGE
URL = 's3://te-aws-s3-bucket001'
STORAGE_INTEGRATION = AWS_STORAGE_INT;
In the above statement
's3://te-aws-s3-bucket001'is the S3 bucket on which you are creating the stage.AWS_STORAGE_INTis the storage integration created in step-2.
4.2.2. Using Access Keys
The alternative way of creating external stage is by creating an IAM User in AWS Management console and using the access keys of the user to create a stage in Snowflake.
Follow below steps to create an external stage using access keys of the user.
1. Create an IAM user
Follow below steps to create an IAM user in AWS Management Console.
1. Login in to AWS Management Console.
2. Go to IAM > Users > Add users
3. Enter a User name and click Next.
4. Select Attach policies directly and search for the policy created in step 4.1.
5. Select the policy and click Next.
6. Review the details and click Create user to create the user.
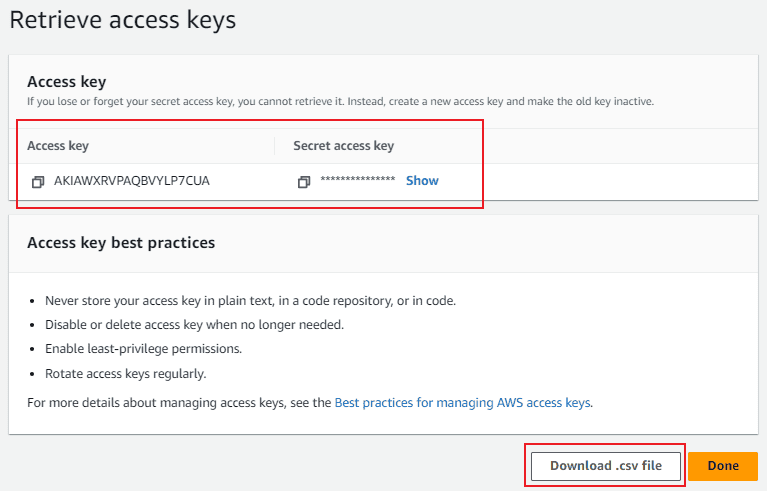
2. Extract the Access Key details of the user
Follow below steps to extract the Access Keys of the user
1. Go to IAM > Users > select the user created in step-1.
2. Select Security credentials > Access Keys > Create access key.
3. Select Application running outside AWS and click Next.
4. Enter an optional description about the usage of keys and click Next.
5. The Access key and Secret access key values are available in next page. You can download the keys for future reference by clicking the Download .csv file at the bottom.
3. Create an External Stage using Access Key details of user
The below SQL statement creates External Stage on AWS S3 location using Access key details of IAM user.
CREATE STAGE s3_stage
URL = 's3://te-aws-s3-bucket001'
CREDENTIALS = (AWS_KEY_ID = ' AKIAWXRVPAQBVYLP7CUA'  AWS_SECRET_KEY = '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');
4.3. Create Snowflake Snowpipe
Before we create a Snowpipe, let us create a table into which the data from stage is to be loaded.
CREATE OR REPLACE TABLE EMPLOYEES(
  EMPLOYEE_ID NUMBER,
  FIRST_NAME VARCHAR(50) ,
  LAST_NAME VARCHAR(50) ,
  EMAIL VARCHAR(50) ,
  PHONE_NUMBER NUMBER
);
Now that the Stage from where the data files will be read and the table where the data will be loaded are setup, let us build the pipe that moves data from the stage into the table. This is going to be an object called a PIPE, and it is wrapped around a COPY command. We will enable the AUTO_INGEST feature and specify the file format of our source data which is CSV.
CREATE OR REPLACE PIPE MY_SNOWPIPE
AUTO_INGEST=TRUE
AS
COPY INTO EMPLOYEES
FROM @MY_S3_STAGE/Inbox
FILE_FORMAT = (TYPE = 'CSV' skip_header = 1);
AUTO_INGEST = TRUE enables automatic data loading when the file arrives in the stage location.
4.4. Create AWS S3 Event Notification to Automate Snowpipe
The AWS S3 Event Notifications configured on your S3 bucket notifies Snowpipe when new data is available to load via SQS Queues. The automatic processing of new files through auto-ingest feature of Snowpipe relies on SQS queues to deliver event notifications from S3 to Snowpipe.
Snowpipe SQS queues are created and managed by Snowflake.
Follow below steps to create AWS S3 Event Notification to Automate Snowpipe.
1. Execute the SHOW PIPES commands to extract the Amazon Resource Name (ARN) of your SQS queue.
SHOW PIPES;The ARN of the SQS Queue is available in the NOTIFICATION_CHANNEL column.
2. Log into the AWS Management Console.
3. Go to Amazon S3 and select the S3 bucket on which stage is created.
4. Click on Properties tab > Event notifications > Create event notification.
5. Configure below properties in Event Notification.
- Event name: Name of the event notification.
- Event types: Select All object create events option.
- Destination: Select SQS queue option.
- Specify SQS queue: Select Enter SQS queue ARN option and enter the SQS queue name from the SHOW PIPES output.
5. Summary
Snowpipes are basically a COPY INTO statement looking for the files on an external stage to process them as soon as they arrive. To configure a Snowpipe, we have set up a
- Policy which defines access policies on S3 bucket.
- External Stage created on the S3 bucket.
- Event Notification service which captures event messages when a new file arrives.
In next articles, we will discuss how to load and monitor the files from external stage using Snowpipe.
Subscribe to our Newsletter !!
Related Articles:

Learn what JWT token is, how to generate it and pre-requisites to generate it for Snowflake Key Pair Authentication.

Snowflake SQL REST API allows users to interact with Snowflake through HTTP requests, making it easy to integrate with other systems.

Learn how to submit an API request containing multiple statements to execute to the Snowflake SQL REST API using Postman.


excellent .
Thanks for the feedback!!