Introduction
In our previous articles we have discussed how to configure Amazon S3 v2 connector using Basic Authentication and IAM Authentication methods. As discussed, unlike basic authentication method, we could avoid using the permanent access key and secret key using IAM Authentication method.
The IAM Authentication method make use of temporary security credentials using AssumeRole to access the S3 buckets from EC2 instance. Though this is a secure way to connect, there are certain scenarios where we could end up providing more privileges than required for Informatica application.
In this article let us discuss how we could provide only the required privileges to the Informatica application by making EC2 role assume a different role when connected by Informatica.
The access is still granted using temporary security credentials using AssumeRole to access the AWS resources but with the limited privileges we specify for Informatica.
Rules and Guidelines
Similar to IAM Authentication method, the secure agent must run on an EC2 instance to grant access using temporary security credentials.
There are two different roles that are involved in this authentication method.
- The EC2 role which is to be assigned to the EC2 Instance.
- The IAM role that needs to be assumed by the EC2 role when connected from Informatica.
Both roles must have permissions policy and trust policy attached. The policy specifies the AWS resource that the IAM user/service can access and the actions that the IAM user/service can perform. The trust policy specifies the IAM user/service from the AWS account that can access the AWS resource.
The EC2 role must have permissions to assume another role. It could also have another permissions to different services including S3. A trust relationship policy with sts:AssumeRole must be attached to the role which trusts EC2 services to assume the role.
The IAM role to be assumed by EC2 role must have the required limited permissions set up to access S3 using a custom policy and a trust relationship policy with sts:AssumeRole must be attached which trusts a user.
Step-1: Create a Custom Policy which provides access to the required S3 Bucket
Follow below steps to create a custom policy in IAM to provide access to the required S3 Bucket.
1. Go to IAM > Policy > Create policy
2. Select JSON and enter the policy contents in the editor and click Next.
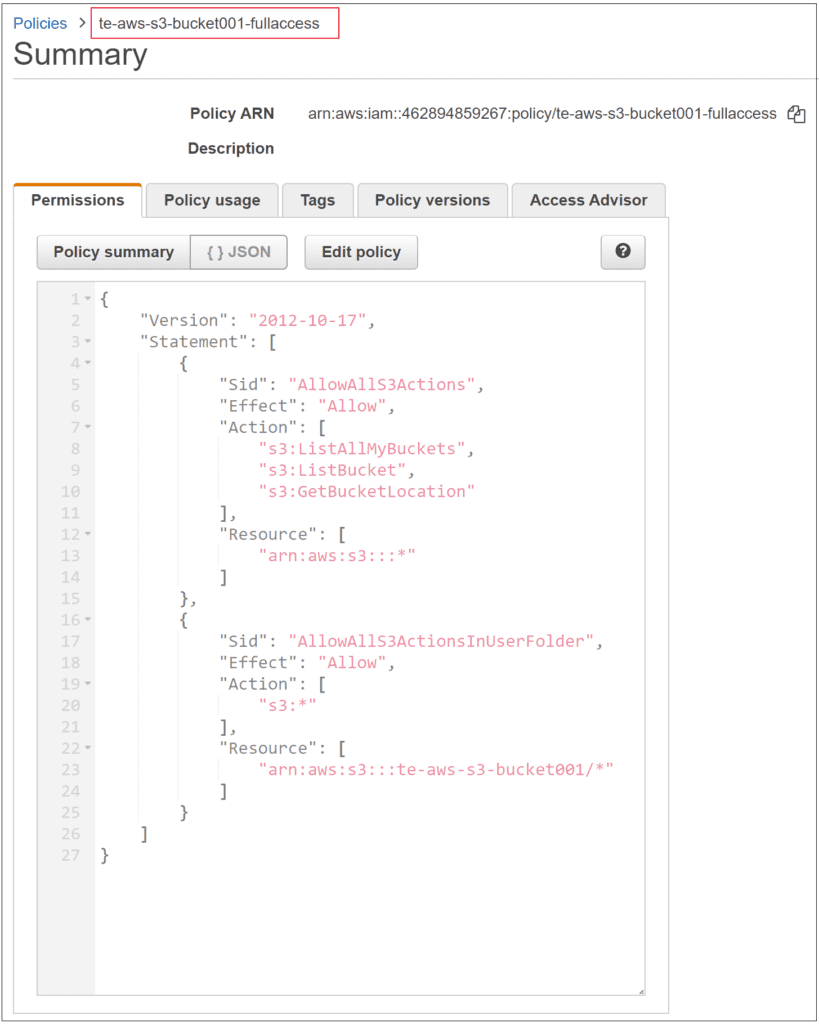
The contents of the policy which provides full access to the S3 bucket te-aws-s3-bucket001 is as shown below
{
    "Version": "2012-10-17",
    "Statement": [
        {
            "Sid": "AllowAllS3Actions",
            "Effect": "Allow",
            "Action": ["s3:ListAllMyBuckets", "s3:ListBucket", "s3:GetBucketLocation"],
            "Resource": “*”
        },
        {
            "Sid": "AllowAllS3ActionsInUserFolder",
            "Effect": "Allow",
            "Action": ["s3:*"],
            "Resource": ["arn:aws:s3:::te-aws-s3-bucket001/*"]
        }
    ]
}
3. The next section to add tags is optional. Click Next.
4. Enter a Name for the policy and click Create policy.
The below image shows the policy te-aws-s3-bucket001-fullaccess which allows full access to the S3 bucket te-aws-s3-bucket001.
Step-2: Create a Custom Policy which provides full access to STS Service
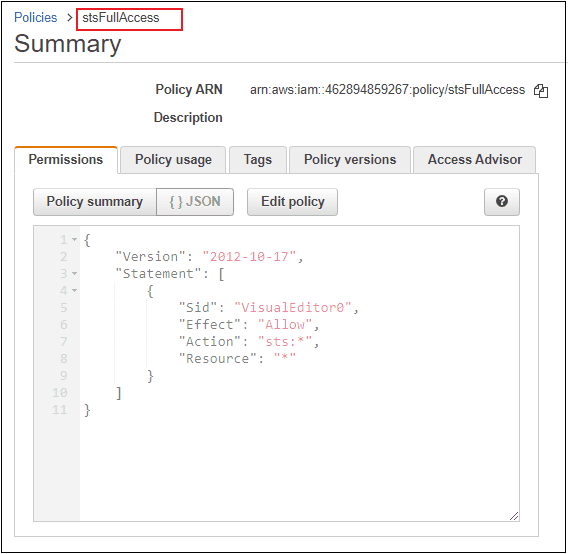
Follow the same steps as mentioned in the above step. The contents of the policy which provides the full access to the STS Service is as shown below.
{
    "Version": "2012-10-17",
    "Statement": [
        {
            "Sid": "VisualEditor0",
            "Effect": "Allow",
            "Action": "sts:*",
            "Resource": "*"
        }
    ]
}
The below image shows the policy stsFullAccess which allows full access to STS service.
Step-3: Create an EC2 role with permissions to assume another role
Follow below steps to create a role to be assigned to the EC2 service with permissions to assume another role.
1. Go to IAM > Roles > Create role.
2. Select Trusted entity type as AWS service.
3. Select the Use case as EC2 and click Next.
4. Select the Custom Policy created in step-2 which grants full access to the STS Service
5. Enter the Role name and click Create role.
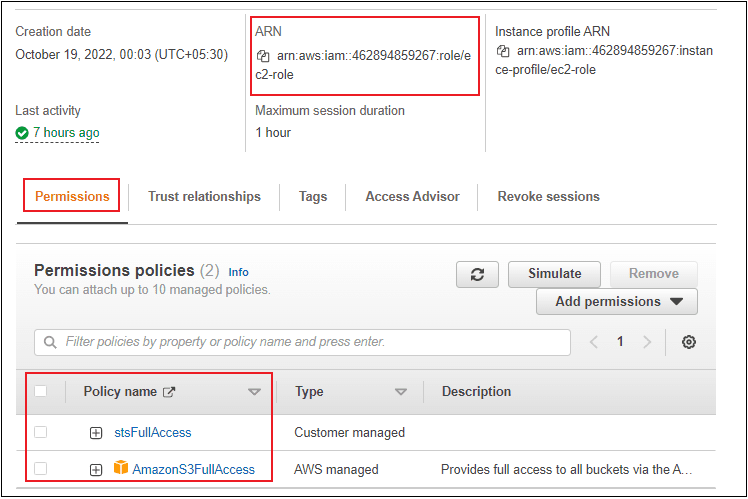
The below image shows the role ec2-role which has full permissions to access all S3 buckets and STS service.
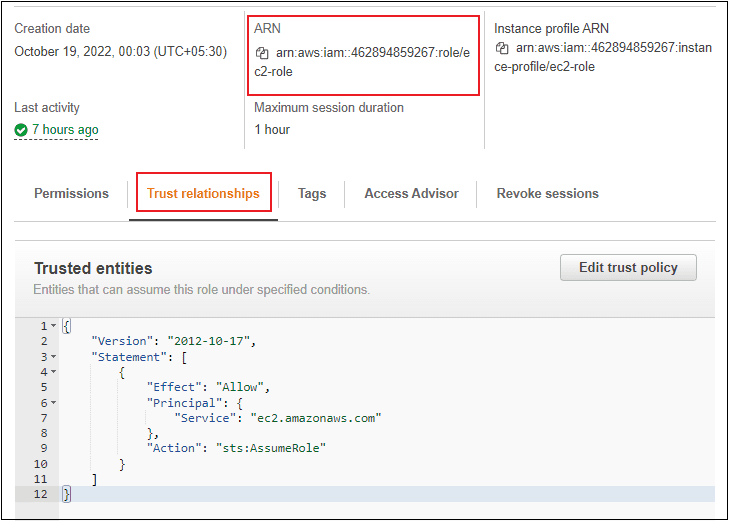
The below image shows the trust relationship policy of role ec2-role which trusts EC2 services to assume the role.
Step-4: Create an IAM role to be assumed by EC2 role
Follow below steps to create a role to be assumed by EC2 role when connected from Informatica application.
1. Go to IAM > Roles > Create role.
2. Select Custom trust policy as Trusted entity.
3. Enter below policy contents in the JSON editor and click Next. The IAM role adds the IAM user as a trusted entity allowing the IAM users to use the temporary security credentials.
{
    "Version": "2012-10-17",
    "Statement": [
        {
            "Effect": "Allow",
            "Principal": {
                "AWS": "arn:aws:iam:: AWS-account-ID:root"
            },
            "Action": "sts:AssumeRole"
        }
    ]
}
4. Select the Custom Policy created in step-1 which grants access to the required S3 bucket.
5. Enter the Role name, review and click Create role.
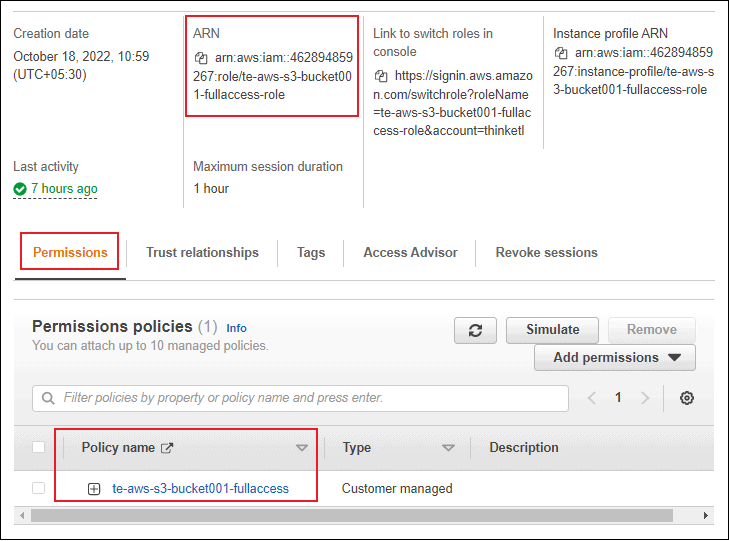
The below image shows the role te-aws-s3-bucket001-fullaccess-role which has full permissions to access the S3 bucket te-aws-s3-bucket001.
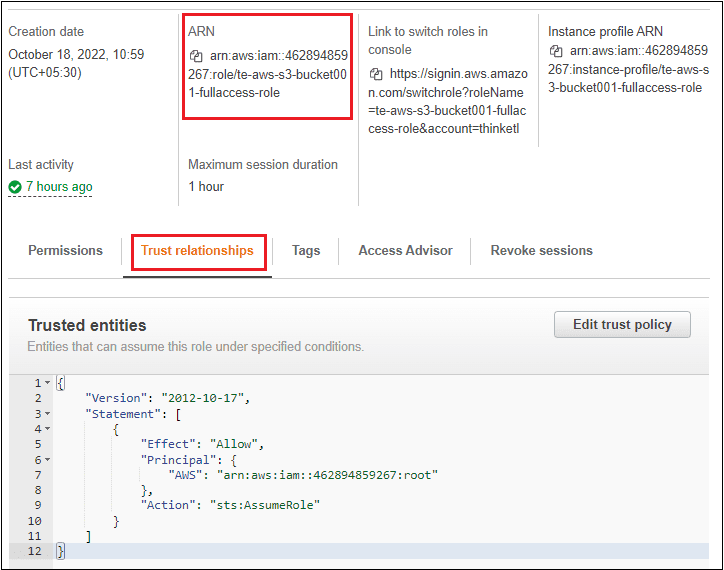
The below image shows the trust relationship policy of role te-aws-s3-bucket001-fullaccess-role which trusts the root user of the AWS account.
Step-5: Assign EC2 role to the instance where secure agent runs
Follow below steps to assign an IAM role to an EC2 Instance
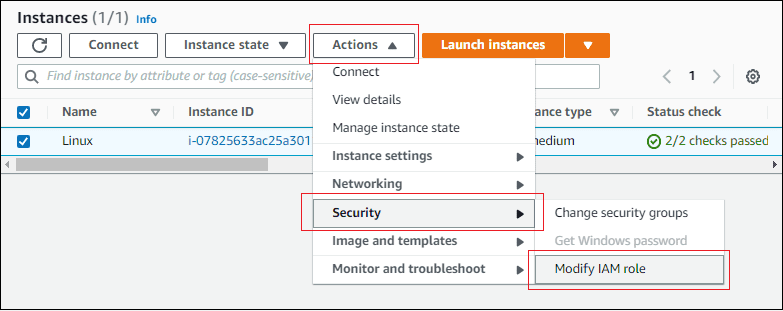
1. Go to EC2 > Instances and select the EC2 instance where the secure agent runs.
2. On the top right menu select Actions > Security > Modify IAM role.
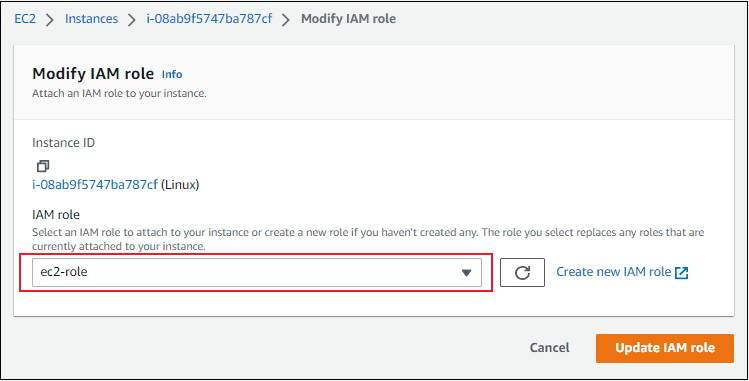
3. Select the EC2 role created in earlier step and click Update IAM role.
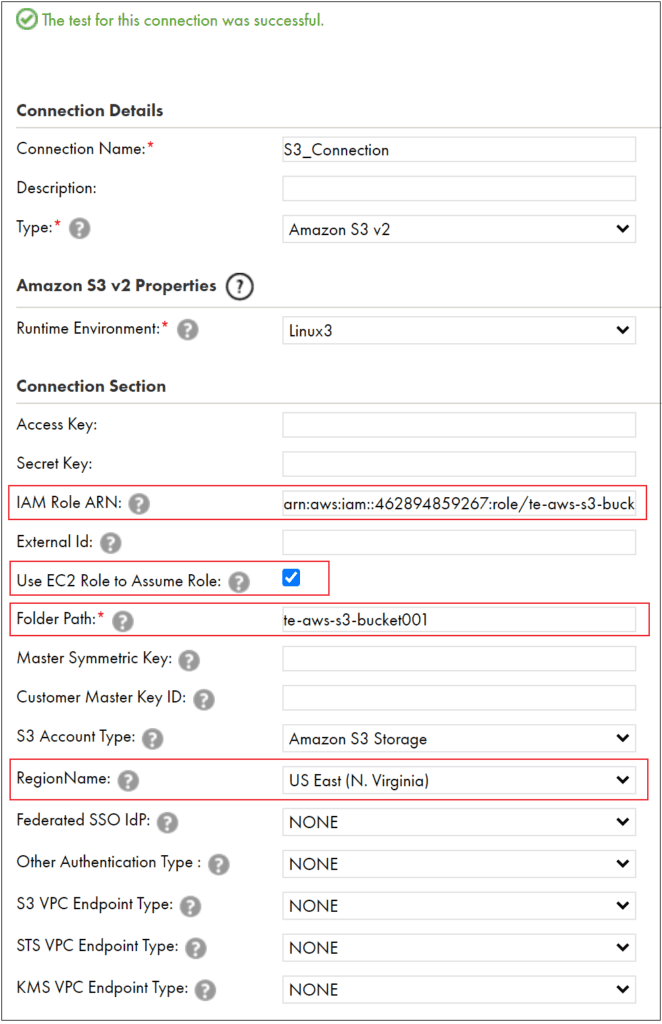
Step-6: Configure IICS Amazon S3 v2 connection
Follow below steps to create an AWS S3 v2 Connector using AssumeRole in Informatica Cloud.
1. Go to Administrator > Connections > New Connection.
2. Enter the Connection Name and select the connection type as Amazon S3 v2
3. Select the Runtime Environment where you want to run the tasks.
4. Enter ARN of the IAM Role to be assumed by the EC2 role (created in step-4) under IAM Role ARN.
5. Check Use EC2 Role to Assume Role for enabling EC2 role to assume another role specified in IAM Role ARN attribute.
5. Enter the bucket name or complete folder path to the Amazon S3 objects. Don’t use a slash at the end of the folder path.
6. Select the region of the bucket that you want to access.
7. Leave the rest of the properties in default state, test the connection and save it.
Subscribe to our Newsletter !!
Related Articles:

Learn how to create Amazon S3 v2 Connection in Informatica Cloud with Basic Authentication method using Access Keys.

Learn how to create Amazon S3 v2 Connection in Informatica Cloud with IAM Authentication method using IAM Roles.

Learn how to create Amazon S3 v2 Connection in Informatica Cloud using Temporary security credentials via AssumeRole