Introduction
Amazon Simple Storage Service (Amazon S3) is a web-based scalable, high-speed, cloud storage service. It provides object storage, which is built for storing and recovering any amount of information or data from anywhere over the internet.
Amazon S3 stores data as objects within buckets. Each object is stored as a file with its metadata included. Buckets are the containers for objects. You can create folders to group objects and nest folders in buckets.
In this article let us discuss how to connect to AWS S3 storage from Informatica Cloud using Basic Authentication with Access Keys.
Step-1: Create IAM User for Informatica in AWS Console
In order to access the Amazon S3 from Informatica, there should be a dedicated user created for Informatica using AWS IAM service.
Follow below steps to create an IAM user for Informatica in AWS
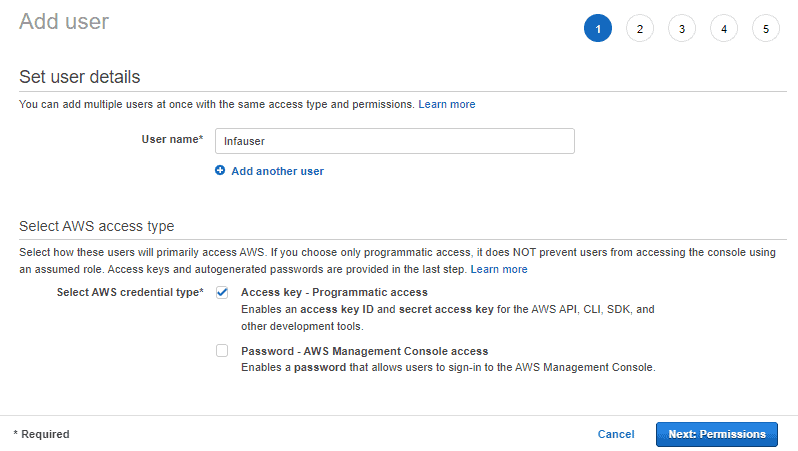
1. Login in to AWS Management Console as a user with Admin privileges.
2. Go to IAM > Users > Add users
3. Enter a User name for the Informatica application.
4. Select the AWS credential type as Access Key – Programmatic access and click Next to assign permissions.
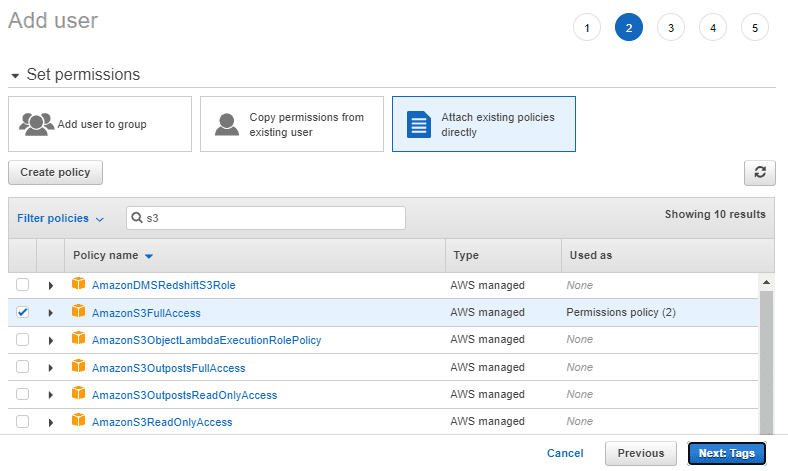
5. Click on Attach existing policies directly. There are several ways to assign permissions to the user. In this example let us assign permissions by attaching an existing policy directly.
6. Under Filter policies search with the keyword s3. There are several pre-built policies available from Amazon. Select AmazonS3FullAccess to provide full permissions on all s3 buckets to the user and click Next.
Note: In the next sections of the article, we will discuss how the access can be restricted only to a required bucket or a folder inside it.
7. The next section to add tags is optional. Click Next.
8. Review the details and click Create user.
9. You will receive a success message along with Access key ID and Secret access key details of the users.
Note: The Secret access key is visible only once. To store the details for future reference click on Download.csv file. You can also request for new pair of access keys if required in the future from IAM.

Step-2: Create a custom IAM Policy
When we created a user for Informatica application in earlier step, we have assigned a policy which provides full access to all S3 buckets. The contents of the policy are as shown below.

But this is not a right approach as there could be multiple S3 buckets used by multiple teams with in your project to which the access should not be granted.
To avoid this we could build our own custom policy which provides access only to the S3 bucket you wanted to access from IICS.
Custom IAM Policy to restrict the access to a Bucket
The below policy provides full access to bucket te-aws-s3-bucket001
{
    "Version": "2012-10-17",
    "Statement": [
        {
            "Sid": "AllowAllS3Actions",
            "Effect": "Allow",
            "Action": ["s3:ListAllMyBuckets", "s3:ListBucket", "s3:GetBucketLocation"],
            "Resource": “*”
        },
        {
            "Sid": "AllowAllS3ActionsInUserFolder",
            "Effect": "Allow",
            "Action": ["s3:*"],
            "Resource": ["arn:aws:s3:::te-aws-s3-bucket001/*"]
        }
    ]
}
Custom IAM Policy to restrict the access to a folder in the Bucket
In the earlier section we have created a custom policy to limit Write access of the user to a particular S3 bucket. Similarly we could also limit the access of the user to a particular folder inside the bucket.
The below policy provides full access to the folder Inbox present inside the bucket te-aws-s3-bucket001
{
 "Version":"2012-10-17",
 "Statement": [
   {
     "Sid": "AllowUserToSeeBucketListInTheConsole",
     "Action": ["s3:ListAllMyBuckets", "s3:GetBucketLocation"],
     "Effect": "Allow",
     "Resource": "*"
   },
  {
     "Sid": "AllowRootAndHomeListingOfBucket",
     "Action": ["s3:ListBucket"],
     "Effect": "Allow",
     "Resource": ["arn:aws:s3:::te-aws-s3-bucket001"],
     "Condition":{"StringEquals":{"s3:prefix":["","Inbox/"],"s3:delimiter":["/"]}}
    },
   {
     "Sid": "AllowListingOfUserFolder",
     "Action": ["s3:ListBucket"],
     "Effect": "Allow",
     "Resource": ["arn:aws:s3:::te-aws-s3-bucket001"],
     "Condition":{"StringLike":{"s3:prefix":["Inbox/*"]}}
   },
   {
     "Sid": "AllowAllS3ActionsInUserFolder",
     "Effect": "Allow",
     "Action": ["s3:*"],
     "Resource": ["arn:aws:s3:::te-aws-s3-bucket001/Inbox/*"]
   }
 ]
}
Steps to create a Custom IAM Policy
Follow below steps to create a custom policy in IAM
1. Go to IAM > Policy > Create policy
2. Select JSON and enter the policy contents in the editor and click Next.
3. The next section to add tags is optional. Click Next.
4. Enter a Name for the policy and click Create policy.
Now that we created a custom policy as per our requirement, we need to detach the existing policy and add the policy we created.
Step-3: Assign a policy to the IAM User
Follow below steps to assign the custom policy to the Informatica user.
1. Go to IAM > Users > Username.
2. Click on X mark present against the policy we attached while creating the user.
3. A pop-up appears asking whether you wanted to detach the policy. Click Detach.
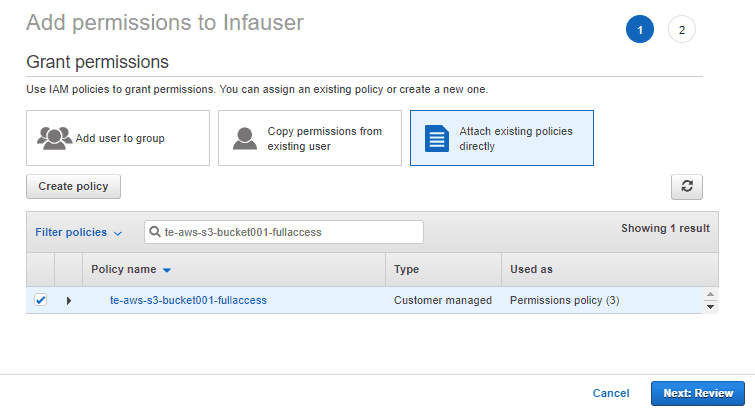
4. To add the custom policy we created, click on Add permissions > Attach existing policy directly
5. Search the custom policy you created, select it and click Next > Add permissions.
Note: We could have created a custom policy first and attach the custom policy while creating the user at the first hand. I just took a different approach in explaining these two activities separately to avoid any confusion.
Step-4: Configuring Amazon S3 v2 Connector using Access Keys
Follow below steps to create an AWS S3 V2 Connector using Access Keys in Informatica Cloud.
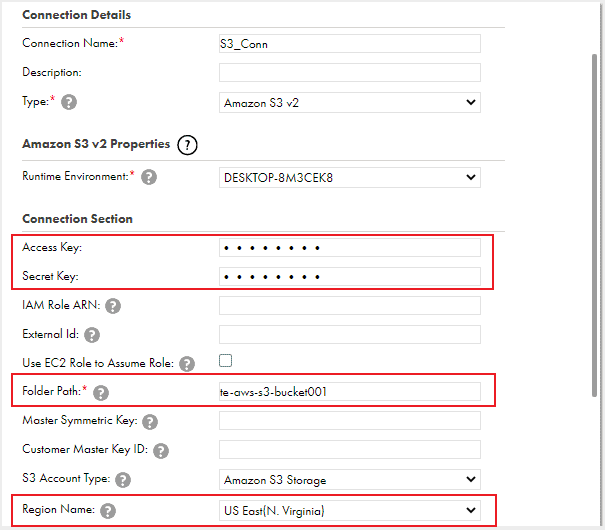
1. Go to Administrator > Connections > New Connection.
2. Enter the Connection Name and select the connection type as Amazon S3 v2
3. Select the Runtime Environment where you want to run the tasks.
4. Enter the Access Key and Secret Key to access the Amazon S3 bucket saved during the IAM user creation. In case you missed to save the Access Key and Secret Key details you have to generate a new pair of keys from IAM.
5. Enter the bucket name or complete folder path to the Amazon S3 objects. Don’t use a slash at the end of the folder path.
6. Select the region of the bucket that you want to access.
7. Leave the rest of the properties in default state, test the connection and save it.
Conclusion
The Amazon S3 V2 Connector is an Add-On Connector and the license needs to be procured by the Administrator before you start building a connection. You get free trail for first 30 days in case you want to try out initially.
There are also other ways in which you can configure the Amazon S3 v2 connector in Informatica Cloud without actually specifying the Access Keys directly in the IICS connection. Those will be discussed in the subsequent articles.
Subscribe to our Newsletter !!
Related Articles:

Learn how to create Amazon S3 v2 Connection in Informatica Cloud with Basic Authentication method using Access Keys.

Learn how to create Amazon S3 v2 Connection in Informatica Cloud with IAM Authentication method using IAM Roles.

Learn how to create Amazon S3 v2 Connection in Informatica Cloud using Temporary security credentials via AssumeRole