1. Introduction
Informatica Cloud REST V2 Connector helps to interact with Web Service applications built on REST architecture. You can use REST V2 Connector in a Source transformation, Target transformation, or midstream in a WebServices transformation.
REST stands for REpresentational State Transfer which is an architectural style. REST defines a set of principles to be followed while designing a service for communication and data exchange between two applications.
API stands for Application Programming Interface, which is a software intermediary provided by an application to other application that allows two applications to talk to each other.
A Web Service facilitates interaction between two machines over a network. These are essentially the services (APIs) that are accessible over the web.
If you are new to the concept of REST, APIs and Webservices, we suggest you go through this article – Overview of Informatica Cloud (IICS) REST API. where we deep dive into these concepts with some real life examples to understand.
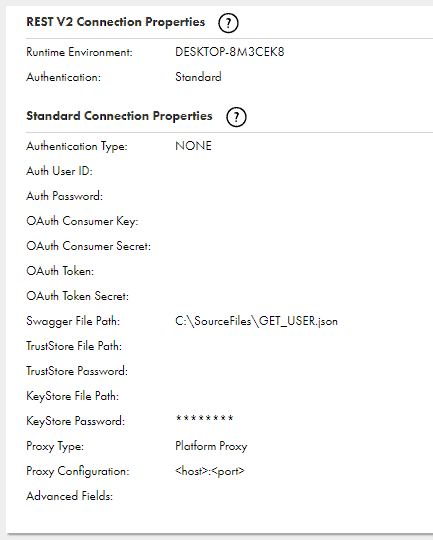
2. REST V2 Connection Properties
- You create a REST V2 connection on the Connections page in Administrator console.
- REST V2 Connection is not a Native IICS connector. It is available under Add-on Connectors.
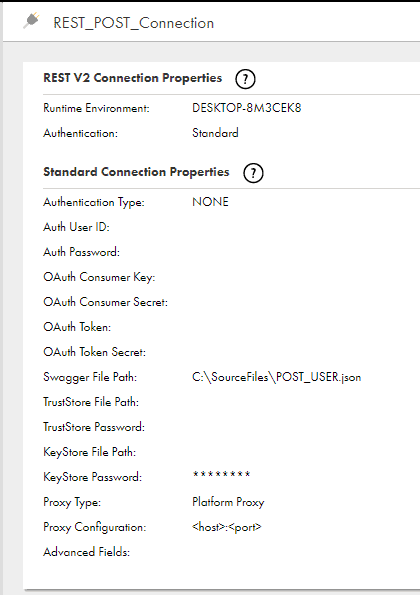
- Choose the mandatory properties runtime environment, Authentication Type that the webservice endpoint supports, Swagger file path to configure the connection. There are several other properties available which can be configured based on the type of request and its authentication methods of the request.
- If your REST endpoint does not have a swagger specification, you can generate the swagger specification file from Administrator. We will discuss how to generate swagger file for your REST connection further in the article.
3. REST API Methods
REST API makes explicit use of HTTP methods to make a request over a network. This helps to break a transaction down to generate a sequence of small components. Every component addresses a specific fundamental aspect of the transaction. This modularity makes it a flexible development approach.
It uses the following requests:
- GET to fetch data
- PUT to alter the state of data (updating)
- POST to create data
- DELETE to delete data
4. Swagger File
- Swagger is a specification for documenting REST API. It specifies the format (URL, method, and representation) to describe REST web services.
- A Swagger file is JSON format file.
- It is mandatory to have Swagger file to configure IICS REST V2 connection to integrate with any REST API.
- Swagger file describes the HTTP method, parameters required and the expected response fields for that API
5. Swagger File Generation
- Login to IICS Org > Administrator Section > Swagger files > New.
- Swagger Generation page will appear.
- Fill in the details according to the type of REST call and other parameters for the REST API CALL such as API paths, authentication details, header parameters, response JSON file and click OK.
- Typically we have 4 operations in REST, GET, POST, PUT or DELETE.
- An entry for the file will be created in the Swagger page.
- Click download to save the Swagger file to a local directory in Secure Agent machine.
6. Demonstration using POSTMAN:
Now that we understood the requirements to use a REST V2 Connection, let us implement the same using an example.
In this demonstration I would be first using Postman to make calls to a Web Service and show the response. Next we would see how to implement the same in Informatica Cloud using REST V2 connector.
For this demonstration I used a free resource available in internet gorest . You could use the resources available in this site to make REST API calls and test it out.
GET USERS
To get user details, use the following request.
Request Method: GET

Request URL: https://gorest.co.in/public/v1/users

GET USER
To get details of a particular user, use the following request
Request Method: GET

Request URL: https://gorest.co.in/public/v1/users

Query Params:
id: 25
The Postman response shows the details of the user with ID=25 as below.

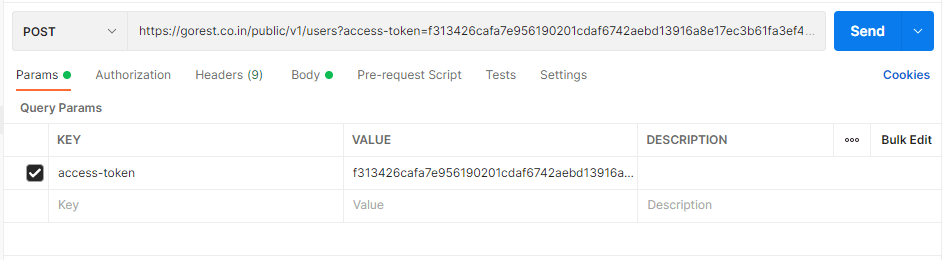
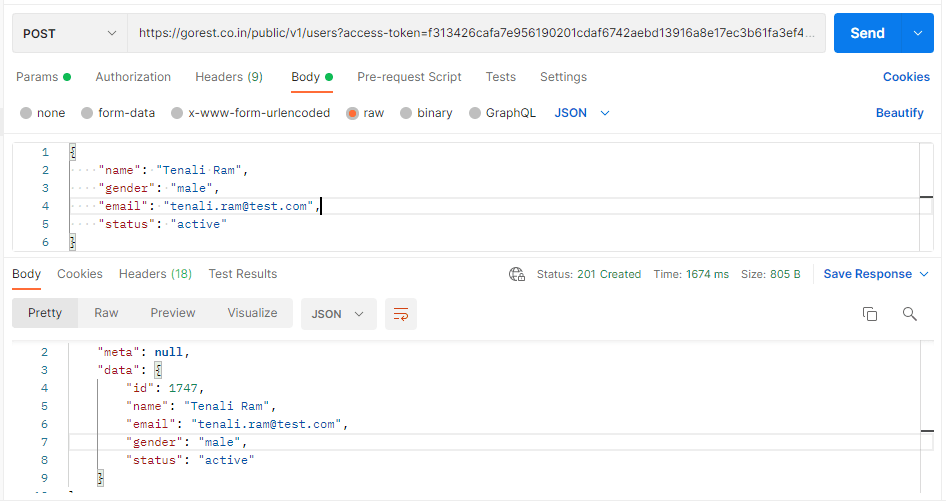
POST USER
To create a user, use the following request
Request Method: POST

Request URL: https://gorest.co.in/public/v1/users

Query Params:
access-token: <access token generated from site >

Body:
{
    "name": "<Name of the user>",
    "gender": "<gender>",
    "email": "<Email-ID>",
    "status": "<active/inactive>"
}
The Postman response shows that the user ‘Tenali Ram’ is successfully created with ID = 1747.
7. REST V2 as Source
REST V2 connection can be used in a Source transformation in the Mapping Designer to read data from the web service application.
As we discussed, in order to create a REST V2 Connection, it is mandatory to have a Swagger file. Let us discuss how to create a swagger file and use it in creation of REST V2 Connection. And use the same connection in a source transformation to read user details.
Swagger file generation
- Login to IICS Org > Administrator Section > Swagger files > New.
- Enter the details for the swagger file and select the runtime environment and the Request Method.
- Split the URL into three parts (URL, Api Base Path, Api Path)
URL: https://gorest.co.in/
Api Base Path: public/v1/
Api Path: users - Enter the Query Params if any. In our case, its ID value which we are passing as a parameter to fetch the details of the user with that ID. Pass the query params value as below.
Query Params: {“id”:”25″} - Enter any value for Operation ID. It’s for your reference and the swagger file would be generated with same value which you provide here.
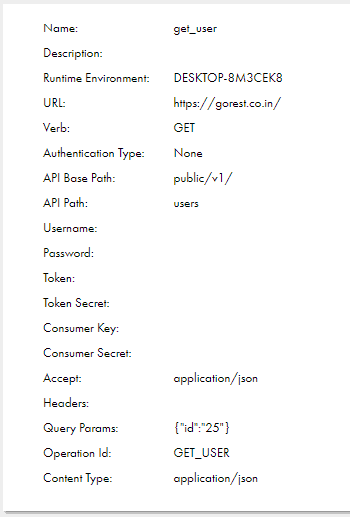
- It is not mandatory to provide a JSON response file. If you provide a JSON response file, a call to the web server’s end point would not be made during the swagger file generation. Otherwise a REST API call would be made to the web server’s endpoint to retrieve the response and it would save the response based on it while swagger file generation.
- The JSON response can be fetched from the POSTMAN. In our example, we are not providing the JSON response file.
- Click Save and download the file from the Swagger Files page.
REST V2 Connection Configuration
- Select REST V2 as connection type from the drop down menu of connection creation page and enter the name for the connection.
- Select the Runtime environment and leave the Authentication and Authentication Type with default values.
- Enter the path of the Swagger file in the secure agent machine created and downloaded in the previous step.
- Click on Test Connection to check if the connection is successful and save it.
Mapping Development
- In the Source transformation, select the REST V2 connection created.
- Select the Operation. The values that appear in the Operations list are based on the operation IDs listed in the swagger specification file.
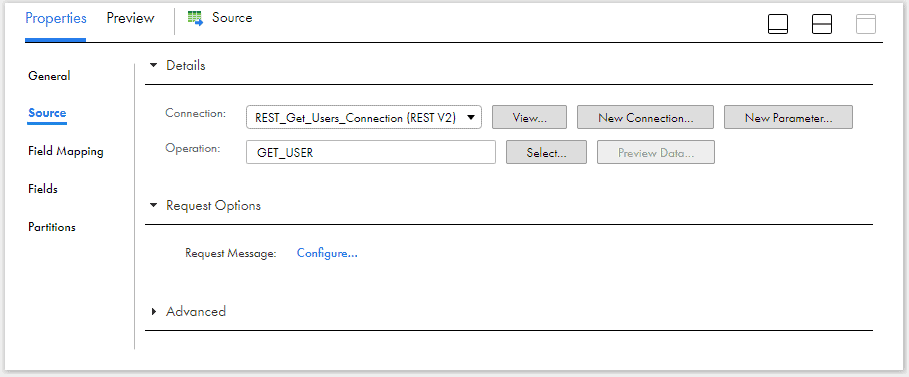
- Under Request Options, click Configure to edit Request Message. Copy paste the template contents into Request Message. In the below image, we are passing the value for id as 35. This request specifically gets the details of user with id =35. This is optional.
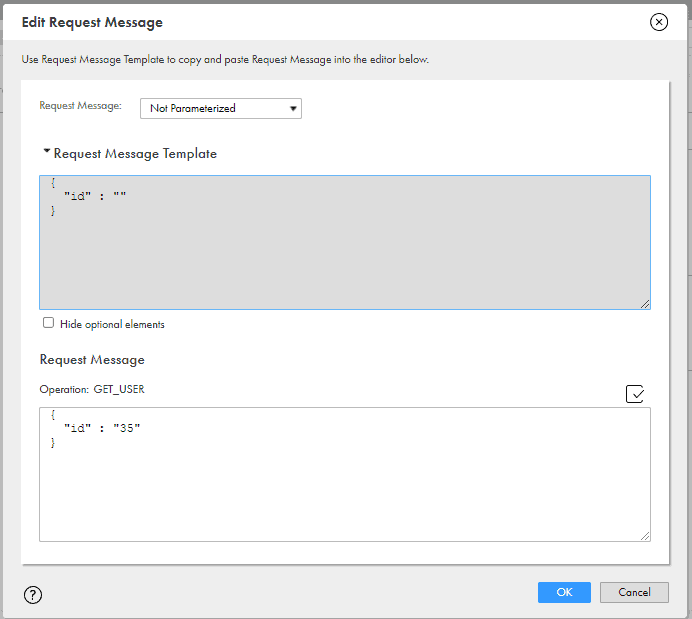
- But we want to fetch the details of all users. So specify the Request Message as empty as shown below.

- Under Field Mapping tab, click on dataArray and select map all descendants.

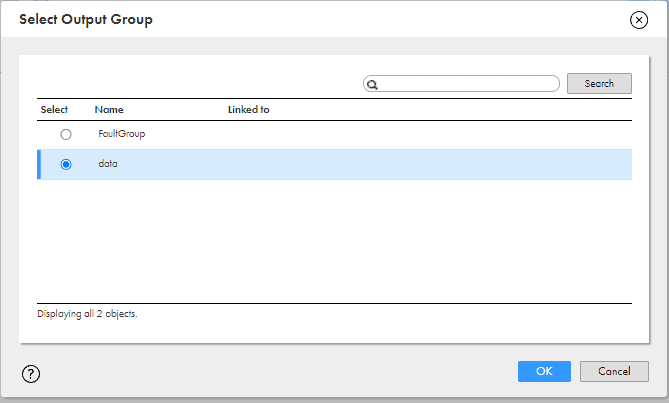
- Map the source transformation to the target transformation. From the pop up select output group as data.
- Configure the target transformation and run the mapping.
8. REST V2 as Midstream using WebServices transformation
You can use REST V2 Connector midstream in a mapping to pass a single or multiple requests to a web service application and process the response data. You can also pass data obtained from multiple transformations in the mapping pipeline and process the data.
When you use REST V2 Connector midstream in a mapping, you first create a Business Service for the operation that you want to perform in the web service application. You then associate the business service in a Web Services transformation midstream in a mapping to read from or write data to the web service application.
Let us understand by building a mapping which reads the id of users as source and pass the id values to the web service to fetch the details. We will use the same REST connection used in the previous example for the demonstration.
Configure Business Service
A Business service is a web service with configured operations. Define a business service to add operations to the Web Services transformation in the Mapping Designer.
Define business services and store them in your project folders. You can use business service definitions in multiple mappings.
- To create a business service navigate to New > Components > Business Services and then click Create.
- Enter the details of the business service and select the REST connection created to connect to web service.
- Click on Select Operation. Select an operation, and then click Select.
- The values that appear in the Operations list are based on the operation IDs listed in the swagger specification file.
- Optionally, you can add more operations and configure the operations if necessary. In our example, there are no configurable elements.
- Save the business service.

Mapping Development
The source to the mapping is a flat file which passes the ids of the users.
Contents of source csv file.
emp_id
37
38
- Select the flat file as source in the source transformation.
- Map the source transformation to a WebServices transformation.
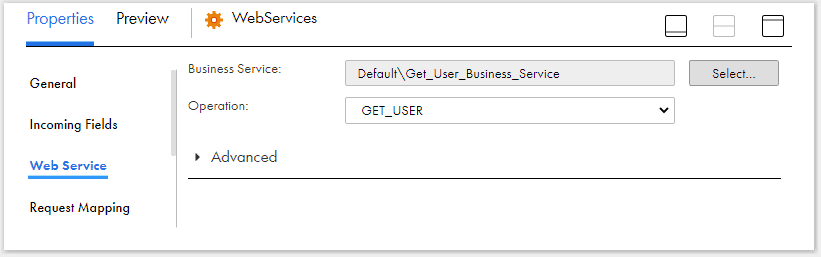
- Under the Web Service tab, select the Business Service and the Operation configured.
- Under Request Mapping tab, create the field mapping between the source field and the web service request. (In our example, the request port is “id” which is configured in swagger file)

- Under Response Mapping tab, map the response fields to the output fields by clicking the dataArray and select map all descendants. You can choose Relational or Denormalized format for output fields. This example uses Relational format.
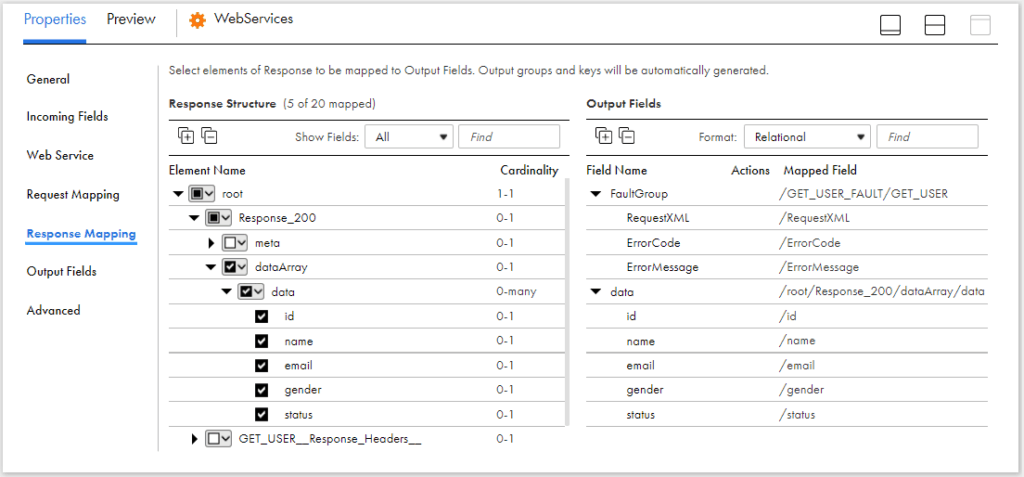
- FaultGroup is a system generated output field group and is created if it is supported by the connection type you are using.
- On the Output Fields tab, you can see each group. If needed, you can edit the type, precision, and scale of the fields.

- Map the WebServices transformation to the target transformation. From the pop up select output group as data and click OK.
- Configure the target to read the fields from WebServices transformation and trigger the mapping.
9. REST V2 as Target
Create a Target transformation in the Mapping Designer to write data to a web service application.
- When you select a REST V2 connection for a Target transformation in a mapping, the Secure Agent displays operation IDs specified in the swagger specification you configure in the connection.
- You must select an operation based on the object configured in the connection.
- You can add multiple input sources to write data to a web service application target object and define the primary and foreign key relationships between the input sources before you run the mapping.
- Each input source appears as separate group in the Field Mapping tab in the target transformation. You can define key relationships in the Field Mapping tab.
Let us understand by building a mapping which creates users by passing the details to the web service. Let us begin by creating a swagger file and REST V2 connection.
Swagger file generation
The process is similar what we earlier discussed in the article.
- Enter the name for the Swagger file and select the Runtime environment and request method as POST.
- Split the Request URL into 3 parts and enter the values for URL, API Base Path and API Path.
- Enter the access-token details in the Query Param .
- Enter the Raw Body with all the details which are required to create a user in the web server in JSON format.
- Enter a value for Operation Id.
- Click Save and download the file from the Swagger Files page.

REST V2 Connection Configuration
The process is similar to what we have already discussed in the earlier sections of the article.
Using the Swagger file created in earlier step, create the REST V2 Connection. Click on Test Connection to check if the connection is successful and save it.
Mapping Development
The source to the mapping is a flat file which passes the details of the users to be created in the web server.
Contents of source csv file.
name,gender,email,status,access-token
testuser1,male,testuser1@test.com,active,f313426cafa7e956190201cdaf6742aebd13916a8e17ec3b61fa3
testuser2,male,testuser2@test.com,active,f313426cafa7e956190201cdaf6742aebd13916a8e17ec3b61fa3
- Select the flat file as source in the source transformation.
- Connect the source transformation to a target transformation.
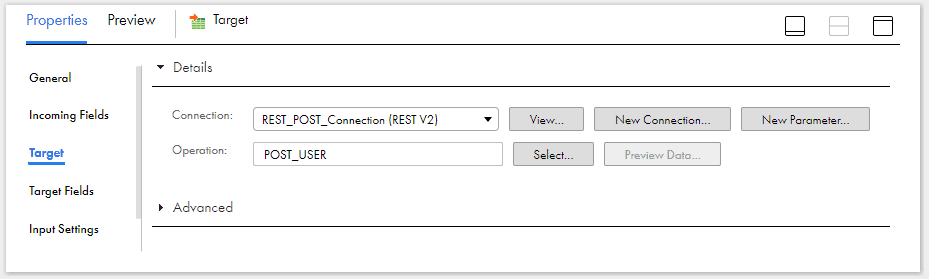
- Select the REST V2 Connection created as target connection.
- When you select a REST V2 connection for a Target transformation, you can select an operation. The operation is based on the swagger specification file that you specify during the REST V2 connection configuration.
- You can add multiple input groups into the REST target and define the primary and foreign key relationships between the multiple input groups before the mapping.
- Since it is a post operation, there are no output fields to map. If the operation is to update, the target fields would appear and the field mapping between the input and target should be made.
- When you save and run the mapping, the Secure Agent updates the user details in the web server.
To verify if the users are created after the mapping succeeded, use the following request in Postman.
Request Method: POST

Request URL: https://gorest.co.in/public/v1/users

Query Params:
name: testuser1

The above response shows that user details we passed as source in the mapping inserted into webserver and the id assigned to the user is 1851.
10. Conclusion
It is recommended to try out the REST API request/response outside IICS using any REST clients like Postman before creating the REST V2 connection in IICS.
IICS also offers several APIs which lets you access the information from your Org. It also allows you to perform tasks such as create, update, delete connections, schedules and tasks. We can access Informatica Cloud REST API just like any other web services from Informatica Cloud using the different methods we discussed in the article.


Excellent
Thank you!!