Introduction
Informatica Cloud (IICS) Secure Agent is a light weight, self-upgrading program that runs all tasks and enables secure communication across the firewall between your organization and Informatica Intelligent Cloud Services. It also runs all the tasks and is responsible for moving data from source to target.
Know more about Secure Agent and its architecture here.
For the Secure Agent to be operational, you must download and run the Secure Agent installation program and then register the agent. Secure Agent registration requires an install token which can be generated from Administrator Service of your Org. The token expires after 24 hours.
In this article, let us discuss how to download and install Secure Agent on both Windows and Linux machines.
Downloading Informatica Cloud Secure Agent
Follow below steps to download Informatica Cloud Secure Agent
1. Navigate to IICS Administrator service and select Runtime Environments.
2. On the Runtime Environments page, click Download Secure Agent.
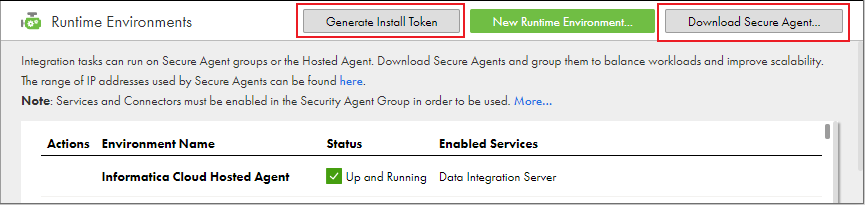
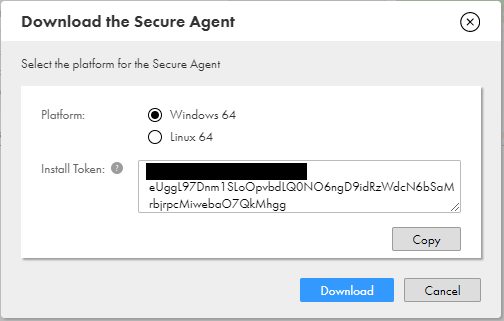
3. Select the operating system platform Windows 64 or Linux 64, copy the Install Token, and then click Download. The installation program will be downloaded to your machine.
Installing Informatica Cloud Secure Agent in Windows
Follow below steps to install Informatica Cloud Secure Agent in Windows
1. Run the installation program downloaded into the machine. The name of the installation program is agent64_install_ng_ext.exe.
- Specify the Secure Agent installation directory, and click Next.
- Click Install to install the agent.
2. The Secure Agent Manager opens and prompts you to register the agent as shown in the following image.

3. The Secure Agent Manager displays a message alerting you that the Secure Agent has not been registered. To register the agent,
- Enter your user name in the User name that you use to access Informatica Intelligent Cloud Services.
- Paste the install token into the Install Token field, and then click Register.
4. If you did not copy the install token when you downloaded the agent, click Generate Install Token on the Runtime Environments page in Administrator, and copy the token.
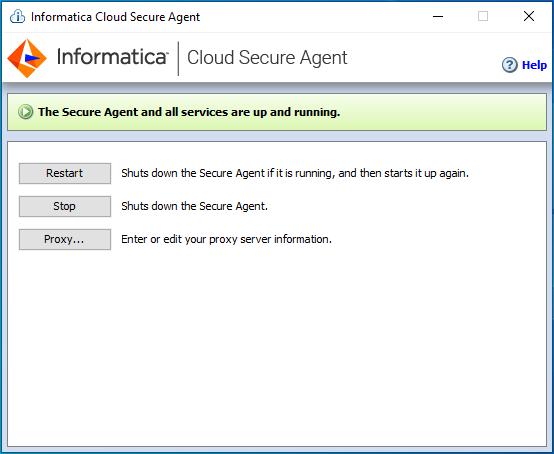
5. The Secure Agent Manager displays the status of the Secure Agent. It may take few minutes for all of the services to start initially.
Configuring login for a Windows Secure Agent Service
The Secure Agent requires read and write permissions on the related directories on your machine while working with Flat File or FTP/SFTP connection types. So we need to configure a login for the machine on which the Secure Agent is installed to allow the Secure Agent to access directories.
Without a Secure Agent login with the appropriate permissions, Informatica Intelligent Cloud Services cannot display the directories in the Browse for Directory dialog box while configuring flat file connections.
Follow below steps to provide read and write permissions on directories to Secure Agent
1. Navigate to Windows Start > Run > services.msc
2. In the Services window, right-click the Informatica Cloud Secure Agent service and choose Properties.
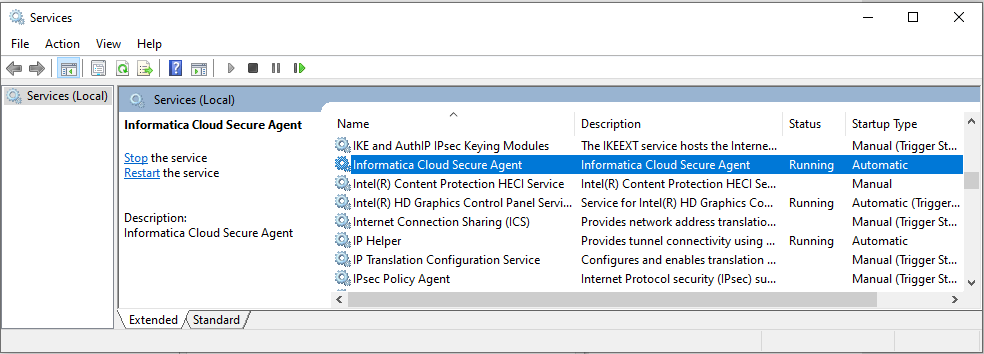
3. In the Properties dialog box, click the Log On tab.
4. To configure a login, select This Account.
5. Enter an account and password. Use an account with the required privileges and permissions for the network security defined for the domain. By default, the account format is <domain name>\<user name>.

6. Click Apply and OK.
7. You will be asked to restart the Informatica Cloud Secure Agent for the changes to take effect. In the Services window, Restart the Secure Agent service.
Installing Informatica Cloud Secure Agent in Linux
Follow below steps to install Informatica Cloud Secure Agent in Linux
1. Copy the installation program downloaded from IICS Administrator to a directory on the machine where you want to run the Secure Agent. The name of the installation program is agent64_install_ng_ext.bin.
2. From a shell command line, navigate to the directory where you downloaded the installation program and enter the following command to install Secure Agent.
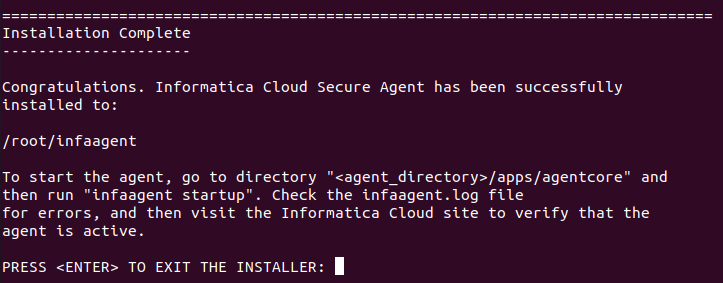
./agent64_install_ng_ext.bin –i console3. The secure agent installation starts and the following message will be displayed after the successful installation of Secure Agent.
4. Once the installation is completed, start the Secure Agent by entering the following command from the <Secure Agent installation directory>/apps/agentcore directory.
./infaagent startup5. The Secure Agent Manager starts. You must register the agent using the username that you use to access Informatica Intelligent Cloud Services. You must also supply the install token.
6. If you did not copy the install token when you downloaded the agent, click Generate Install Token on the Runtime Environments page in Administrator, and copy the token.
7. From the <Secure Agent installation directory>/apps/agentcore directory, enter the following command using your Informatica Intelligent Cloud Services user name and the token that you copied to register the secure agent.
./consoleAgentManager.sh configureToken <user name> <install token>8. Verify the registration status of a Secure Agent using the following command. If the registration is successful, the output will be returned as true.
./consoleAgentManager.sh isConfiguredConclusion
After the successful installation and registration of Informatica Cloud Secure Agent, the secure agent is added automatically under the Runtime Environments in IICS Administrator.
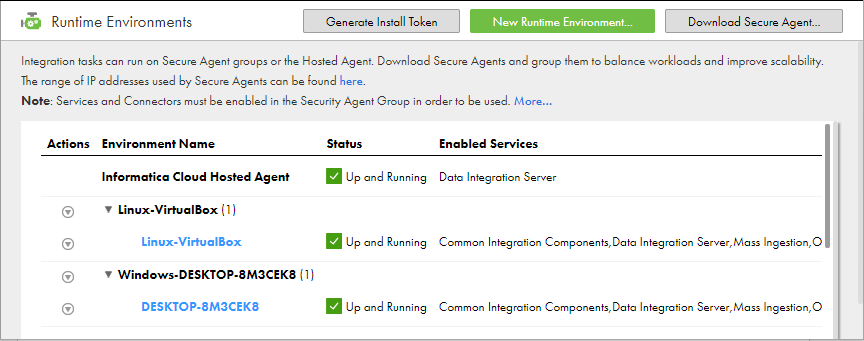
You can rename the Secure Agent and Secure Agent Group names in Runtime Environments page. You can Start, Stop, verify the secure agent status that are installed and registered.
Related Articles on Secure Agent: