1. Introduction
Informatica Cloud supports updating NULL values in Salesforce by enabling the Set To NULL option available under Advanced properties of a target transformation.
This implies NULL values are allowed to replace the existing values in the target Salesforce object.
By default, this option is not enabled(unchecked) which implies NULL values cannot replace existing values in target.

2. How to pass NULL values to Salesforce target?
Now that we understood that we can update with NULL values in Salesforce target, let us understand how to pass null values to Salesforce target in mapping designer.
In the expression transformation, create a field of target field type and enter the expression values as NULL without any quotes.
Map the field to the target transformation and make sure Set To NULL option is enabled.
Once the mapping is triggered and succeeded, the field value will be updated with NULL value.
Do not use ‘’ (blank value without any spaces) to update field value to NULL.
3. Using #N/A to update NULL values in Salesforce
Instead of using NULL to update value as NULL in Salesforce, using #N/A also works with Salesforce objects.
In the expression transformation, create a field of type String and enter the expression value as ‘#N/A’.
There is no need to enable the Set To NULL option while updating with #N/A. But the target load type should be using Bulk API.
4. Updating Non-String Values to NULL using #N/A
Since #N/A value is a string, using #N/A to update string values to NULL works flawlessly.
However, you cannot create a datetime field and enter a string ‘#N/A’ as value in the field expression. Informatica throws error in such cases due to datatype mismatch.
There is a workaround in Informatica Cloud in such cases. Follow below steps to update non-string values to NULL using #N/A.
- Create the field of type string and assign the value as ‘#N/A’ in expression.
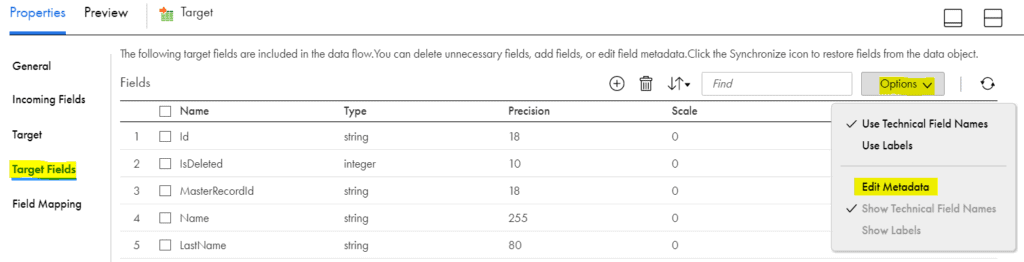
- In the target transformation, navigate to Target Fields, click on Options and select Edit Metadata.
- Now select the datetime time field you want to update to NULL using #N/A and change the Native Type of the field to String from datetime.
- Map the field created in expression transformation to the salesforce target field under Field Mapping.
This implies, though the actual field in Salesforce is of type datetime, Informatica considers the field as string and updates the values with #N/A which would be accepted by Salesforce.
The datetime field value will be updated to NULL.
Note: The datetime field should not be a salesforce native field such as createddate, Lastmodifieddate etc., and the field should not be a custom field with triggers which would be updated automatically.
5. Conclusion – When and Why should you use #N/A instead of NULL?
Straightaway #N/A is the best option when you don’t want enable Set to NULL option to update values with NULL in Salesforce.
In some of the cases, the source might send the field values as NULL implying there is no change in the value of the field. That means the value should be retained as it is in Salesforce when the source value is NULL and should not be updated.
In the same scenario you were asked to update some fields to NULL based on a condition. Then using Set to NULL option is not useful.
If you enable Set to NULL option, you can update the value with NULL but the values which were delivered as NULL and should not be updated also gets updated to NULL which is not expected.
Using #N/A in such scenarios solves the problem. Do not enable Set To NULL option in the target and whatever fields you want to update to NULL in salesforce use #N/A to update them to NULL.
Do not forget to enable Bulk mode in target while using #N/A.