1. Introduction
Consider a scenario where you have to load data from several tables in a database into flat files in a staging area.
One way of doing it is by building a mapping for each database table. In the mapping you choose the database table as source, configure the target file and its properties and build a mapping configuration task using the mapping.

The problem with this approach is that we are replicating the same mapping logic for each and every table and the number of assets we are developing are going to be more.
The alternate approach is to build a parameterized mapping by parameterizing the source and target transformations. This way there would be only one mapping and you could configure the source and target details inside a mapping configuration task build for each table.
Though this is one of the best possible approach, we still end up building multiple mapping task assets on the same parameterized mapping.
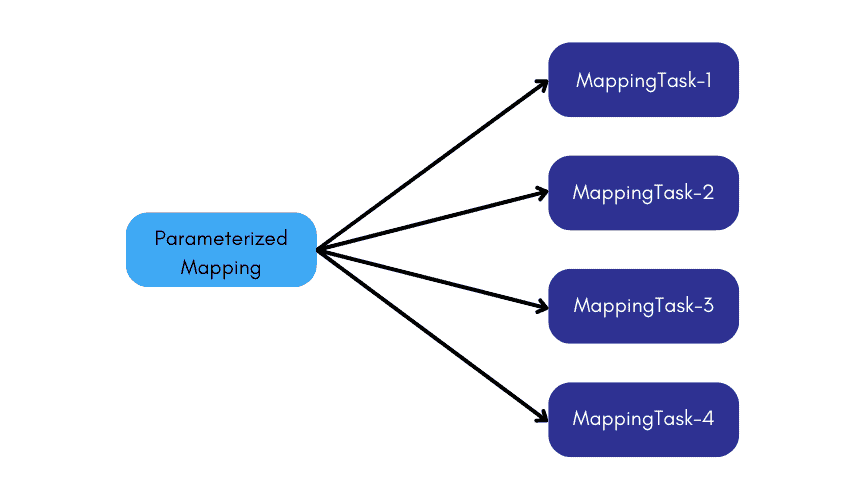
The best possible approach to this requirement is to build a parameterized mapping and use a Dynamic Mapping Task. Inside the Dynamic mapping task you can define multiple jobs with different sources and targets.

In this approach we end up building only two assets, one mapping and a Dynamic mapping task making it so easy to build and manage the assets.
Let us discuss more about Dynamic Mapping Task in Informatica Cloud using examples in this article.
2. Dynamic Mapping Task
A Dynamic Mapping Task allows you to create and group multiple jobs within the single asset that process data based on the data flow logic defined in a mapping. Instead of creating multiple mapping tasks, you can configure multiple jobs based on the same mapping in one task.
A Dynamic mapping task reduces the number of assets that you need to manage if you want to reuse a parameterized mapping.
For the demonstration purpose consider below parameterized mapping as an example.

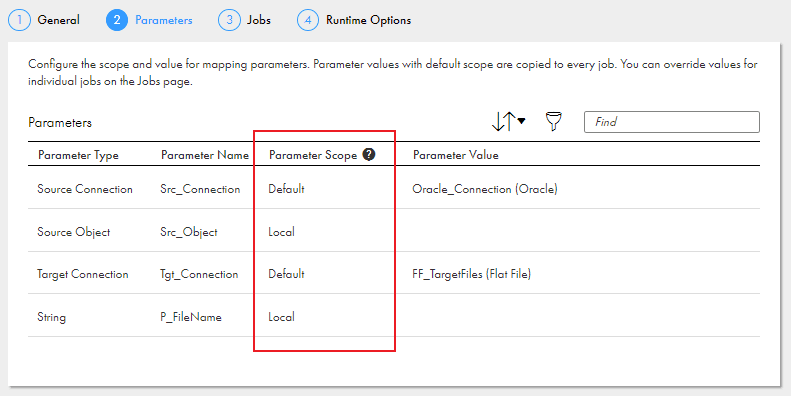
Below are the parameters defined inside the mapping.
- Src_Connection: The parameter which holds the source connection value.
- Src_Object: The parameter which holds the source object value.
- Tgt_Connection: The parameter which holds the target connection value.
- P_FileName: The parameter which holds the target file name.

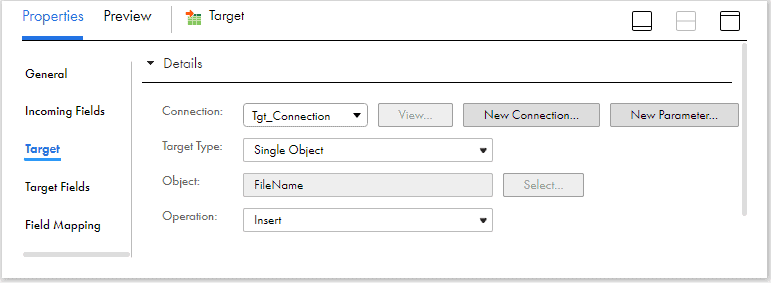
Note: You might be wondering why not parameterize the target object also? The reason is, in the trail version of IICS, when the target object is parameterized, it is not allowing to create target object at runtime. Hence as a work around for the demo, I have created a parameterized field FileName in expression transformation and passed it as the target object value in the target.
3. Configuring a Dynamic Mapping Task
Follow below steps to create and configure a Dynamic Mapping task based on a parameterized mapping.
3.1. Defining a Dynamic Mapping Task
1. To create a Dynamic Mapping task, click New > Tasks. Select Dynamic Mapping Task and click Create.
2. Configure below properties in General Properties area.
- Name: Name of the dynamic mapping task.
- Location: Project folder in which the task resides.
- Description: Description of the task.
- Runtime Environment: Runtime environment that contains the Secure Agent to run the task.
- Mapping: Mapping associated with the task.
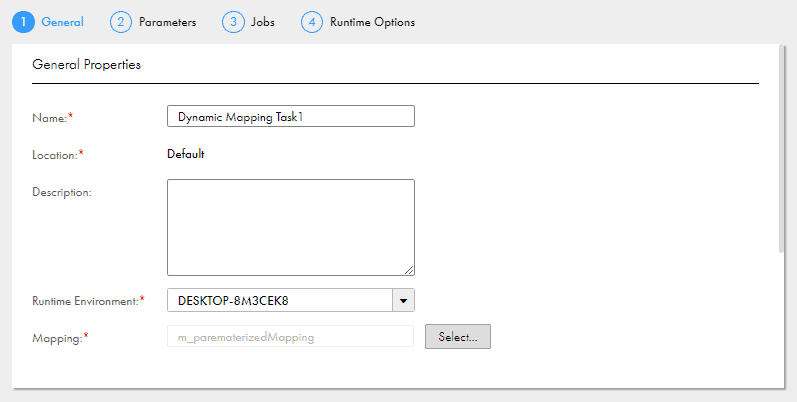
3. Click Next.
3.2. Configuring Default parameters
The Parameters page lists all the parameters defined in the mapping that is configured in the dynamic mapping task. You need to define the Parameter Scope and Parameter Value for the parameters.
Parameter Scope:
- Default: The parameter value you define will be copied to all jobs. You can also override the value when you configure the job.
- Local: The parameter value must be assigned when you configure the job.
In the below example, default values are set for source and target connection parameters which will be applied to all the jobs. The scope of Source Object and FileName parameters are set to Local which means the value must be assigned when you configure the job.
3.3. Configuring Jobs and Job Groups
A Job is a single run of the mapping that the task is based on. A dynamic mapping task can include multiple groups of jobs. For every job, a different set of parameter values can be configured.
The below image shows three jobs defined in the Jobs page of Dynamic Mapping Task.
- Job_1 and Job_2 belong to Group_1 and Job_3 belongs to Group_3.
- The Source and Target Connections defined are same for all the jobs. (It can be modified to different connection values if required)
- The Source Object and Target FileName values are configured different for each job.

A Job Group is a set of jobs that run concurrently.
The below image shows the Groups sections in the Jobs page of Dynamic mapping task.
- Groups run sequentially, and all jobs in the previous group have to complete before the next group begins.
- You might set up groups when data in one group depends on the results of a previous group.
- There is no limit on the number of jobs and groups that you can add to a dynamic mapping task.
- You can enable or disable a group, delete and the change the order of execution of groups.

3.4 Dynamic Mapping Task Job Settings
The following additional configurations can be done in Jobs page.
- To create a new job/group, use + sign in the Jobs/Groups area.
- The job/group names can be renamed to meaningful names by clicking on the job/group name.
- When you hover over the Job, you will find the additional options of Settings, Copy and Delete as shown in the image below.
- Under the settings of the Job, following properties can be configured.
- Stop on either error or Warning
- Pre-processing commands.
- Post-processing commands.
- Hovering over the parameters present in the job shows settings of the individual parameters which include advanced options for connections, Filter/Sorting options for Source objects etc.

You can disable individual jobs so that they won’t run when you run the task. If you disable a group, no jobs in that group run when you run the task.
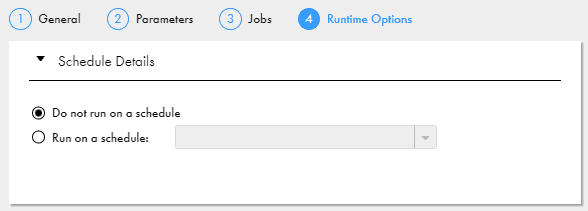
3.5. Configuring Runtime options
Under the Runtime options, you can configure the dynamic mapping task to run at a scheduled time. You must have a schedule created in Administrator before you configure it in the task.
4. Conclusion
Dynamic Mapping Tasks solves the problems of maintaining multiple assets of a parameterized mapping. It is easy to build and manage and reduces lot of development effort.
Few things to keep in mind before using Dynamic Mapping tasks.
- If any one of the job in the dynamic mapping task fails, you need to restart the task from the beginning.
- I did not find the option to configure a Parameter file in Dynamic mapping tasks. Hopefully this option will be added in feature releases but something worth keeping in mind if you requirement includes use of parameter files.
- Like regular mapping tasks, dynamic mapping tasks can be added in an advanced taskflow using the data task step.
Have you ever used Dynamic Mapping Task in your projects? Would you still prefer regular mapping task over dynamic mapping task for any reason? Let me know in the comments section.
Subscribe to our Newsletter !!
Related Articles:
Expression transformations can be fully parameterized in Informatica Cloud mappings, allowing fields to be created at the mapping task level.

A comprehensive guide to the date/time functions in Informatica Cloud Data Integration (IICS)

A comprehensive guide to the most commonly used string and conditional functions in Informatica Cloud Data Integration (IICS)


This is a very interesting article, but I wonder how to migrate a dynamic mapping/task from DEV to TEST/PROD, when the Snowflake schema names are different in different environment. Dynamic mapping/Task does not allow an external parameter file.
Exactly!! It is not possible as currently Dynamic Mapping Tasks do not support the use of parameter file. The same has been mentioned in the conclusion section already.
However there is an option to edit the metadata of the IICS Asset using REST API after migrating to TEST/PROD where in you update the DEV schema name with TEST/PROD schema name. I will soon try to publish the article on the same.
So this works only if source and target have same table structure in all jobs right?
How can departments and employee tables/files use same columns in source and expression? They both have different set of tables right?
If we are doing some operation on employee email in expression, its not the same as department name. I am not sure how you were able to use employee and department data sets using the same mapping?
Yes..In the example used in the article, they are 1:1 mappings without any transformation logic. The expression used is only to specify the filename which is not dependent on source fields. Hence it works.
could you please explain with diagram “I have created a parameterized field FileName in expression transformation and passed it as the target object value in the target”
In the expression transformation, create an output field named “FileName” and assign the input parameter “P_FileName” as value.
The input parameter and the Target transformation images are already included in article. I hope whats done in expression transformation is clear now!!