What is Slowly Changing Dimension (SCD) Type-6?
The Slowly Changing Dimension Type-6 method also referred as “Hybrid SCD” combines the approaches of SCD types 1, 2 and 3 (1 + 2 + 3 = 6).
The SCD type 6 is used to track the history of the record by creating a new version whenever there is a change in data (similar to SCD type 2) and also allows you to track the partial history data within the record (similar to SCD type 3) by maintaining the current state of data in all versions of the record (similar to SCD type 1).
The implementation of the SCD Type-6 mapping in Informatica Cloud involves
- Identifying the new record and inserting it.
- Identifying a record that is already existing and there is a change in the data.
- Mark the existing record as INACTIVE by updating the effective date column.
- Insert a new version of the record with latest data and is considered as ACTIVE.
- Update the latest value of the chosen attribute in all the previous versions of the record.
- Identifying a record that is already existing and there is no change in the data.
- Update the latest value of the chosen attribute in all the previous versions of the record.
Setting up Source and Target data objects for Demonstration
For the demonstration purpose consider a flat file employees.csv as a source which provides employees information.
EMP_ID,EMP_NAME,EMP_SALARY,DEPT_ID
100,Jennifer,6000,10
The data should be loaded into the target table Dim_Employees. The structure of the table is as follows.
CREATE TABLE Dim_Employees
   (
    Employee_Key     Number(6,0),
    Employee_Id        Number(6,0),
    Name                    Varchar2(20),
    Current_Salary     Number(8,2),
    Previous_Salary   Number(8,2),
    Department_Id     Number(4,0),
    Start_Date            Date,
    End_Date             Date,
    Checksum            Varchar2(50)
    )
;- Employee_Key is the surrogate key which increments the value plus one for each record inserted into the table.
- Every record has a CHECKSUM value which is unique sequence representing the data of the record. For any change in the data, the checksum value differs and helps in identifying if there is any change in the record data.
- For every record which is inserted, Start_Date field is loaded with system date value and the End_Date field is loaded with maximum date value which is ‘9999-12-31’ to represent it as an ACTIVE record.
- When the record data is modified, the End_Date field of the existing record is updated with system date value to make it INACTIVE.
- Current_Salary field indicates the latest salary amount of the employee. Previous_Salary field indicates the salary amount when the record is inserted and the time period during which this salary amount is applicable can be found out using effective date columns.
Steps to Create SCD Type-6 Mapping
The below mapping illustrates the design of SCD Type-6 implementation in Informatica Cloud Data Integration.
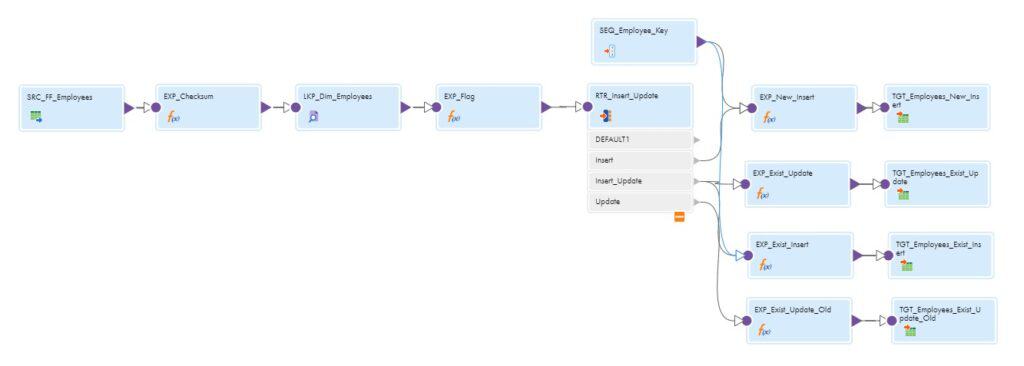
Follow below steps to create a SCD Type-6 mapping in Informatica Cloud.
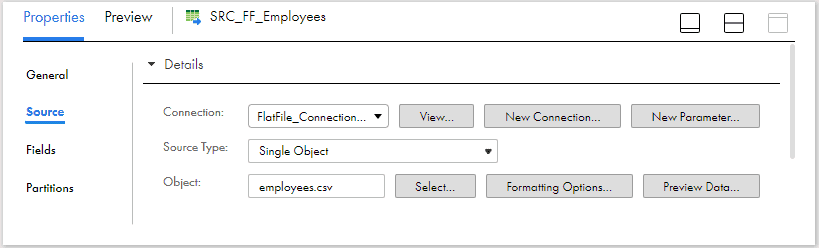
1. Select the Source Object
In the source transformation, select the employees.csv as the source object. Under Formatting Options, select the delimiter and other flat file related properties. Verify if the source fields are properly read under Fields section.
2. Create Output Fields and Checksum Value
Pass the data from source transformation to the expression transformation.
- All the fields read from flat file will be of type String. These fields should be converted to the respective data types defined as in the target dimension table.
- Calculate the Checksum value using a MD5 function by passing the required source fields in the expression transformation.
O_CHECKSUM = MD5(EMP_ID||EMP_NAME||EMP_SALARY||DEPT_ID)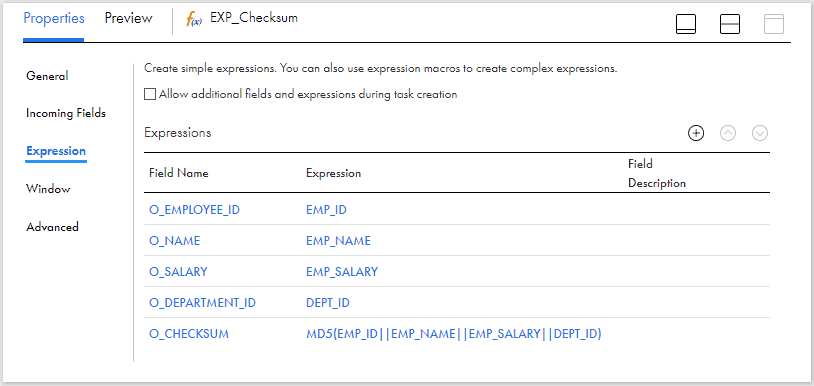
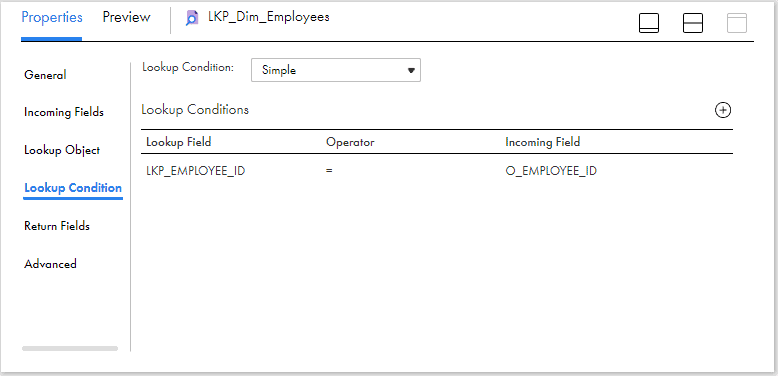
3. Look up on Target Object based on Natural Key
Pass the data from expression to the Lookup transformation. Select the records from Dim_Employees table using a SQL query as shown below.
SELECT
    Employee_Key   AS    Lkp_Employee_Key ,
    Employee_Id      AS    Lkp_Employee_Id ,
    Current_Salary   AS    Lkup_Current_Salary,
    Checksum          AS    Lkp_Checksum,
    End_Date           AS    Lkp_End_Date
FROM Dim_Employees
Since we need to maintain the current Salary value in the previous versions of the record, all the records needs to be selected including INACTIVE records.
Under Lookup Condition tab, select the condition based on employee id fields from source and lookup objects as shown below.
4. Flag data based on output from Lookup
Based on output from lookup transformation, the data needs to be flagged for either Insert or Insert-Update or Update.
- If there is no matching record found for the employee_id read from source in the lookup object, flag the record for Insert.
- If there is a matching record found for the employee_id read from source in the lookup object and the data is changed,
- Flag the record for Insert-Update if the end_date value is ‘9999-12-31’.
- Else flag the record for Update.
- If there is a matching record found for the employee_id read from source in the lookup object and the data is unchanged, flag the record for Update.
Pass the data from Lookup to an Expression transformation and create an output field Flag and assign the below field expression to flag the records.
IIF( ISNULL(LKP_EMPLOYEE_KEY), 'I',
            IIF(O_CHECKSUM != LKP_CHECKSUM,
                        IIF(TO_CHAR(LKP_END_DATE,'YYYY-MM-DD')='9999-12-31','IU','U') ,'U'
            )
)
5. Route data to different targets based on Flag
Create three output groups in the Router transformation to route the data to different targets based on the flag value for Insert (Flag=’I’), Insert_Update (Flag=’IU’) and Update(Flag=’U’) operations as shown below.
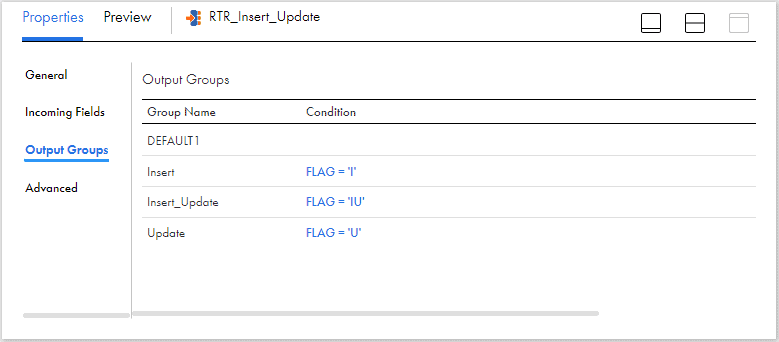
Route the data from Router transformation to four different expression transformations one from Insert output group, two from Insert_Update output group and one for Update output group before mapping to target.
6. Configure Sequence Generator for generating Surrogate Keys
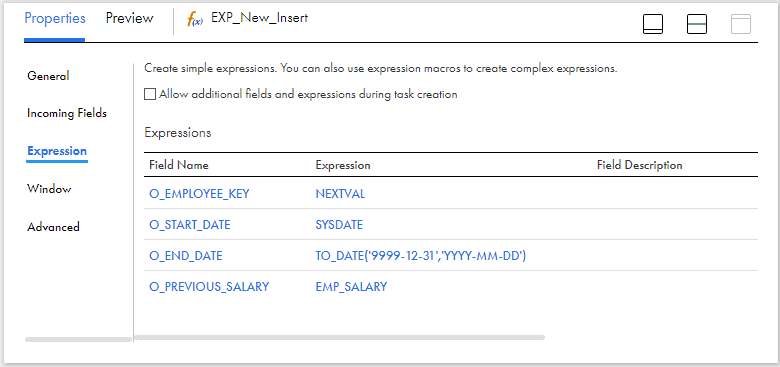
A Sequence Generator transformation could be used for generating surrogate keys for the target dimension table. Pass the data from sequence generator to the expression transformation linked to the Insert group of the Router transformation.
The following fields are created in the expression transformation linked from the sequence generator
- An output field O_EMPLOYEE_KEY of type bigint and assign the field value as NEXTVAL coming from sequence generator.
- An output field O_START_DATE of type date/time and assign the system variable SYSDATE as value.
- An output field O_END_DATE of type date/time and assign the date value as ‘9999-12-31’.
- An output field O_PREVIOUS_SALRY of type decimal and assign thesame value mapped for current_salary field coming from source.
If the surrogate key value generation is handled at the database level, there is no need to use the Sequence generator transformation.
When the record is inserted for the first time, both the Current_Salary and Previous_Salary fields will store the same value.
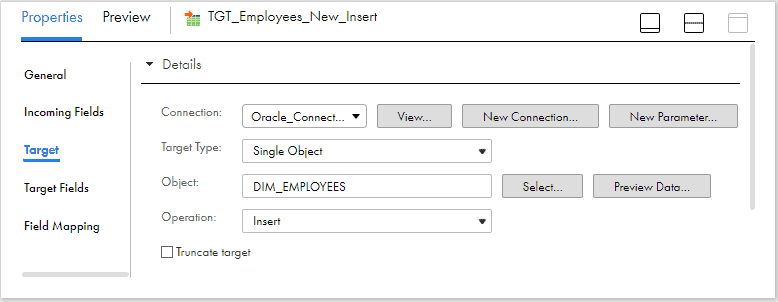
7. Configure Target for Insert Operations
Pass the data from expression configured in earlier step to a target transformation. Select the dimension table Dim_Employees as target object with operation defined as Insert.
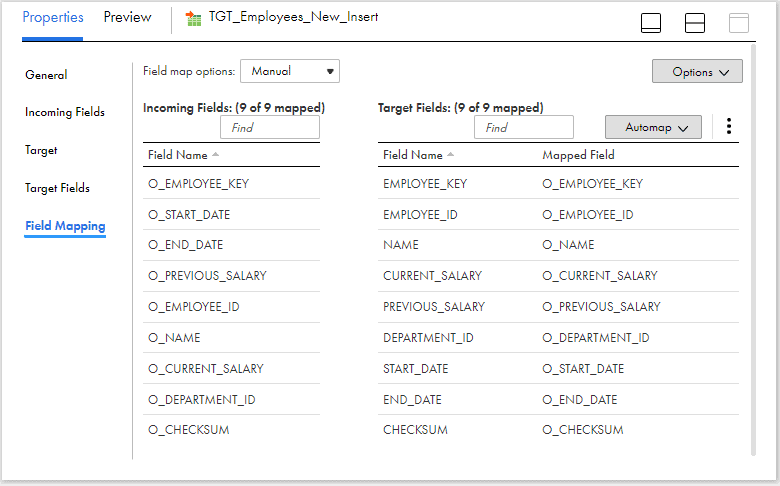
Under Field Mapping section of the target transformation, map the output fields created in the mapping to the respective target fields.
8. Configure Target for Update Operation of latest existing record
In one of the expression transformation to which data is routed from Insert_Update group of the router transformation,
- Create an output field O_EMPLOYEE_KEY and assign the LKP_EMPLOYEE_KEY field as the value which is read from lookup.
- Create an output field O_END_DATE and assign SYSDATE as the value.
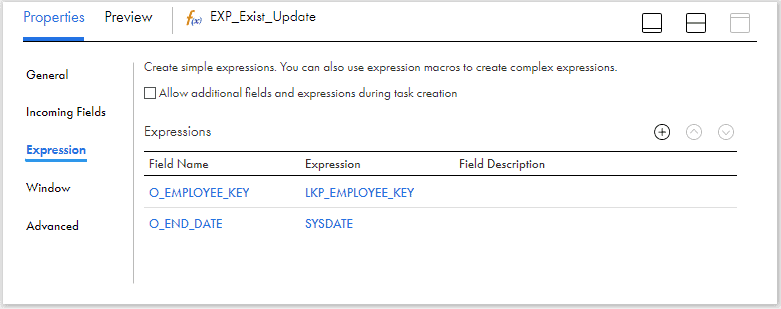
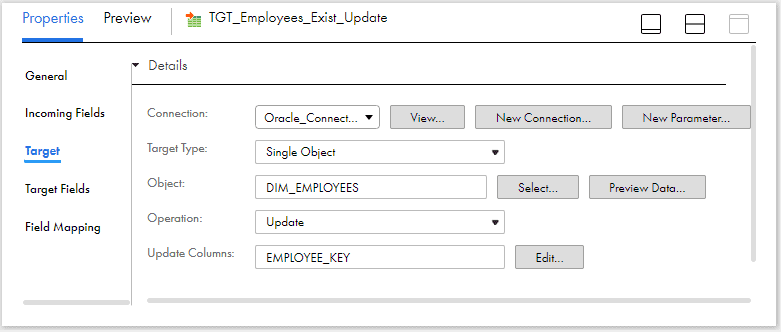
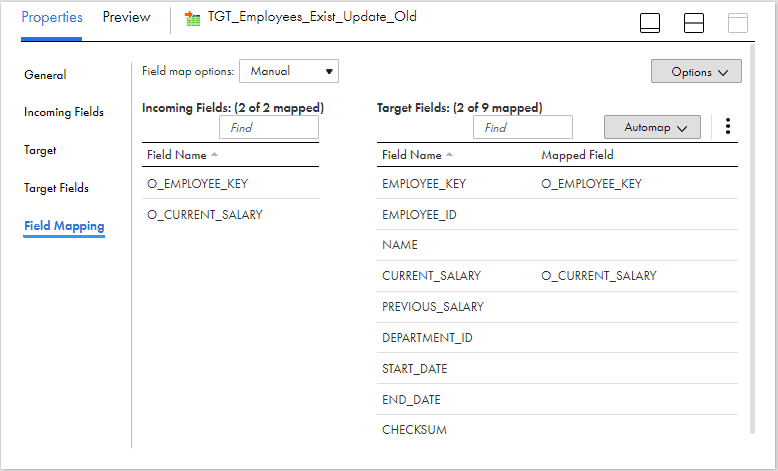
Pass the data from expression to a target transformation. Select the dimension table Dim_Employees as target object with operation defined as Update. Select the EMPLOYEE_KEY as the Update column. It is the column based on which record is identified in the target and updated.
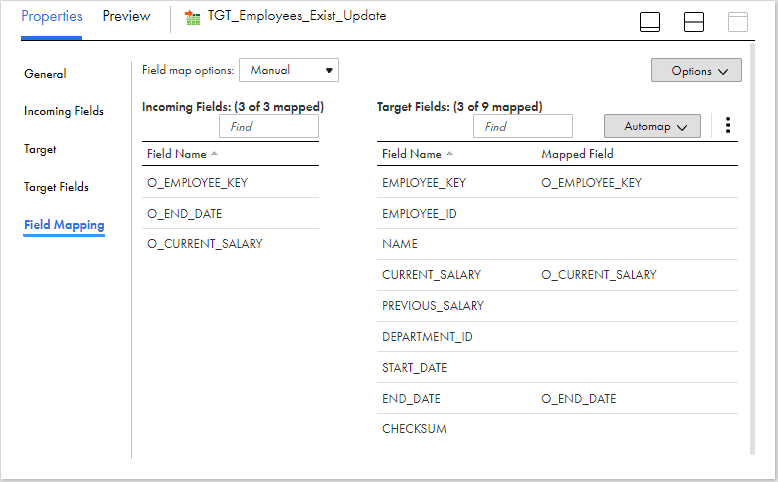
Under Field Mapping section of the target transformation, map the output fields created in the mapping to the respective target fields. Note that we need to only update the End_Date field to make the record INACTIVE and the Current_Salary field to maintain the latest salary value. Employee_Key is mapped to identify the record to update.
Along with updating the effective date column with system date value to make it INACTIVE, the current_salary column must be updated with latest salary value.
9. Configure Target for Insert Operation of latest existing record
The process is similar to what we discussed in steps 6 and 7. Pass the data from sequence generator to another expression transformation which is linked to the Insert_Update output group of the Router transformation.
Create the same output fields discussed in step 6 in the expression transformation and pass the data to the target.
The target configuration is exactly same as what we discussed under step 7.
10. Configure Target for Update Operation of older existing records
In the expression transformation to which data is routed from Update group of the router transformation,
- Create an output field O_EMPLOYEE_KEY and assign the LKP_EMPLOYEE_KEY field as the value which is read from lookup.
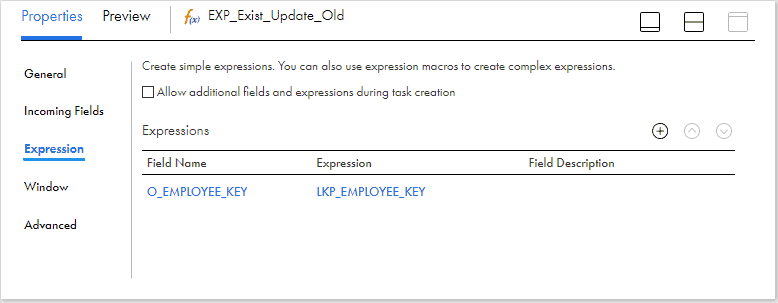
We need not create an output field to update end_date column as the older versions of the records are already made INACTIVE and the end_date column is updated in previous runs.
Pass the data from expression to a target transformation. Select the dimension table Dim_Employees as target object with operation defined as Update similar to step 8. Select the EMPLOYEE_KEY as the Update column.
Under Field Mapping section of the target transformation, map the output fields created in the mapping to the respective target fields. Note that we need to only update the Current_Salary field. Employee_Key is mapped to identify the record to update.
Validate, Save and trigger the mapping.
Verifying data in dimension table after the initial run
The data in the Dim_Employees table after the source data is processed is as below.

Since there is no data in the dimension table during the initial run, the records is flagged for Insert and the data is inserted. The Start_Date value is loaded with system date value and End_Date is loaded with maximum date value as defined in the mapping.
Notice that Current_Salary and Previous_Salary fields are loaded with the same value.
Verifying data in dimension table after the second run with modified source data
Consider the salary of Jennifer is modified to 9000 from 6000.
After the data is processed by Informatica, the data in the dimension table is as below.

The initial record is made INACTIVE by updating the End_Date field with system date value. A new record is inserted with updated salary information.
Notice that Current_Salary of previous version of the record is also updated with latest value.
Verifying data in dimension table after the third run with modified source data
Consider the salary of Jennifer is modified to 12000 from 9000.
After the data is processed by Informatica, the data in the dimension table is as below.

Notice that Current_Salary field is updated with latest value in all versions of the record. For the initial version of the record only the current_Salary field is updated. For the second version of the record both Current_Salary and End_Date fields are updates.
Conclusion
In the example we discussed, we overwrite the Current_Salary information in the first record (Employee_Key = 1) with the new information, as in Type 1 processing. We create a new record to track the changes, as in Type 2 processing. And we store the history in a second salary column (Previous_Salary), which incorporates Type 3 processing.
Understand the reason for a separate Update pipeline in SCD type 6 implementation compared to SCD type 2 implementation. It is to avoid updating the end_date of older versions of the records which are already INACTIVE.
If you are with me until here, I hope this article helped you in understanding what SCD type 6 is and how it can be implemented in Informatica cloud. Try it out and let me know why we need to update the record even though there is no change in record data in comments section (check the filed expression of Flag field again).
Subscribe to our Newsletter !!
Related Articles: