1. Introduction
Informatica supports passing values to the Input parameters of a taskflow through JSON or XML payload at runtime. This requires you to publish the taskflow as an API and run it through external applications to pass the values dynamically to the input parameters.
In order to support the passing of values dynamically to the input parameters of a taskflow natively within the Data Integration, the concept of parameterization has been introduced in taskflows using Parameter Sets.
2. What is a Parameter Set?
A Parameter Set assigns a parameter file to a taskflow and provide values for taskflow input parameters. The taskflow reads parameter file during runtime and the values from the parameter file are applied.
The parameter file with input parameters to a taskflow needs to be uploaded to Informatica managed cloud-hosted repository using the ParamSetCli utility to use them in taskflows.
This uploaded parameter file becomes the Parameter Set for the taskflow.
3. ParamSetCli utility Setup
ParamSetCli is Informatica’s command line interface utility that enables you to Upload, Download, Delete and List all parameter sets in cloud-hosted repository.
Note that the ParamSetCli utility can be run from your local machine.
It is not mandatory that the ParamSetCli utility and Secure Agent run on same machine.
Below are the steps to setup ParameSetCli utility
- Setting up a Java Runtime Environment(JRE)
- Downloading the ParamSetCli utility
- Configuring Login Properties
3.1.a. Setting up a Java Runtime Environment on Windows machine
You must have a Java Runtime Environment on your machine to run the ParamSetCli utility
From the command prompt of your machine, issue the following command to verify if JRE is installed on your machine.
java –versionIf the JRE is not installed in your machine, you will receive a following response that java is not recognized.

3.1.1. Download and Install Java on Windows
1. Navigate to Oracle Java Downloads page.
2. Under Windows category, click and download the x64 Installer.

3. Once the download is complete, double-click the downloaded file to start installation.
4. In the installation wizard, click Next in each step to proceed.
5. Note the destination folder for Java installation files. You will need it later.
6. Wait for the wizard to finish the installation process until the Successfully Installed message appears. Click Close to exit the wizard.
3.1.2. Set Environmental Variables for Java
To enable program compiling from any directory,
you need to set Java environmental variables once it is installed.
Step-1: Add Java to System Variables
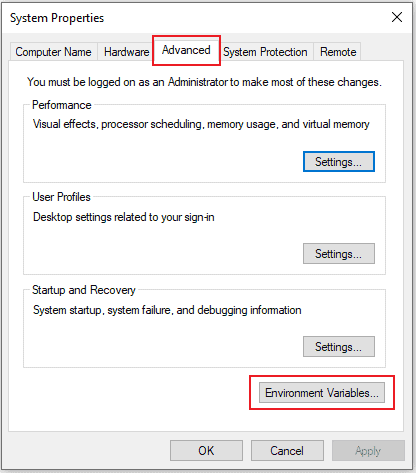
1. From the Start menu, search for environmental variables and click on the Edit the system environment variables result.
2. In the System Properties window, under the Advanced tab, click Environment Variables.
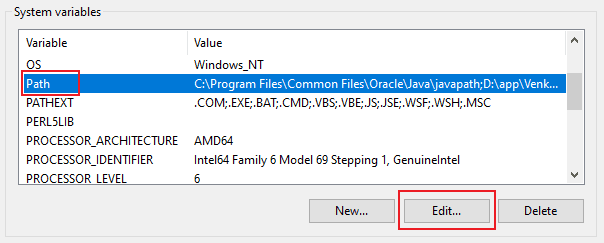
3. Under the System variables category, select the Path variable and click Edit.
4. Click the New button and enter the path to the Java bin directory. It is the java installation directory you saved while installing.
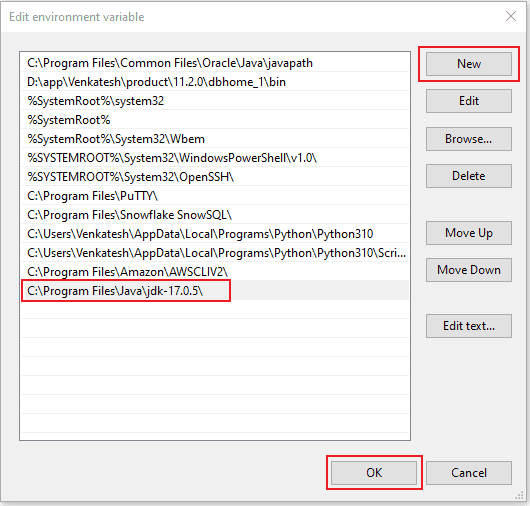
5. Click OK to save the changes.
Step-2: Add JAVA_HOME System Variable
1. In the same Environmental Variables window where you added Java to System variables, click New to create a new system variable.
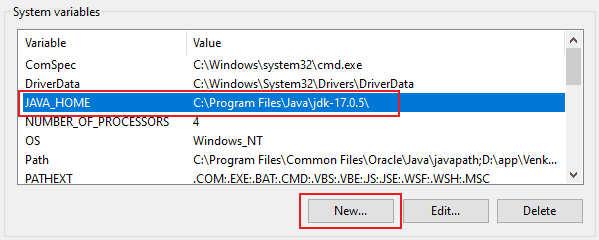
2. Enter the Variable name as JAVA_HOME.
3. Enter the Variable value as the java installation directory you saved while installing and click OK.
4. Click OK to confirm the changes and exit.
3.1.3. Test the Java Installation
Run the java –version from a new command prompt window. If the installation and the variables set up is done correctly, the command outputs the Java version as shown below.

3.1.b. Setting up a Java Runtime Environment on Linux machine
Follow below steps to download and install Java on a Linux machine
1. Navigate to Oracle Java Downloads page.
2. Under Linux category, copy the download link address to x64 RPM Package.
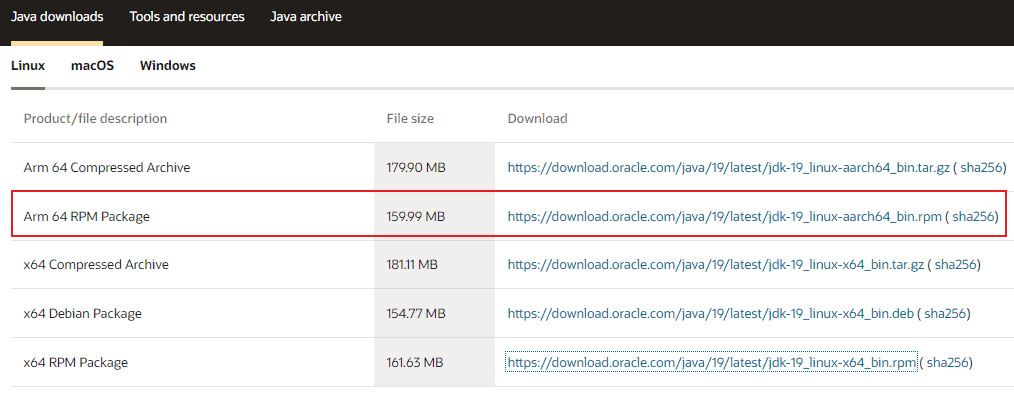
3. Run the below command to download the installation package from the desired directory where you want to Java to be installed.
wget <download link address>
4. Run the below command to install the Java on your linux machine from the directory where the rpm package is downloaded.
sudo rpm -i <downloaded rpm package>
5. Test the java installation on the linux machine by running below command.
java –version
3.2. Downloading the ParamSetCli utility
Download the ParamSetCli utility from the below shared community article link.
https://network.informatica.com/docs/DOC-19232
A zip file gets downloaded into your local machine. Unzip the contents to a desired location on your machine.
3.3. Configuring Login Properties
The downloaded paramsetcli.zip file contains a preloaded file named restenv.properties which specifies the login credentials for the utility to connect to Informatica Intelligent Cloud Services.
The following parameters needs to be configured in restenv.properties file
- baseURL: Informatica Intelligent Cloud Services login URL.
Default value is https://dm-us.informaticacloud.com/ma - Username: Username of your IICS account.
- Password: Password of your IICS account.
- paramSetBaseUrl: Base URL of Informatica Cloud Data Integration suffixed with active-bpel.
https://<POD>.dm-us.informaticacloud.com/ma/active-bpel
The following example shows a sample restenv.properties file
baseUrl=https://dm-us.informaticacloud.com/ma
username=infauser
password=Infa@1234567
ACTIVITYMONITORWAIT=2000
TOTALWAIT=5000
PROXYHOST=
PROXYPORT=
RETRYCOUNT=
use.encryption=false
paramSetBaseUrl=https://usw5.dm-us.informaticacloud.com/active-bpel
3.3.1. Password Encryption in restenv.properties file
The ParamSet utility also allows you to create an encrypted password for the password parameter value in restenv.properties file.
To create an encrypted password, use the following commands:
Windows:
paramsetcli.bat encryptText -t <password>

Linux:
sh paramsetcli.sh encryptText -t <password>
For restenv.properties file to make use of encrypted password, set the use.encryption flag to true
use.encryption=true4. Parameter file setup for a Parameter Set
The Parameter file uploaded as a part of Parameter Set is similar to the parameter files used in the mapping tasks.
- If the parameter is used across multiple tasks across all the projects, define the parameter under the [Global] section.
- If the parameter is used in a specific taskflow, define the parameter under the heading as shown below.
[project name].[folder name].[taskflow name]
When you define values for the same parameter in multiple sections in a parameter set, the parameter with the smallest scope takes precedence over parameters with a larger scope.
Precede the parameter name with two dollar signs with value defined after the equals sign (=) as follows:
$$<parameter>=valueThe following example shows a sample parameter file built for a Parameter Set that contains parameter values for a taskflow.
#USE_SECTIONS

[GLOBAL]
$$email=infauser@gmail.com

[Default].[Folder1].[tf_Paramset_Demo]
$$emailbody=Hi All,~~This is a test email~~Thanks
5. ParamSetCli utility Commands
From the downloaded paramsetcli.zip file, use paramsetcli.bat for Windows and paramsetcli.sh for Linux operating systems.
Type the script file name followed by runParamSetCli command followed by the arguments.
Below are some of the mandatory arguments that should be passed in a ParamSetCli command.
| Argument | Description |
| -un | Parameter Set Unique Name |
| -pf | Parameter directory |
| -pd | Parameter file name |
| -a | Action. You can specify one of the following actions: uploaddownloaddeletelist |
The following actions can be performed on the Parameter Sets
5.1. Uploading a Parameter Set
Upload a parameter set to the cloud-hosted repository using the following syntax. You can upload a file with a size up to 5 MB.
paramsetcli.bat runParamSetCli -un <unique_param_set_name> -pf <parameter_file_name> -pd <parameter_directory> -a <action>For example:
paramsetcli.bat runParamSetCli -un tf_Paramset -pf Paramsetfile.params -pd C:\files -a upload5.2. Downloading a Parameter Set
You can download a parameter set from the cloud-hosted repository using the unique name of an uploaded parameter using following syntax.
paramsetcli.bat runParamSetCli -un <unique_param_set_name> -pf <parameter_file_name> -pd <parameter_directory> -a <action>For example:
paramsetcli.bat runParamSetCli -un tf_Paramset -pf Paramsetfile.paramsDownload -pd C:\files -a download5.3. Deleting a Parameter Set
You can delete a parameter set from the cloud-hosted repository using the unique name of an uploaded parameter using following syntax.
paramsetcli.bat runParamSetCli -un <unique_param_set_name> -a <action>For example:
paramsetcli.bat runParamSetCli -un tf_Paramset -a delete5.4. List the Parameter Sets
You can list all the parameter sets that are uploaded to the cloud-hosted repository using the following syntax.
paramsetcli.bat runParamSetCli -a list6. Running IICS taskflow with a Parameter Set
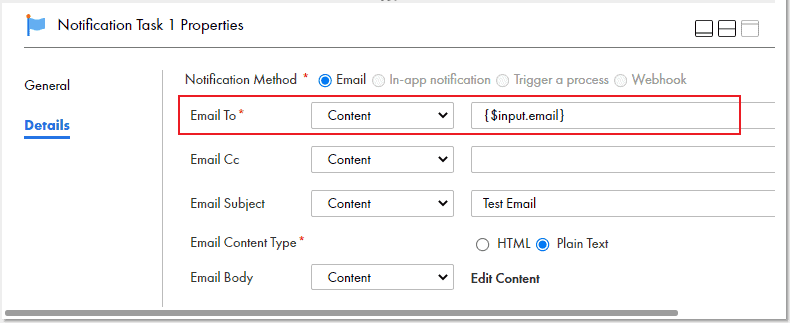
Below is an example of parameterizing email recipients in the Notification step of a IICS taskflow using parameter sets.
Follow below steps to parameterize and run a taskflow with a parameter set
1. Create a Parameter file for the taskflow and upload it into the Informatica cloud-hosted repository using the ParamSetCli upload command.
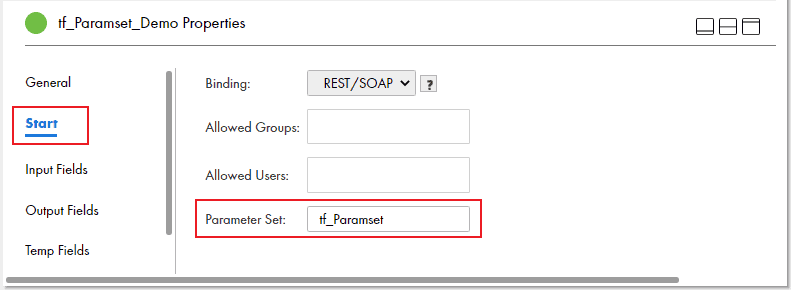
2. In the taskflow in which you want to assign a Parameter Set, navigate to Start step.
3. In the Start tab of the Start step, enter the parameter set name in the Parameter Set field.
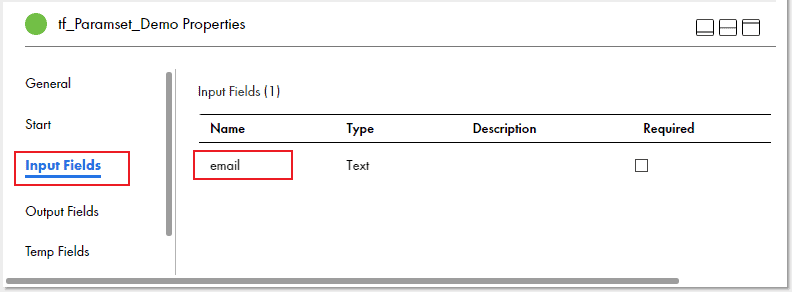
4. Under Input Fields, create the fields for which you want to read the values from the parameter set. The field names should match with the parameter names defined in the parameter set.
5. Use the input fields created in the Start step across all the steps in the taskflow.
6. Save and Publish the taskflow.
7. Conclusion
Parameter Sets allows us to deploy taskflows with different input parameter values across different environments without the need of any changes to the taskflow. Below are few key things to keep in mind while running taskflows with parameter sets.
- If the parameter set that you use in a taskflow is not available in the cloud-hosted repository, the taskflow fails at run time.
- If the input field that you pass does not have a value specified in the parameter set, the taskflow takes the default value of the data type. i.e null for string, 0 for integer and false for boolean.
- You can also override the parameter set name at run time when triggered using REST clients.
Subscribe to our Newsletter !!
Related Articles:
Learn how to recover a taskflow from faulted step in IICS. You could choose to resume from faulted step or skip the faulted step and resume.
A taskflow can be invoked based on a file event or you can plan a taskflow execution through file events in IICS using File Listener and File Watch Task step.

Email notifications can be enabled in Informatica Cloud to notify Success, Warning and Failure details of the jobs at various levels.


Where the Parameter Set files are stored ? In Server on which Secure agent is running or in the IICS cloud like other metadata
It gets stored in the Informatica Cloud Repository.