1. Introduction
Apache Iceberg is a powerful open-source table format specifically designed for organizing and managing data within data lakes. It determines how to manage, organize, and track all the data files stored in open file formats that make up a table.
Apache Iceberg enables streamlined CRUD (Create, Read, Update, Delete) operations and strengthens ACID (Atomicity, Consistency, Isolation, Durability) transactional capabilities within data lakes.
In this article, let us explore Snowflake’s implementation of Apache Iceberg open-source table format.
2. Snowflake Iceberg Tables
A Snowflake Iceberg table is a type of table in Snowflake that employs the Apache Iceberg format for organizing and storing data within the Snowflake data warehouse environment. This format stores the actual data outside of Snowflake in a public cloud object storage location such as Amazon S3, Google Cloud Storage, or Azure Storage.
Iceberg tables for Snowflake combine the performance and query semantics of regular Snowflake tables with enhanced data management capabilities provided by the Apache Iceberg format.
3. Pre-requisites to creating a Snowflake Iceberg table
To create a Snowflake Iceberg table, you must specify an External Volume and a base location (a directory within the external volume) where Snowflake can store both the table data and metadata.
An External Volume is an account-level Snowflake object that stores a generated Identity and Access Management (IAM) entity for your external cloud storage for Iceberg tables. This feature allows users to avoid supplying credentials when connecting to your storage for accessing table data, Iceberg metadata, and manifest files that store the table schema, partitions, and other metadata.
Follow the below steps to create an external volume in Snowflake on Amazon S3
- Create an S3 Bucket in the same region of your Snowflake Account
- Create an IAM policy that grants access to your S3 location
- Create an IAM role
- Create an External Volume in Snowflake
- Retrieve the AWS IAM User for your Snowflake Account
- Grant the IAM user Permissions to Access Bucket Objects
STEP-1: Create an S3 Bucket in the same region of your Snowflake Account
Snowflake Iceberg tables are supported if the S3 bucket location is in the same region that hosts your Snowflake account.
Navigate to Admin > Accounts > Active Accounts in Snowsight to find the region where your Snowflake account is hosted.
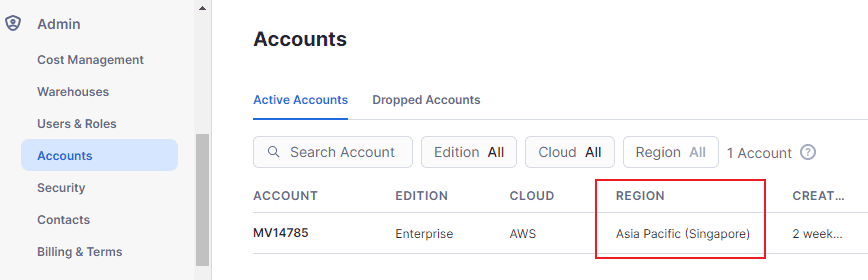
To create an S3 bucket, login to your AWS account and navigate to the S3 service. Select the same region where your Snowflake account is hosted and create a bucket with a unique name.
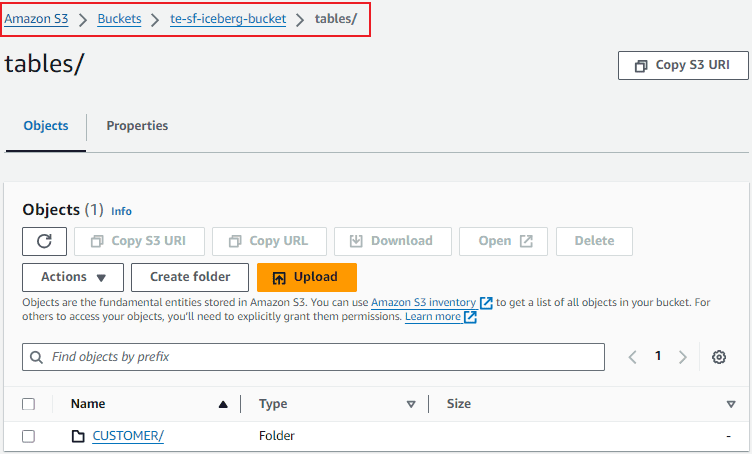
For the demonstration, we have created a bucket named te-sf-iceberg-bucket and a folder named tables within it.

Make a note of the S3 URL: s3://te-sf-iceberg-bucket/tables/

STEP-2: Create an IAM policy that grants access to your S3 location
Follow the below steps to create a custom policy in IAM which configures access permissions for Snowflake to access your S3 bucket.
1. Log into the AWS Management Console.
2. Go to IAM > Policies > Create policy.
3. Select the JSON tab and enter the policy contents in the editor as shown below and click Next.
{
    "Version": "2012-10-17",
    "Statement": [
        {
            "Effect": "Allow",
            "Action": [
                "s3:PutObject",
                "s3:GetObject",
                "s3:GetObjectVersion",
                "s3:DeleteObject",
                "s3:DeleteObjectVersion"
            ],
            "Resource": "arn:aws:s3:::te-sf-iceberg-bucket/tables/*"
        },
        {
            "Effect": "Allow",
            "Action": [
                "s3:ListBucket",
                "s3:GetBucketLocation"
            ],
            "Resource": "arn:aws:s3:::te-sf-iceberg-bucket",
            "Condition": {
                "StringLike": {
                    "s3:prefix": [
                        "*"
                    ]
                }
            }
        }
    ]
}
4. Enter the Policy name (e.g. Iceberg_Policy) and an optional description. Click Create policy.
STEP-3: Create an IAM role
Follow the below steps to create an AWS IAM Role to grant privileges on the S3 bucket containing your data files.
1. Go to IAM > Roles > Create role.
2. Select Trusted entity type as AWS account.
3. Select Another AWS account and specify your own AWS account ID temporarily. We will come back to modify this value to grant access to Snowflake.
4. Select the Require external ID option. Enter an External ID value of your choice, for example, 0000.
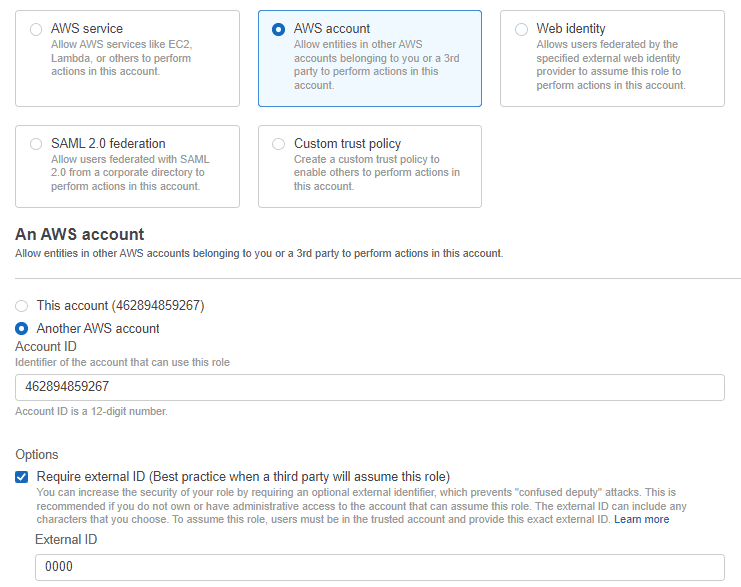
5. Click the Next button.
6. Select the policy created in the earlier step and click Next.
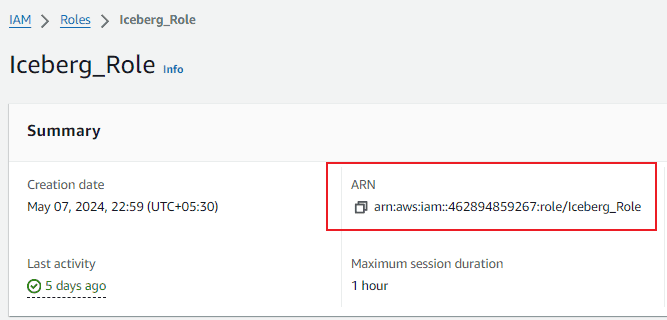
7. Enter a Role name (e.g. Iceberg_Role) and an optional description. Click Create Role.
Once the role is created, note the Role ARN from the role summary page. The Role ARN should be passed as a reference while creating the External Volume.
STEP-4: Create an External Volume in Snowflake
Create an external volume using the CREATE EXTERNAL VOLUME command.
The below SQL creates an External Volume in Snowflake.
CREATE OR REPLACE EXTERNAL VOLUME my_ext_vol
   STORAGE_LOCATIONS =
      (
         (
            NAME = 'my_iceberg_ext_vol'
            STORAGE_PROVIDER = 'S3'
            STORAGE_BASE_URL = 's3://te-sf-iceberg-bucket/tables/'
            STORAGE_AWS_ROLE_ARN = 'arn:aws:iam::462894859267:role/Iceberg_Role'
         )
      );
In the above SQL statement:
- The base URL for your cloud storage location created in STEP-1 is passed as a value to the STORAGE_BASE_URL.
- The ARN of the role created in the previous step is passed as a value to the STORAGE_AWS_ROLE_ARN.
STEP-5: Retrieve the AWS IAM User for your Snowflake Account
1. Retrieve the ARN for the AWS IAM user that was created automatically for your Snowflake account using the DESCRIBE EXTERNAL VOLUME command as shown below.
DESC EXTERNAL VOLUME my_ext_vol;Where my_ext_vol is the external volume created in the earlier step.
2. Record the following value from the output of the above command.
- STORAGE_AWS_IAM_USER_ARN: AWS IAM user created for your Snowflake account.
- STORAGE_AWS_EXTERNAL_ID: The external ID that is needed to establish a trust relationship.
STEP-6: Grant the IAM user Permissions to Access Bucket Objects
The IAM user created for your Snowflake account should be provided access to the storage account. To achieve this, the details of your Snowflake account should be configured in the role which provides access to the S3 bucket folders.
Follow the below steps to grant the Snowflake IAM User permissions to access bucket objects.
1. Go to IAM > Roles > select the Role created in STEP-3.
2. Click on the Trust relationships tab > Edit trust policy.
3. Replace the AWS Principle and ExternalID values in the Policy document with values from DESC EXTERNAL VOLUME recorded in the previous step.
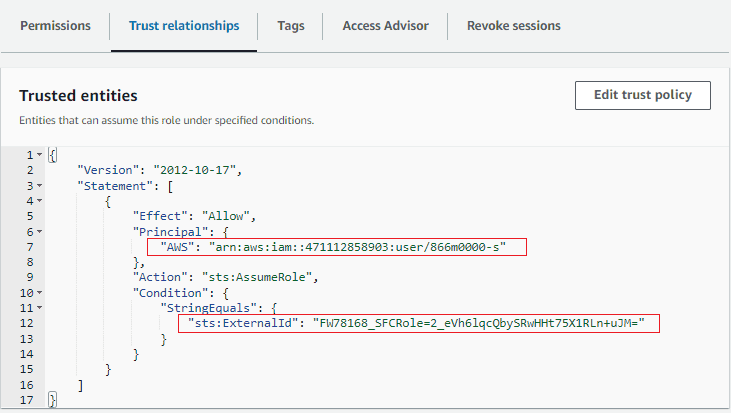
4. Click the Update policy button to save your changes.
4. Creating a Snowflake Iceberg table
Create an Iceberg table with Snowflake as the catalog using the external volume name created in the earlier step, along with specifying a base location (directory on the external volume) where Snowflake can store table data and metadata.
The following SQL statement creates an Iceberg table named CUSTOMER.
CREATE OR REPLACE ICEBERG TABLE DEMO_DB.PUBLIC.CUSTOMER (
CUSTOMER_KEY number(38,0),
CUSTOMER_NAME string,
CUSTOMER_ADDRESS string,
CUSTOMER_NATIONKEY number(38,0),
CUSTOMER_PHONE string,
CUSTOMER_ACCTBAL number(12,2),
CUSTOMER_MKTSEGMENT string,
CUSTOMER_COMMENT string
)
CATALOG = 'SNOWFLAKE'
EXTERNAL_VOLUME = 'my_ext_vol'
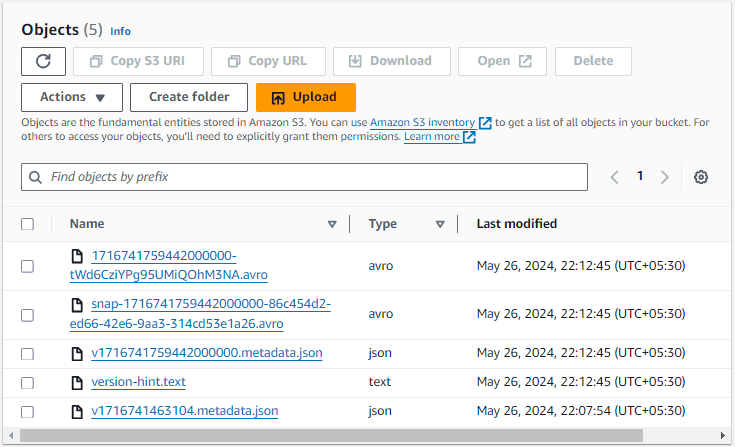
BASE_LOCATION = 'CUSTOMER';Once the table is successfully created, a new folder with the name specified in the BASE_LOCATION will be created in AWS as shown below.
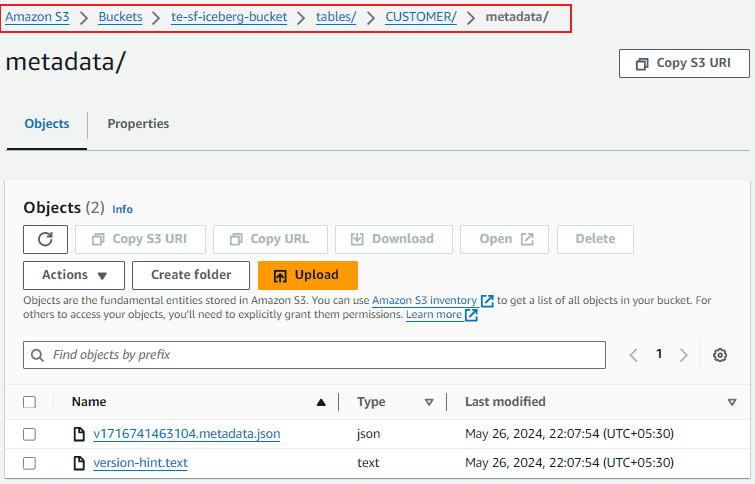
Inside the CUSTOMER folder, a metadata folder containing metadata and version files is created.
The following SQL statement inserts data into the Iceberg table.
INSERT INTO DEMO_DB.PUBLIC.CUSTOMER
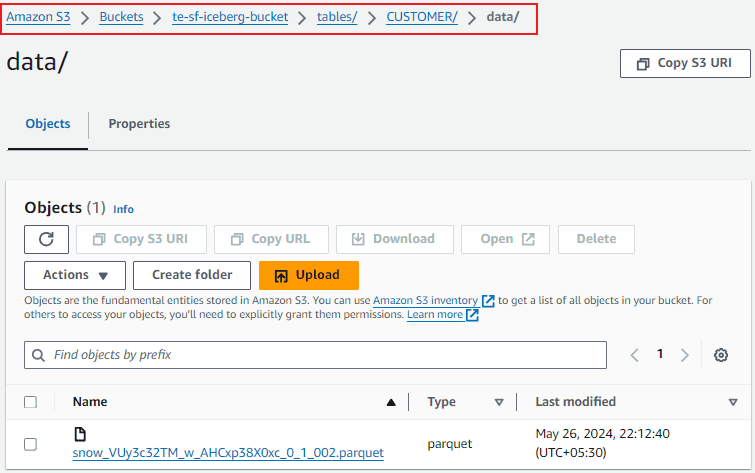
SELECT * FROM SNOWFLAKE_SAMPLE_DATA.TPCH_SF100.CUSTOMER WHERE c_custkey = 1;Once the data is successfully loaded into the table, a new folder named data will be created inside the CUSTOMER folder which holds the data present in the table in the form of parquet files.
Additionally, once data is loaded in the table, the following files are created inside the metadata folder.
- New Metadata file in JSON format containing the metadata of a table at a given timestamp.
- Manifest List file in Avro format that stores details about manifest files.
- Manifest file in Avro format that contains a list of data files present in the data folder.
5. Summary
Usually, the data of the tables created in Snowflake is managed by Snowflake itself. In contrast, Iceberg tables in Snowflake use external storage that you configure and maintain. The Iceberg tables are ideal for existing data lakes that you cannot or choose not to, store in Snowflake.
Snowflake also supports different catalog options. In the demonstration of the current article we have used Snowflake as the Iceberg catalog, but Snowflake also supports external catalogs such as AWS Glue.
Follow us to learn more about connecting to external catalogs from Snowflake and understand more about the architecture of the Iceberg tables’ data managed by Snowflake in external storage.
Subscribe to our Newsletter !!
Related Articles:
Snowflake supports three types of tables namely Permanent, Temporary and Transient tables.
A complete guide to types of Snowflake Stages and how to load data into and unload data from Snowflake tables using stages.
Learn how to create external stages on AWS S3, Microsoft Azure and Google Cloud platforms in Snowflake.